Articles
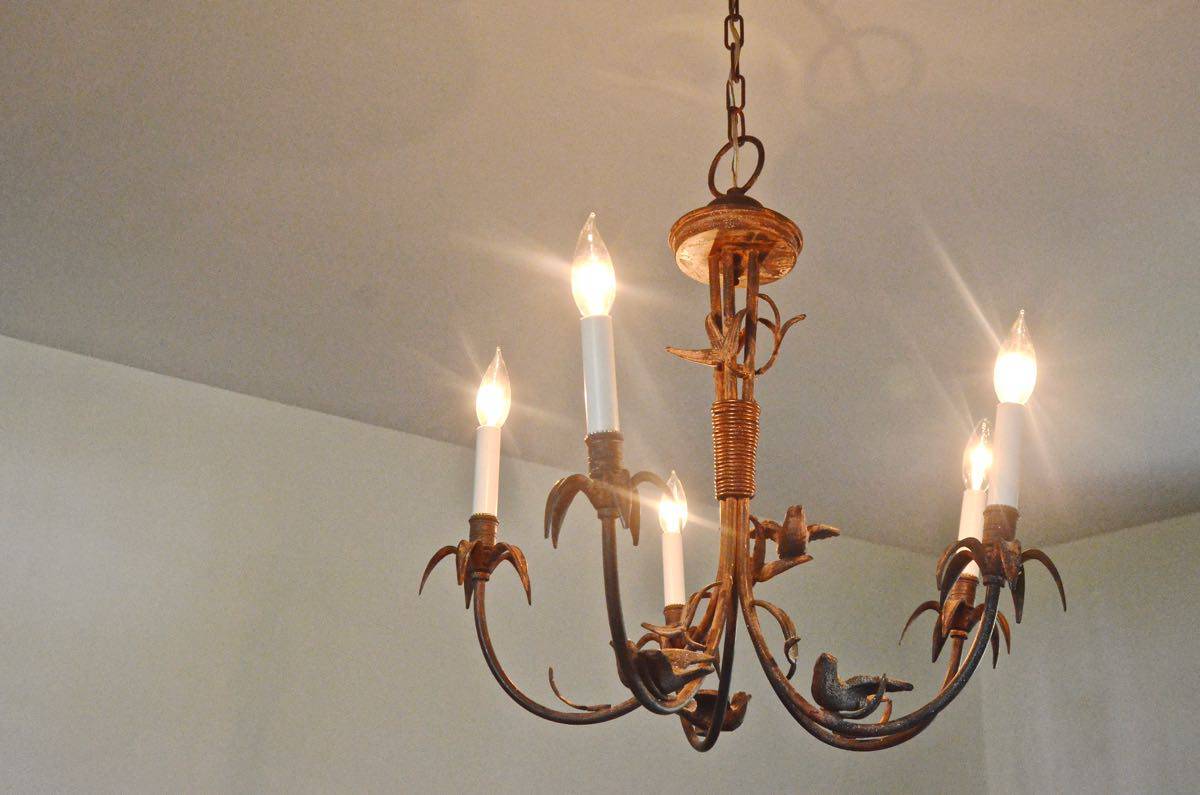
How To Repair A Chandelier In 5 Steps
Modified: October 19, 2024
Learn how to repair a chandelier in just 5 simple steps with our informative articles. Expert tips and detailed instructions to fix your chandelier like a pro.
(Many of the links in this article redirect to a specific reviewed product. Your purchase of these products through affiliate links helps to generate commission for Storables.com, at no extra cost. Learn more)
Introduction
Welcome to this comprehensive guide on how to repair a chandelier in just 5 simple steps. Chandeliers are not only elegant and beautiful, but they also provide a statement piece in any room. However, like any electrical fixture, chandeliers can experience issues and require repairs over time.
Whether you have a small crystal chandelier in your dining room or a grand, elaborate piece in your foyer, knowing how to troubleshoot and fix common problems can save you time and money. In this article, we will walk you through each step of the process, from gathering the necessary tools to testing and restoring power to your chandelier.
Before we dive into the steps, it’s important to note that safety should always be your top priority when working with electrical fixtures. Make sure to turn off the power supply before attempting any repairs. If you are unsure or uncomfortable with any step, it is best to consult a professional electrician.
Now, let’s get started with step one.
Key Takeaways:
- Repairing a chandelier in 5 simple steps can save time and money. Remember to prioritize safety, gather the right tools, and follow the process diligently for a successful repair.
- By inspecting, identifying, and addressing common chandelier issues, you can restore its elegance and functionality. With patience and the right approach, you can confidently tackle chandelier repairs.
Read also: 9 Amazing 5 Light Chandelier for 2025
Step 1: Gather the Necessary Tools and Materials
Before you begin repairing your chandelier, it’s essential to gather all the tools and materials you’ll need. Having everything organized and readily available will streamline the process and ensure you have everything you need to successfully complete the repair.
Here is a list of tools and materials you may need:
- Step ladder: Depending on the height of your chandelier, a step ladder may be necessary to safely reach it.
- Screwdriver: Most chandeliers have screws or nuts that secure various parts. A screwdriver with interchangeable heads will be useful for removing and tightening these screws.
- Wire stripper: If you need to replace any electrical wiring, a wire stripper is essential for removing the insulation from the wires.
- Needle-nose pliers: These pliers come in handy for gripping and manipulating small wires and components.
- Multimeter: This tool is used to test the electrical connections and voltage of the chandelier.
- Replacement parts: Depending on the issue with your chandelier, you may need to replace certain components such as bulbs, sockets, wires, or crystals. Make sure to have the appropriate replacements on hand.
- Electrical tape: This will be used to secure and insulate any electrical connections you make during the repair process.
Once you have gathered all the necessary tools and materials, lay them out in a well-organized manner. This will make it easier to access what you need as you progress through the repair steps.
Now that you have everything you need, it’s time to move on to Step 2: Turning off the power.
Step 2: Turn Off the Power
Before you begin any electrical work, it’s crucial to turn off the power to the chandelier to avoid any potential accidents or injuries. Here’s how you can safely turn off the power:
- Locate the circuit breaker box in your home. Most circuit breaker boxes are located in the basement, utility room, or garage.
- Open the circuit breaker box and locate the circuit breaker that controls the power supply to your chandelier. The circuit breaker should be labeled for easy identification. If it’s not labeled, you can identify the correct circuit breaker by turning off the main power switch and testing the chandelier to see which circuit breaker cuts power to it.
- Once you have identified the correct circuit breaker, switch it to the “off” position. This will cut off power to the chandelier.
- For an extra layer of safety, place a piece of tape over the circuit breaker, indicating that it should not be turned back on while you are working on the chandelier.
Turning off the power ensures that you won’t encounter any live electrical wires or risk electric shock while working on your chandelier. It’s essential to double-check that the power is indeed off before proceeding to the next steps.
With the power turned off, you can now move on to Step 3: Inspecting and Identifying the Problem.
Step 3: Inspect and Identify the Problem
Now that the power is turned off, it’s time to inspect your chandelier and identify the problem. Understanding the underlying issue is crucial to determine the appropriate repair steps. Here’s how you can inspect and identify the problem:
- Start by visually inspecting the chandelier. Look for any obvious signs of damage, such as broken or missing crystals, loose wires, or burnt-out bulbs. Take note of any areas that require attention.
- Next, carefully remove any decorative elements, such as crystals or shades, that may be obstructing your view. This will allow for a more thorough inspection of the internal components.
- Examine the sockets and wiring for any signs of damage or wear. Check for loose connections, frayed wires, or charred spots. If you notice any of these issues, it may be necessary to replace the faulty components.
- If your chandelier has multiple bulbs, test each one individually to ensure they are all in working condition. Replace any burnt-out bulbs with new ones.
- If your chandelier has a dimmer switch, ensure that it is functioning correctly by testing different settings. If the dimmer switch is not working properly, it may need to be replaced.
As you inspect and identify the problem, it’s helpful to take notes or pictures to refer back to during the repair process. This will provide a reference for reassembly later on.
Once you have identified the problem or problems with your chandelier, you’re ready to move on to Step 4: Repairing or Replacing the Faulty Parts.
When repairing a chandelier, always turn off the power supply before starting any work to avoid the risk of electrical shock.
Step 4: Repair or Replace the Faulty Parts
Now that you have identified the problem with your chandelier, it’s time to repair or replace the faulty parts. The specific steps will depend on the issue you discovered during the inspection. Here are some common scenarios and how to address them:
- Loose or damaged wires: If you found any loose or damaged wires during the inspection, you’ll need to repair or replace them. Begin by carefully disconnecting the wires from the affected area. Strip the ends of the new wire if necessary, and then connect them securely using wire nuts or electrical tape. Make sure all connections are tight and insulated to prevent any electrical hazards.
- Broken or missing crystals: If you noticed any broken or missing crystals, you can easily replace them. Remove the remaining crystals and take note of their placement for reassembly. Purchase replacement crystals of the same size and style, and carefully install them according to the original configuration.
- Faulty sockets: If you found that one or more of the sockets are not functioning properly, they may need to be replaced. First, turn off the power supply to the chandelier. Remove the old socket by unscrewing it from the fixture. Install the new socket, making sure the wiring is connected correctly. Test the socket to ensure it is working before moving on.
- Burnt-out bulbs: Simply replace any burnt-out bulbs with new ones. Make sure to use the correct wattage and style of bulb as specified by the manufacturer.
Throughout the repair process, refer to any notes or pictures you took during the inspection stage. This will help ensure that you reassemble the chandelier correctly.
Once you have repaired or replaced the faulty parts, it’s time to move on to the final step: testing the chandelier and restoring power.
Read more: How To Tile A Floor – In Easy Steps
Step 5: Test the Chandelier and Restore Power
With the repairs and replacements completed, it’s time to test your chandelier and restore power. Here’s how to do it:
- Double-check the connections: Before restoring power, ensure that all the wiring connections are secure and insulated. Check that the bulbs are properly installed and all components are reassembled correctly.
- Turn on the power supply: Return to the circuit breaker box and switch the circuit breaker for the chandelier back to the “on” position. This will restore power to the fixture.
- Test the chandelier: Carefully turn on the chandelier to test its functionality. Check that all the bulbs illuminate and that there are no flickering lights or unusual noises. If everything is working correctly, you have successfully repaired your chandelier!
- Final adjustments: Make any final adjustments needed to ensure the chandelier is level or properly positioned. Adjust any shades, crystals, or decorative elements to their desired placements.
It’s important to monitor the chandelier over the next few days to ensure that the repairs hold and that there are no further issues. If you notice any problems or if the chandelier is not functioning properly, it may be necessary to retrace your steps and inspect for any missed issues.
Remember, if you encounter any difficulties or are unsure about any step of the repair process, it’s always best to consult a professional electrician to ensure the safety and integrity of your chandelier.
With your chandelier now repaired and restored to its former glory, you can once again enjoy the stunning ambiance it brings to your space.
So there you have it, the 5 steps to repairing a chandelier. By following these steps and taking the necessary precautions, you can save both time and money on chandelier repairs and continue to enjoy this beautiful fixture for years to come.
Thank you for reading and happy chandelier repairing!
Conclusion
Repairing a chandelier might seem like a daunting task, but with the right knowledge and approach, it can be a straightforward and rewarding experience. By following the five steps outlined in this guide, you can confidently tackle chandelier repairs and bring back the spark of elegance to your living space.
Remember, safety should always be your top priority when working with electrical fixtures. Before you begin any repairs, make sure to turn off the power supply and take the necessary precautions to avoid accidents or injuries. If you are unsure or uncomfortable with any step, it is best to consult a professional electrician who can assist you.
Gathering the necessary tools and materials, turning off the power, inspecting and identifying the problem, repairing or replacing faulty components, and finally testing the chandelier and restoring power are the essential steps to successfully repairing your chandelier.
Throughout the process, it is important to be organized, patient, and thorough. Take notes, document the steps, and refer to any pictures or diagrams you took during the inspection phase. This will help ensure that you reassemble the chandelier correctly and avoid any further complications.
With your repaired chandelier glowing beautifully once again, take the time to admire its elegant presence in your space. However, make sure to monitor the fixture over the next few days to ensure that the repairs hold up and there are no further issues.
Remember, if you encounter any problems or uncertainties during the repair process, it’s always best to seek professional assistance. A licensed electrician will have the expertise and knowledge to handle any complex issues and ensure the safety of your chandelier and your home.
Now that you have learned how to repair a chandelier in just 5 simple steps, you can tackle this project with confidence. With some patience and the right tools, you can extend the lifespan of your chandelier and continue to enjoy its beauty for years to come.
Thank you for reading this comprehensive guide, and we hope it has empowered you to take on chandelier repairs with ease and success. Happy chandelier repairing!
Frequently Asked Questions about How To Repair A Chandelier In 5 Steps
Was this page helpful?
At Storables.com, we guarantee accurate and reliable information. Our content, validated by Expert Board Contributors, is crafted following stringent Editorial Policies. We're committed to providing you with well-researched, expert-backed insights for all your informational needs.


0 thoughts on “How To Repair A Chandelier In 5 Steps”