Articles
How To Replace Bathroom Floor
Modified: October 20, 2024
Learn how to replace your bathroom floor with our helpful articles. Find step-by-step instructions and expert tips for a successful DIY project.
(Many of the links in this article redirect to a specific reviewed product. Your purchase of these products through affiliate links helps to generate commission for Storables.com, at no extra cost. Learn more)
Introduction
When it comes to home improvement projects, replacing a bathroom floor can completely transform the look and feel of your bathroom. Over time, bathroom floors can become worn out, damaged, or simply outdated, making it necessary to invest in a new floor. Whether you’re looking to upgrade the aesthetics of your bathroom or address functional issues, replacing the bathroom floor is a great place to start.
In this article, we will guide you through the step-by-step process of replacing a bathroom floor. We will cover everything from removing the old flooring to installing the new one, as well as applying the necessary finishing touches. This comprehensive guide will provide you with the knowledge and confidence to tackle this project on your own.
Before we dive into the process, it’s important to gather a few essential tools and materials to ensure a smooth and successful installation. Let’s take a look at what you’ll need:
Key Takeaways:
- Transform your bathroom with a new floor, from removing the old flooring to adding the finishing touches. Prioritize safety, take your time, and choose a flooring material that suits your style and needs for a successful bathroom floor replacement.
- Gather essential tools and materials, measure and cut accurately, and apply a floor sealant for protection. Replace baseboards and trim for a polished finish, then enjoy your beautifully transformed bathroom space with proper care and maintenance.
Read more: How To Replace A Shed Floor
Tools and Materials Needed
Before embarking on your bathroom floor replacement project, it’s important to gather the necessary tools and materials. Having everything you need at the start will save you time and frustration along the way. Here’s a list of the essential items:
Tools:
- Utility knife
- Chisel
- Hammer
- Measuring tape
- Straight edge
- Power drill
- Tile cutter (if using tile)
- Notched trowel
- Level
- Sponge
- Paintbrush
Materials:
- New flooring material (e.g., tile, vinyl, laminate, etc.)
- Underlayment (if necessary)
- Adhesive (if using tile)
- Grout and grout sealer (if using tile)
- Floor sealant
- New baseboards or trim
- Finishing nails
- Wood filler (if needed)
- Primer and paint (if painting baseboards)
Take the time to gather all the tools and materials on this list to ensure a smooth and efficient bathroom floor replacement process.
Step 1: Remove the Old Flooring
Before you can install your new bathroom floor, you’ll need to remove the old flooring. The process of removing the old flooring may differ depending on the type of flooring material you currently have. Here’s a general guideline for removing common types of bathroom flooring:
Read more: How To Replace A Floor Joist
1. Start by preparing the area:
Clear out any furniture or obstacles in the bathroom to create a workspace. It’s also a good idea to cover nearby fixtures and cabinets with plastic sheets to protect them from debris.
2. Begin removing the flooring:
If you have tile or vinyl flooring, start by prying up a corner of the flooring using a chisel and hammer. Once you have a section lifted, continue to remove the rest of the flooring by applying pressure and carefully prying it up. You may need to use a utility knife to cut the flooring into smaller, manageable sections.
If you have a laminate or hardwood floor, you may need to remove the baseboards first. Use a pry bar and gently remove the baseboards to prevent any damage to the walls. Once the baseboards are removed, you can start removing the flooring by prying it up with a chisel and hammer.
3. Remove any adhesive:
In some cases, you may encounter adhesive residue on the subfloor after removing the old flooring. Use a scraper or putty knife to carefully remove any remaining adhesive. This step is crucial as it ensures a smooth surface for the installation of the new flooring.
4. Inspect the subfloor:
After removing the old flooring, thoroughly inspect the subfloor for any signs of damage or rot. If you notice any issues, such as water damage or weakened areas, it’s important to address them before proceeding with the installation of the new floor. Depending on the severity of the damage, you may need to repair or replace sections of the subfloor.
By following these steps, you’ll effectively remove the old flooring and prepare the subfloor for the installation of the new bathroom floor. Remember to take your time and be cautious while removing the old flooring to avoid any injuries and damages.
Read more: How To Replace Wood Floor
Step 2: Prepare the Subfloor
Once you have successfully removed the old flooring, the next step is to prepare the subfloor for the installation of the new bathroom floor. Properly preparing the subfloor is crucial to ensure a stable and long-lasting flooring installation. Here’s what you need to do:
1. Clean the subfloor:
Before proceeding with any further preparations, thoroughly clean the subfloor to remove any debris, dust, or adhesive residue. Use a broom or vacuum cleaner to sweep the subfloor and a damp cloth or mop to wipe away any remaining dirt.
2. Check for levelness:
Use a level tool to check the levelness of the subfloor. Place the level in different areas of the floor and check for any unevenness or slopes. If you notice any significant discrepancies, it may be necessary to level the subfloor using a leveling compound or plywood underlayment.
3. Repair any damaged areas:
If you discovered any damaged or weak areas during the inspection in Step 1, now is the time to address them. Repair any sections of the subfloor that are rotted, cracked, or weakened. Depending on the extent of the damage, you may need to replace the affected sections or reinforce them with additional plywood sheets.
Read more: How To Replace Pedestal Sink With Vanity
4. Install underlayment (if necessary):
Depending on the type of new flooring you plan to install and the condition of the subfloor, you may need to install an underlayment layer. Underlayment provides an additional level of insulation, moisture resistance, and stability to the flooring. Follow the manufacturer’s instructions to properly install the underlayment, ensuring that it covers the entire subfloor area.
5. Allow the subfloor to dry:
If you have applied any repairs, leveling compound, or underlayment, it’s important to allow sufficient time for these materials to dry completely. Follow the recommended drying time specified by the manufacturer before proceeding with the installation of the new bathroom floor.
By thoroughly cleaning, leveling, and repairing the subfloor, you are setting the foundation for a successful and durable flooring installation. Taking the time to properly prepare the subfloor ensures that your new bathroom floor will look and perform its best for years to come.
Step 3: Choose the New Flooring
Choosing the right flooring for your bathroom is an important decision that will not only enhance the aesthetic appeal of the space but also contribute to its functionality and durability. There are various types of flooring options available, each with its own unique characteristics. Here are some popular options to consider when selecting your new bathroom floor:
1. Ceramic or Porcelain Tile:
Tile flooring is a classic and versatile choice for bathrooms. Ceramic and porcelain tiles are water-resistant, durable, and easy to clean. They come in a wide range of colors, patterns, and textures, allowing you to create a customized look for your bathroom. Additionally, tiles can be arranged in various patterns, such as subway, herringbone, or chevron, to add visual interest to the space.
Read more: How To Replace Boat Floor
2. Vinyl:
Vinyl flooring is a budget-friendly and low-maintenance option that offers a wide range of styles and designs. It is water-resistant, making it an ideal choice for bathrooms. Vinyl comes in sheets, tiles, or planks, allowing you to choose the format that best suits your preferences and installation needs. It can mimic the appearance of natural materials like hardwood or stone, providing a visually appealing and durable flooring solution.
3. Laminate:
Laminate flooring is a cost-effective alternative to hardwood or tile flooring. It consists of multiple layers of synthetic materials topped with a photographic layer that replicates the look of wood or stone. Laminate is resistant to moisture and relatively easy to install, making it a popular choice for bathrooms. It is available in a wide variety of finishes and styles, offering a range of aesthetic options.
4. Engineered Wood:
If you desire the warmth and elegance of hardwood flooring in your bathroom, engineered wood is a suitable option. It is crafted from multiple layers of wood and topped with a veneer of real hardwood. Engineered wood flooring is designed to withstand moisture and humidity better than solid hardwood, making it a more suitable choice for bathrooms. However, it is important to note that excessive water exposure should still be avoided.
5. Natural Stone:
Natural stone flooring, such as marble, slate, or travertine, adds a touch of luxury and sophistication to any bathroom. These materials are durable, long-lasting, and offer unique textures and natural variations. However, natural stone can be more expensive and requires regular maintenance to preserve its appearance. It is important to seal natural stone flooring properly to protect it from moisture and stains.
Consider your budget, personal style, maintenance requirements, and durability when choosing the new flooring for your bathroom. You may also want to consult with a flooring specialist to ensure you select the best option that meets your specific needs and preferences.
Read more: How To Replace Floor In Camper
Step 4: Measure and Cut the New Flooring
With your chosen flooring material ready, it’s time to measure and cut the new flooring to fit your bathroom space. Proper measurements and accurate cuts are crucial for a seamless and professional-looking installation. Follow these steps to ensure a precise fit:
1. Measure the bathroom:
Start by measuring the length and width of the bathroom using a measuring tape. Take into account any nooks, corners, or obstacles that may require special consideration when cutting the flooring. It’s important to measure accurately to avoid excessive material waste or incorrect fit.
2. Add extra for allowances:
When measuring, remember to add a few inches to your measurements for allowances. This will account for any errors or adjustments needed during installation. It’s better to have slightly more material than needed than to be short and have to make additional cuts or purchase more flooring.
3. Transfer the measurements to the new flooring:
Using a straight edge and a pencil or marker, transfer the measurements onto the backside of the new flooring material. Ensure that your markings are clear and visible to guide your cutting process.
Read more: How To Replace Floor Tile
4. Cut the flooring:
Depending on the type of flooring material you are using, different cutting tools may be necessary. For vinyl or laminate flooring, a utility knife or a circular saw with a fine-tooth blade is typically sufficient. Follow the manufacturer’s recommendations for cutting the specific flooring material to ensure clean and accurate cuts.
5. Cut around obstacles:
If you have obstacles like pipes or vanities in the bathroom, you may need to make additional cuts to fit the flooring around them. Use a jigsaw or hole saw to carefully cut out the necessary shapes or holes in the flooring material. Take your time and work cautiously to achieve precise cuts.
6. Dry-fit the flooring:
After cutting the flooring pieces, dry-fit them in the bathroom to ensure they fit properly and align with the edges and corners. This step allows you to make any necessary adjustments before moving on to the installation process.
By measuring accurately, allowing for allowances, and making precise cuts, you will ensure a seamless and professional-looking installation of your new bathroom flooring. Remember to take your time and double-check your measurements to achieve the best possible fit.
Step 5: Install the New Flooring
Now that you have measured and cut the new flooring to the desired size and shape, it’s time to install it in your bathroom. Proper installation techniques will ensure a secure and long-lasting floor. Follow these steps to install your new bathroom flooring:
Read more: How To Replace Vanity Lights
1. Start with a clean and dry subfloor:
Ensure that the subfloor is clean, dry, and free from any debris or dust. This will provide a smooth and stable surface for the new flooring.
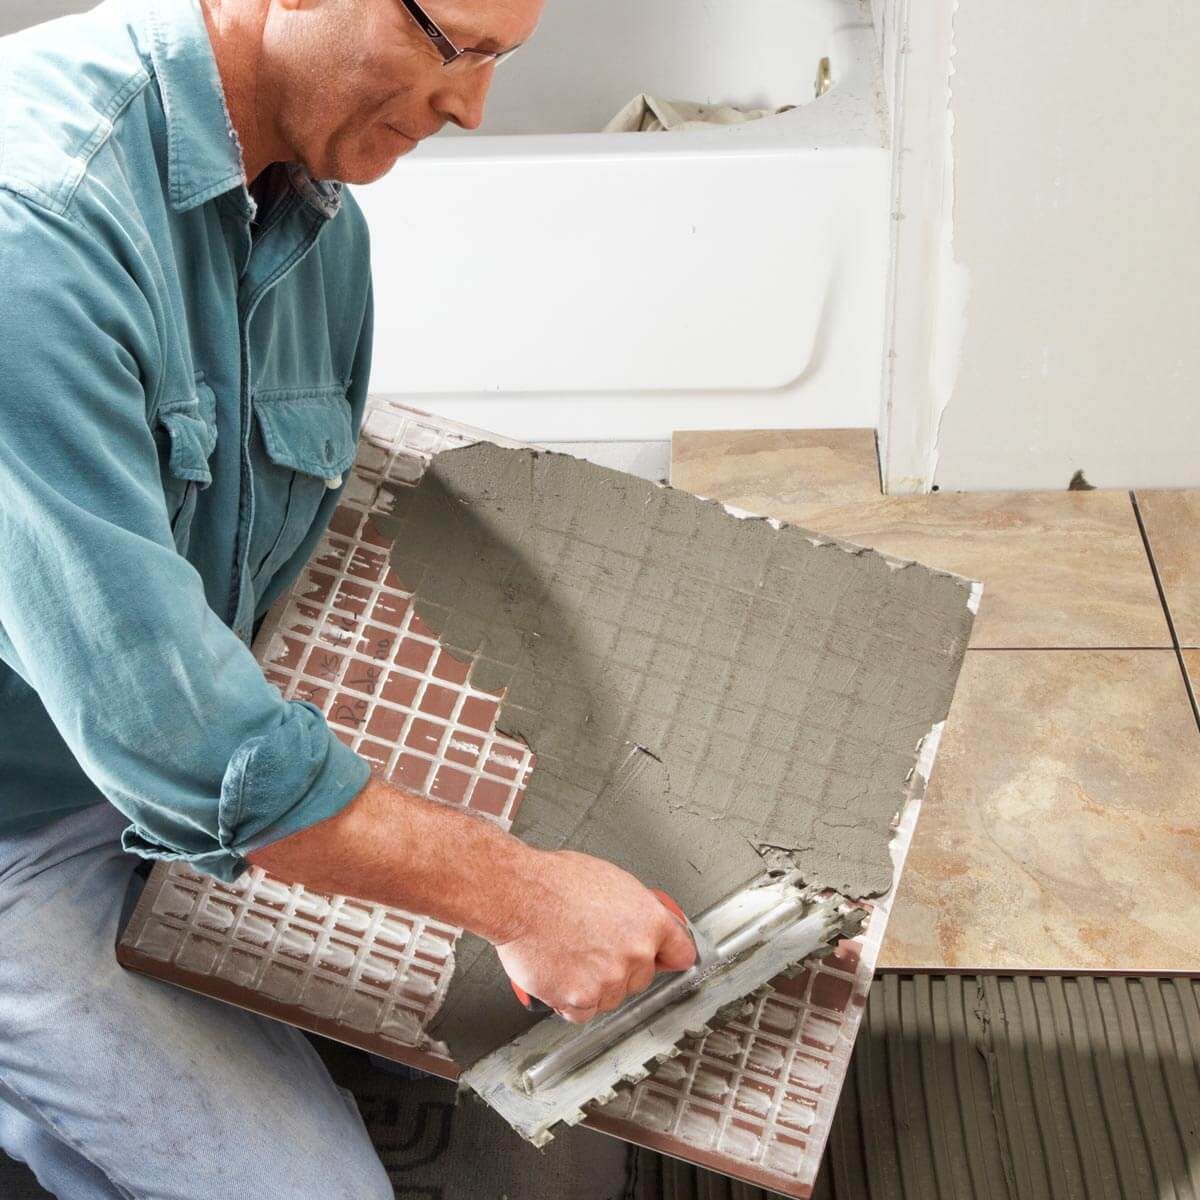
2. Apply adhesive (if required):
If you are using flooring materials like tile or vinyl that require adhesive, follow the manufacturer’s instructions to apply the adhesive evenly onto the subfloor. Use a notched trowel to create ridges in the adhesive, which will help with adhesion and prevent air bubbles.
3. Start laying the flooring:
Begin laying the new flooring in one corner of the room, aligning it with the reference line or wall. Press the flooring firmly into place, using a rolling pin or a weighted object to ensure good adhesion (if necessary). If you are using click-and-lock flooring, simply click the planks or tiles together.
4. Continue with the installation:
Work your way across the room, laying the flooring row by row. Make sure to maintain consistent spacing between the flooring and the walls or any fixed objects in the room. Use spacers or wedges to create a small gap, allowing for expansion and contraction of the flooring material.
Read more: How To Replace Shower Faucet Valve
5. Trim the last row:
As you reach the opposite wall, you may need to trim the last row of flooring to fit properly. Measure and mark the necessary cuts, using a straight edge and a utility knife or a saw to make clean and precise cuts. Take your time and double-check your measurements to ensure a snug fit.
6. Check for smoothness and levelness:
Once the flooring is completely installed, use a level to check for any unevenness or slopes. Gently tap down any areas that may be slightly raised or uneven to ensure a smooth surface.
7. Allow the flooring to set:
If you have used adhesive or grout, follow the manufacturer’s instructions on the recommended drying or curing time. Avoid walking on the flooring or placing heavy objects on it until it has fully set to prevent any damage or shifting.
By following these installation steps, you will successfully lay down your new bathroom flooring. Remember to use proper techniques and tools for the specific type of flooring you have chosen to achieve the best results.
Step 6: Apply Floor Sealant
Applying a floor sealant is an important step in protecting your new bathroom flooring, especially if you have chosen a material that is susceptible to moisture or water damage. A floor sealant creates a protective barrier that helps prevent staining, warping, and deterioration. Follow these steps to properly apply a floor sealant:
Read more: How To Replace A Roman Tub Faucet
1. Choose the appropriate sealant:
Look for a floor sealant that is specifically designed for the type of flooring material you have installed in your bathroom. Different flooring materials may require different types of sealants. Consult the manufacturer’s recommendations or seek advice from a flooring specialist to ensure you select the appropriate sealant.
2. Clean the flooring:
Before applying the sealant, make sure the flooring is clean and free from any dust or debris. Sweep or vacuum the floor to remove any loose particles. If needed, use a damp cloth or mop to clean the surface and allow it to dry completely before proceeding.
3. Apply a thin and even layer:
Using a brush or roller designated for sealant application, start applying a thin and even layer of the sealant onto the entire surface of the flooring. Follow the manufacturer’s instructions regarding the recommended application method and quantity.
4. Pay attention to seams and edges:
Pay extra attention to the seams and edges of the flooring, as these areas are more prone to water penetration. Apply a slightly thicker layer of sealant along the seams and edges to ensure complete coverage and protection.
Read more: How To Replace Bathroom Sink
5. Allow the sealant to dry:
Allow the sealant to dry completely according to the manufacturer’s instructions. This typically takes a few hours, but it may vary depending on the specific product. During this time, avoid walking on the sealed surface or placing any heavy objects on it.
6. Apply additional coats (if required):
Some sealants may require multiple coats for optimum protection. If recommended, apply additional coats of sealant, allowing sufficient drying time between each application. This will enhance the strength and durability of the sealant.
By applying a floor sealant, you are adding an extra layer of protection to your bathroom flooring, prolonging its lifespan, and safeguarding it against moisture-related damages. Follow these steps and take care in the application process to ensure a thorough and effective seal.
Step 7: Replace Baseboards and Trim
Replacing the baseboards and trim is the final touch to complete the look of your newly installed bathroom floor. Baseboards and trim not only provide a finished appearance but also help protect the edges of the flooring and hide any gaps or imperfections. Follow these steps to replace the baseboards and trim:
1. Remove the old baseboards and trim:
Using a pry bar or a putty knife, carefully remove the old baseboards and trim from the walls. Take your time to minimize any damage to the walls or the existing flooring. Set aside the old baseboards and trim for disposal or potential reuse, if they are in good condition.
Read more: How To Replace A Carpet With Vinyl Flooring
2. Measure and cut the new baseboards:
Measure the lengths needed for the new baseboards along the walls. Use a miter saw or a miter box to make clean and precise cuts at the appropriate angles for corners or joints. Remember to add a little extra length to each measurement for allowances and adjustments.
3. Install the new baseboards:
Starting in one corner of the room, apply a thin layer of adhesive along the backside of the new baseboard. Press it firmly against the wall, ensuring that it aligns with the edge of the flooring. Use a nail gun or finishing nails to secure the baseboard in place. Repeat this process for the remaining lengths of baseboard, making necessary cuts and adjustments as you go.
4. Add the finishing trim:
In addition to the baseboards, you may also want to install finishing trim around areas such as doorways, windowsills, or thresholds. Measure and cut the trim pieces to fit the specific areas, and attach them using adhesive or finishing nails, as appropriate.
5. Fill nail holes and gaps:
After the baseboards and trim are securely installed, use wood filler to fill any nail holes or gaps along the seams or joints. Smooth out the filler with a putty knife, and allow it to dry according to the manufacturer’s instructions. Once dry, lightly sand the filled areas for a smooth and even finish.
Read more: How To Replace Bathroom Tile Floor
6. Paint or stain the baseboards and trim (if desired):
If you prefer a different color or finish for the baseboards and trim, paint or stain them before or after installation. Choose a paint or stain that complements the overall aesthetic of the bathroom and follow the appropriate application techniques.
By replacing the baseboards and trim, you will achieve a polished and cohesive look for your new bathroom floor. Take your time to measure and cut accurately, and pay attention to the details to ensure a professional and visually appealing result.
Step 8: Clean and Finishing Touches
As you near the completion of your bathroom floor replacement project, it’s important to take the time to clean and add the finishing touches to ensure a pristine and well-kept appearance. Follow these final steps to put the finishing touches on your new bathroom floor:
1. Clean the floor:
Thoroughly clean the newly installed flooring to remove any dust, debris, or residue that may have accumulated during the installation process. Sweep or vacuum the floor to remove loose particles, and use a damp mop or cloth with a mild cleaning solution to wipe down the surface. Be sure to use cleaning products that are suitable for the specific type of flooring you have installed.
2. Inspect for any imperfections:
Take a close look at the entire floor to identify any imperfections or touch-ups that may be necessary. Look for any visible gaps, loose tiles or planks, or areas that may require additional adhesive. Address these issues promptly to ensure a seamless and durable flooring finish.
Read more: How To Replace Sink Faucet
3. Apply floor polish or wax (if applicable):
If you have installed a flooring material that benefits from polish or wax, consider applying a layer to enhance its shine and protection. Follow the manufacturer’s instructions on the appropriate product to use and the application process. Allow sufficient drying time before walking on the newly polished or waxed floor.
4. Reinstall fixtures and accessories:
If you had to remove any fixtures or accessories during the flooring installation, now is the time to reinstall them. This may include items such as bathroom mats, towel bars, toilet paper holders, or other decorative elements. Ensure they are securely attached and properly aligned with the new floor.
5. Place rugs or mats:
Consider adding rugs or mats to enhance the overall aesthetics and functionality of your bathroom floor. They can provide warmth, comfort, and protection to high-traffic areas, as well as add style and texture to the space.
6. Enjoy your newly replaced bathroom floor:
With the cleaning and finishing touches complete, you can now enjoy your beautifully replaced bathroom floor. Take a moment to appreciate the transformation and the hard work you put into the project. Maintain the cleanliness and care of your new floor by following proper maintenance practices specific to the flooring material.
By completing these final steps, you will give your new bathroom floor a polished and well-maintained appearance. Regular cleaning and proper maintenance will help preserve its beauty and functionality for years to come.
Conclusion
Replacing a bathroom floor can breathe new life into the space, providing both aesthetic appeal and functional improvements. Throughout this comprehensive guide, we have walked you through the step-by-step process of replacing your bathroom floor, from removing the old flooring to adding the finishing touches.
By following these steps, you can successfully complete your bathroom floor replacement project, transforming your bathroom into a beautiful and inviting space. Remember to gather the necessary tools and materials, measure and cut the new flooring accurately, and properly prepare the subfloor to ensure a seamless installation. Applying a floor sealant will help protect your new flooring from moisture and damage, while replacing the baseboards and trim adds a professional and polished finish.
Throughout the entire process, it is crucial to prioritize safety and take your time to ensure quality results. Whether you choose ceramic tile, vinyl, laminate, engineered wood, or natural stone, selecting a flooring material that suits your style and meets your needs is key to a successful bathroom floor replacement.
Once the project is complete, take the time to clean the floor and add the finishing touches that personalize your bathroom. With proper care and maintenance, your new bathroom floor will continue to elevate the overall look and functionality of your bathroom for years to come.
We hope that this guide has provided you with valuable insights and guidance for replacing your bathroom floor. Get ready to enjoy a fresh and stylish bathroom that reflects your unique taste and enhances the comfort of your home!
Frequently Asked Questions about How To Replace Bathroom Floor
Was this page helpful?
At Storables.com, we guarantee accurate and reliable information. Our content, validated by Expert Board Contributors, is crafted following stringent Editorial Policies. We're committed to providing you with well-researched, expert-backed insights for all your informational needs.
0 thoughts on “How To Replace Bathroom Floor”