Home>diy>Architecture & Design>How To Draw A Shower On A Floor Plan

Architecture & Design
How To Draw A Shower On A Floor Plan
Modified: October 20, 2024
Learn how to draw a shower on a floor plan with our comprehensive guide. Perfect for architecture design enthusiasts looking to optimize their space.
(Many of the links in this article redirect to a specific reviewed product. Your purchase of these products through affiliate links helps to generate commission for Storables.com, at no extra cost. Learn more)
Introduction
When designing or renovating a living space, having a clear and detailed floor plan is essential. It allows you to visualize the layout and placement of various elements, such as furniture, appliances, and fixtures. One crucial component that often needs careful consideration is the shower. Drawing a shower on a floor plan not only helps you visualize its location but also ensures proper placement of plumbing and drainage systems.
In this article, we will guide you through the process of drawing a shower on a floor plan. Whether you are an architect, interior designer, or a homeowner taking on a DIY project, these steps will help you create an accurate and well-designed floor plan for your bathroom.
Before we dive into the steps, there are a few materials you will need to gather for this project. These include:
Key Takeaways:
- Designing a shower on a floor plan requires careful consideration of measurements, plumbing fixtures, drainage, and additional features. A well-drawn floor plan ensures a functional and visually appealing shower space.
- Incorporating creativity and personal style into the drawing process allows for a beautiful and enjoyable shower design. Regular review and refinement of the floor plan are essential for a successful project.
Read more: How To Draw An Evacuation Floor Plan
Step 1: Gathering Materials
- Graph paper or a floor plan template
- Straight edge ruler or T-square
- Pencil or pen
- Architectural scale or ruler
- Eraser
With these materials in hand, you’re ready to move on to the next step: measuring the area.
Key Takeaways:
- Designing a shower on a floor plan requires careful consideration of measurements, plumbing fixtures, drainage, and additional features. A well-drawn floor plan ensures a functional and visually appealing shower space.
- Incorporating creativity and personal style into the drawing process allows for a beautiful and enjoyable shower design. Regular review and refinement of the floor plan are essential for a successful project.
Read more: How To Draw An Evacuation Floor Plan
Step 1: Gathering Materials
Before you begin drawing the shower on your floor plan, it’s important to have the right materials on hand. These materials will help you accurately measure the space and create a detailed representation of your shower. Here’s what you’ll need:
- Graph paper or a floor plan template: This will serve as the foundation for your floor plan. You can use pre-printed graph paper or find floor plan templates online to print out and work on.
- Straight edge ruler or T-square: A straight edge ruler or T-square will help you draw straight lines and angles with precision. This is essential for creating accurate measurements and outlines.
- Pencil or pen: You’ll need a writing instrument to sketch out your floor plan. A pencil is recommended so you can easily erase and make adjustments as needed.
- Architectural scale or ruler: An architectural scale or ruler is necessary to convert real-world measurements into scale measurements for your floor plan. This ensures that your drawings accurately represent the dimensions of the actual space.
- Eraser: Mistakes happen, and having an eraser handy will allow you to make corrections without having to start over.
Once you have gathered these materials, you’ll be well-equipped to move forward with drawing the shower on your floor plan. Remember, having the right tools makes the process much smoother and more accurate.
Now that you’re prepared with materials, it’s time to move on to the next step: measuring the area where the shower will be located.
Step 2: Measuring the Area
Before you start drawing the shower on your floor plan, you need to accurately measure the area where the shower will be located. This step is crucial in ensuring that your floor plan is an accurate representation of the space.
Grab your measuring tape and follow these steps:
- Start by measuring the length and width of the room. Measure from wall to wall, and note down the measurements in feet or meters.
- Identify the specific area where the shower will be placed. Measure the length and width of this area, making sure to include any alcoves or cutouts.
- Measure the height of the ceiling. This is important to determine if there is enough clearance for a standard showerhead or if you need to consider alternative options.
- Take note of existing features such as windows, doors, or any structural elements that may affect the placement of the shower. Measure their distances from the walls and their dimensions.
Once you have gathered these measurements, you can proceed to transfer them onto your floor plan. Using your architectural scale or ruler, convert the real-world measurements into scale measurements that will fit on your graph paper or floor plan template.
Remember to label each measurement accordingly on your floor plan, indicating the length, width, and height of the area where the shower will be located. This will help you visualize the space accurately as you move forward with drawing the shower.
With the area measured and the measurements transferred to your floor plan, you’re now ready to move on to the next step: drawing the outline of the shower.
Step 3: Drawing the Outline
Now that you have measured the area and transferred the measurements to your floor plan, it’s time to draw the outline of the shower. This will give you a visual representation of the space and help you determine the size and shape of the shower.
Follow these steps to draw the outline:
- Using your pencil or pen, locate the area on your floor plan where the shower will be placed. Begin by drawing a rectangle or square to represent the footprint of the shower. Make sure the dimensions of the shape align with the measurements you previously recorded.
- If your shower will have any alcoves or cutouts, draw those as well. Take into account any existing features like windows or doors and adjust the shape of the outline accordingly.
- After drawing the basic outline, consider the layout and functionality of the shower. If you’re planning to include a shower bench, niche, or other elements, sketch them within the outline to visualize their placement.
- If you’re unsure about the size or shape of the shower, consider using a stencil or tracing paper to experiment with different configurations. This will allow you to find the best layout before finalizing the outline on your floor plan.
As you draw the outline, remember to keep in mind building codes and regulations, as well as any specific requirements or preferences you may have. This will ensure that your shower fits within the allotted space and meets your needs.
Once you’re satisfied with the outline, trace over it with a bold pen or marker to make it stand out on your floor plan. Double-check that the dimensions and proportions are accurate before moving on to the next step.
Congratulations! You’ve successfully drawn the outline of the shower on your floor plan. Now let’s move on to the next step: adding plumbing fixtures.
Read more: How To Draw A Door In A Floor Plan
Step 4: Adding Plumbing Fixtures
Now that you have the outline of the shower on your floor plan, it’s time to add the plumbing fixtures. This step is crucial in ensuring that the shower is properly connected to the water supply and drainage system. By accurately placing and indicating the fixtures, you will have a comprehensive understanding of the plumbing layout.
Here’s how you can add plumbing fixtures to your floor plan:
- Identify the location of the showerhead. This is typically positioned on the same wall as the faucet handles or control panel. Mark this location on your floor plan using a symbol or icon that represents the showerhead.
- Indicate the location of the faucet handles or control panel. These are typically mounted on the wall opposite the showerhead. Use another symbol or icon to mark this location on your floor plan.
- Consider the placement of additional fixtures such as a handheld showerhead, body sprayers, or a bathtub if you have one within your shower space. Mark these fixtures on your floor plan accordingly.
- Ensure that the plumbing lines are properly represented by drawing dashed lines that connect the fixtures to the water supply and drainage system. These lines should be labeled to indicate hot and cold water supply, as well as the drain.
By adding the plumbing fixtures to your floor plan, you will have a clear understanding of how the shower will be connected to the water sources and drain. This step also allows you to identify any potential issues or challenges that may arise during the installation process.
Once you’ve added the plumbing fixtures and lines, take a moment to review your floor plan and make any necessary adjustments. Ensure that the fixtures are properly positioned and that the plumbing lines align with the intended layout of the shower.
With the plumbing fixtures accurately indicated on your floor plan, you’re ready to move on to the next step: incorporating drainage.
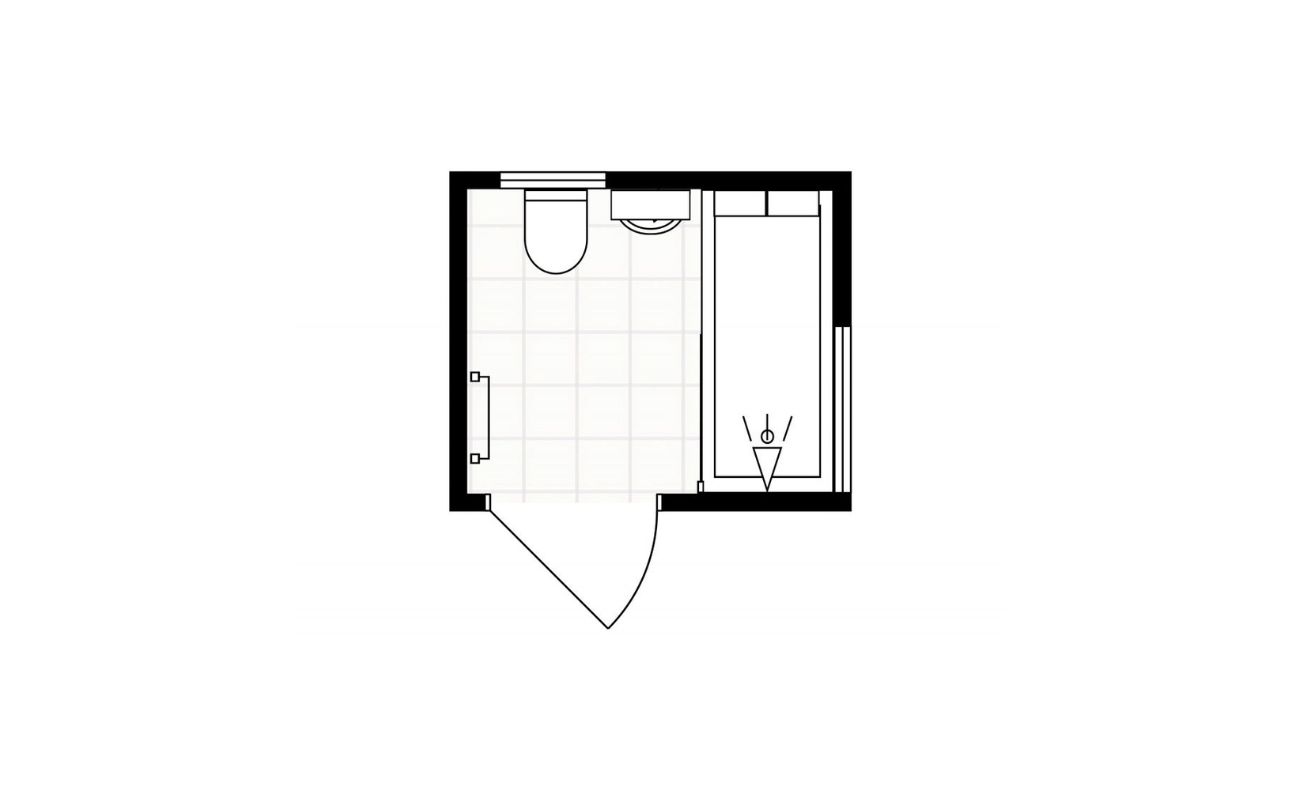
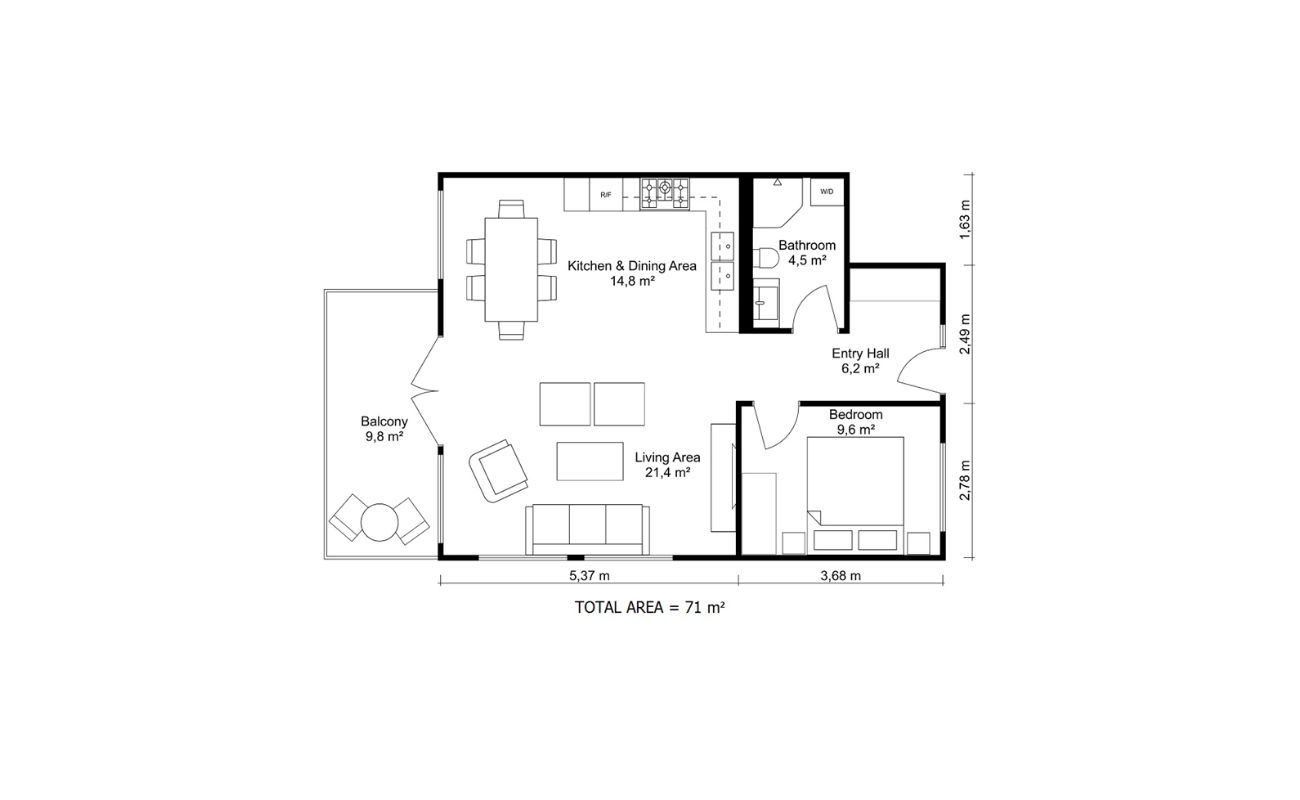
When drawing a shower on a floor plan, use a small rectangle to represent the shower stall and include a small circle or oval to indicate the showerhead. Be sure to label it clearly.
Step 5: Incorporating Drainage
When designing a shower on a floor plan, it’s important to consider the drainage system. Proper drainage ensures that water flows efficiently out of the shower and prevents any potential water damage or pooling. By incorporating drainage into your floor plan, you can ensure that the shower will function effectively.
Follow these steps to incorporate drainage into your floor plan:
- Identify the location of the shower drain. Typically, the drain is positioned in the center or towards one end of the shower. Mark this location on your floor plan using a symbol or icon that represents the drain.
- Draw a dashed line from the drain to the nearest wall or floor drain connection. This line represents the path that the water will take to reach the drainage system.
- If your shower requires a shower pan or a floor slope, indicate these elements on your floor plan. A shower pan is a waterproof membrane that prevents water from seeping into the subfloor, while a floor slope allows water to flow towards the drain more efficiently.
- Label the drainage lines accordingly, indicating that they are connected to the main sewer line or a floor drain. This will provide a clear understanding of how the shower’s drainage system is integrated into the overall plumbing infrastructure.
By incorporating drainage into your floor plan, you can ensure that the shower will effectively remove water and maintain a clean and functional space. This step also allows you to identify any potential challenges or modifications that may be required to ensure proper drainage.
Once you have incorporated drainage into your floor plan, review the layout and ensure that everything is accurately represented. Make any necessary adjustments or refinements to ensure that the drainage system aligns with the intended design of your shower.
With drainage successfully incorporated into your floor plan, you’re now ready to move on to the next step: detailing the shower enclosure.
Step 6: Detailing the Shower Enclosure
As you continue drawing a shower on your floor plan, it’s important to focus on detailing the shower enclosure. The shower enclosure includes elements such as walls, doors, and any additional features that define the boundaries of the shower space. By carefully considering these details, you can create a functional and visually appealing shower design.
Follow these steps to detail the shower enclosure on your floor plan:
- Start by drawing the walls of the shower enclosure. Use solid lines to represent the walls, ensuring that they align with the outline of your shower. Consider the materials that will be used for the walls, such as tile or glass, as this will affect the overall aesthetic and functionality.
- If your shower enclosure includes a door, draw it on your floor plan. Indicate the swing direction of the door using an arc or arrow, ensuring that it doesn’t interfere with other fixtures or elements in the bathroom.
- Consider any additional features you plan to include in the shower enclosure, such as shelves, niches, or seating areas. Sketch these elements onto the floor plan, making sure they are appropriately placed and scaled to fit within the enclosure.
- Take into account any ventilation needs for the shower enclosure. Ensure that there is adequate space for an exhaust fan or a window to prevent moisture buildup and maintain good air circulation.
Detailing the shower enclosure helps you visualize the final look and functionality of the shower space. By accurately representing the walls, doors, and additional features on your floor plan, you can ensure that everything fits together harmoniously and creates the desired effect.
Once you’ve detailed the shower enclosure on your floor plan, step back and evaluate the design. Make any necessary adjustments or refinements to ensure that it meets your needs and preferences.
With the shower enclosure detailed on your floor plan, you’re now ready to move on to the next step: indicating the tiles or flooring.
Step 7: Indicating Tiles or Flooring
When drawing a shower on a floor plan, it’s important to indicate the tiles or flooring that will be used in the shower space. The choice of tiles or flooring not only affects the aesthetic appeal but also contributes to the overall functionality and maintenance of the shower. By indicating the tiles or flooring on your floor plan, you can ensure a cohesive and well-designed shower design.
Follow these steps to indicate the tiles or flooring on your floor plan:
- Consider the type of tiles or flooring you plan to use in the shower. Will it be ceramic, porcelain, natural stone, or another material? Determine the desired size and shape of the tiles as well.
- Using different patterns or shading techniques, draw the tiles or flooring directly on your floor plan. Use different colors or shading to differentiate between different areas, such as the shower floor and walls, or any decorative patterns or accents.
- Label each area of the tiles or flooring according to the materials or colors you plan to use. This will help you visualize the final look and ensure a more accurate representation.
- Consider the transition of the tiles or flooring between the shower and the rest of the bathroom. Determine a logical and aesthetically pleasing boundary or transition, and mark it on your floor plan.
Indicating the tiles or flooring on your floor plan helps you envision the final look and feel of the shower space. It also allows you to ensure that the chosen materials and design elements are cohesive with the overall style of the bathroom.
Once you have indicated the tiles or flooring on your floor plan, take a moment to review the design and make any necessary adjustments or refinements. This will ensure that your shower design aligns with your vision and preferences.
With the tiles or flooring indicated on your floor plan, you’re now ready to move on to the final step: including any additional features.
Read more: How To Draw Chairs On A Floor Plan
Step 8: Including Additional Features
In the final step of drawing a shower on a floor plan, it’s time to consider any additional features that you want to include in the shower space. These features can enhance the functionality, comfort, and overall experience of the shower. By carefully incorporating these elements into your floor plan, you can create a shower design that meets all your needs and preferences.
Here are some additional features to consider:
- Built-in Seating: If you have enough space, consider adding a built-in bench or seating area to the shower. This provides a convenient spot to relax or shave your legs.
- Storage Shelves or Niches: Incorporate storage shelves or niches into the shower design to keep bathing essentials within reach. These can be recessed into the walls or added as standalone units.
- Shower Lighting: Think about the lighting in your shower. Consider adding waterproof and moisture-resistant LED lights for both functional and ambient lighting.
- Steam Functionality: If you enjoy the benefits of a steam shower, consider including a steam function in your design. This requires additional space and special considerations, such as a vapor barrier.
- Aromatherapy or Chromatherapy: If you want to create a spa-like experience, consider incorporating aromatherapy or chromatherapy features. This can be achieved through built-in diffusers or LED lighting systems that provide calming scents or colors.
When including additional features, make sure to consider the available space and any specific requirements for installation. You may need to consult with professionals or refer to product specifications to ensure that these features can be seamlessly incorporated into your shower design.
Once you have determined the additional features you want to include, update your floor plan to indicate their locations. Use symbols, labels, or specific drawings to represent each feature and its placement within the shower space.
With the additional features included in your floor plan, take a moment to review the design and make any necessary refinements. Ensure that the layout and placement of these features align with your vision and enhance the overall functionality of your shower.
Congratulations! You have successfully completed the process of drawing a shower on a floor plan. By following these steps and carefully considering each element, you have created a comprehensive and detailed representation of your desired shower design.
Remember to regularly review your floor plan and make adjustments as needed throughout your project. This will help you stay on track and ensure that your final shower design meets your expectations.
With your well-crafted floor plan in hand, you can confidently move forward with your shower project, whether you are handling it yourself or working with professionals. Happy designing!
Conclusion
Designing and drawing a shower on a floor plan is an essential step in creating a functional and visually appealing bathroom. By following the steps outlined in this article, you can efficiently and accurately incorporate a shower into your floor plan, ensuring proper placement of plumbing fixtures, drainage system, and additional features.
From gathering materials and measuring the area to detailing the shower enclosure and indicating tiles or flooring, each step plays a vital role in creating a well-designed and efficient shower space. By investing time and attention to detail during the drawing process, you can avoid potential issues and achieve the desired look and functionality that aligns with your vision.
Throughout the process, it’s important to consider your specific needs, preferences, and any applicable building regulations or codes. Create a floor plan that not only meets your practical requirements but reflects your personal style and design aesthetics.
Remember, a well-drawn floor plan serves as a roadmap for your project. It allows you to communicate your vision with professionals, such as contractors or interior designers, ensuring that the execution of your shower design goes smoothly and meets your expectations.
Regularly review and refine your floor plan as you progress through your project. This will allow you to make any necessary adjustments and adapt to unexpected changes or challenges that may arise along the way.
In conclusion, by following the steps outlined in this article and infusing your creativity and personal touch, you can confidently draw a shower on a floor plan that not only meets your functional needs but also creates a beautiful and enjoyable space in your home.
So, grab your pencil and paper, gather your materials, and let the drawing process begin. Happy designing!
Now that you've mastered drawing a shower on a floor plan, why not deepen your understanding of the basics? Dive into the essentials of designing spaces with our article on what a floor plan is. If renovating is more your style, don't miss our guide on choosing the best hardwood floors for your next project. Whether you're sketching blueprints or selecting materials, these reads will surely enhance your home improvement journey.
Frequently Asked Questions about How To Draw A Shower On A Floor Plan
Was this page helpful?
At Storables.com, we guarantee accurate and reliable information. Our content, validated by Expert Board Contributors, is crafted following stringent Editorial Policies. We're committed to providing you with well-researched, expert-backed insights for all your informational needs.


0 thoughts on “How To Draw A Shower On A Floor Plan”