Furniture
How To Make A Flower Chandelier
Modified: April 23, 2024
Discover how to turn your furniture into a stunning flower chandelier. Get step-by-step instructions and tips to create a unique centerpiece for your home.
(Many of the links in this article redirect to a specific reviewed product. Your purchase of these products through affiliate links helps to generate commission for Storables.com, at no extra cost. Learn more)
Introduction
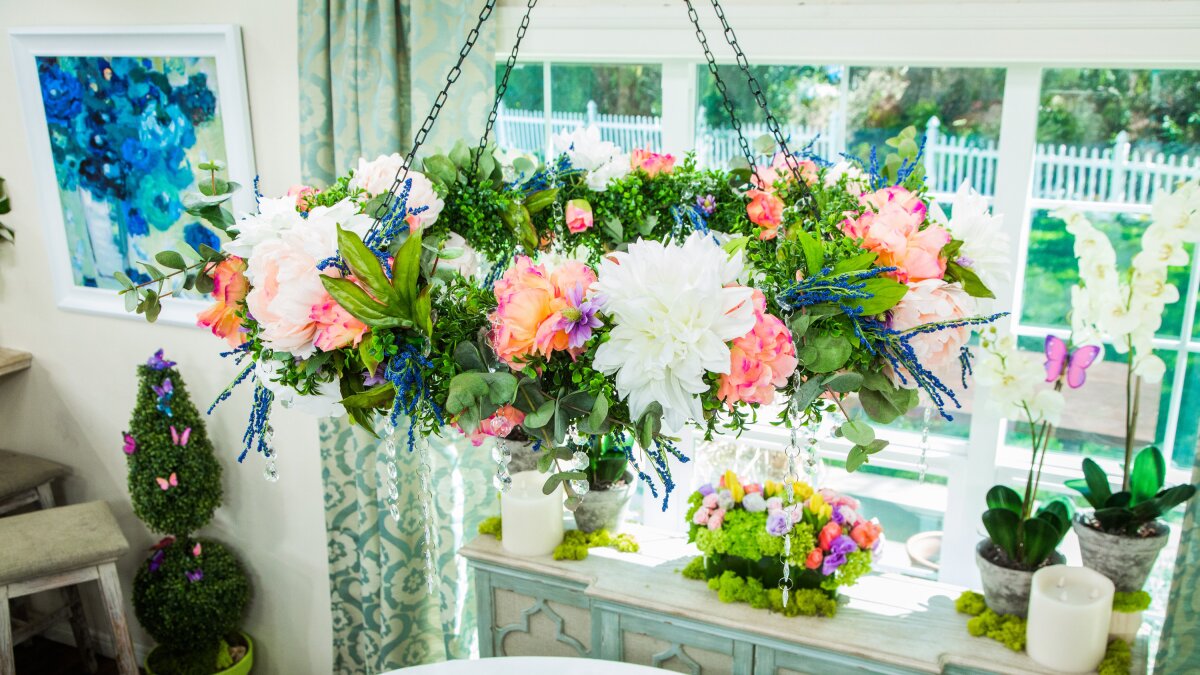
Welcome to the world of flower chandeliers, where nature meets elegance and creativity. A flower chandelier is a stunning piece of decor that can instantly elevate any space – whether it’s for a wedding, a special event, or even for adding a touch of beauty to your home. It combines the natural beauty of flowers with the enchantment of hanging lights, creating a mesmerizing and romantic ambiance.
In this article, we will guide you step-by-step on how to make your very own flower chandelier. From choosing the right materials to arranging the flowers and hanging the final masterpiece, we will cover all the essential tips and tricks to help you create a breathtaking floral centerpiece.
Creating a flower chandelier is not only a fun and rewarding DIY project, but it also allows you to unleash your creativity and add a personal touch to your space. Whether you’re a flower enthusiast or a seasoned crafter, this project will surely spark your imagination and leave you with a unique and eye-catching masterpiece.
So, gather your supplies, put on your creative hat, and let’s dive into the world of flower chandeliers!
Key Takeaways:
- Create a captivating flower chandelier by selecting a variety of flowers and greenery, arranging them on a base, and adding optional decorations for a personalized touch. Hang it in a suitable location to enjoy an enchanting ambiance.
- Unleash your creativity and bring nature’s elegance into any space by making a stunning flower chandelier. From preparing the base to securing the flowers and adding extra decorations, let your imagination run wild and create a mesmerizing centerpiece.
Read more: How To Make A Chandelier
Materials Needed
Before we begin, let’s gather all the materials necessary to create your flower chandelier. Don’t worry – you won’t need anything too complicated or hard to find. Here’s a list of what you’ll need:
- Floral foam or oasis foam
- A wire wreath form or a round base
- A variety of fresh flowers and greenery
- Floral wire or floral tape
- Scissors or floral cutters
- Hanging hardware (such as fishing line or ribbon)
- Hanging lights (optional)
- Additional decorations like ribbons, beads, or crystals (optional)
If you can’t find floral foam or oasis foam, you can use a Styrofoam ball as an alternative. The wire wreath form or round base should be large enough to accommodate the size of your chandelier, but not too heavy that it becomes difficult to hang.
When it comes to choosing the flowers, opt for a mix of sizes, shapes, and colors to create a visually appealing chandelier. Roses, hydrangeas, peonies, and cascading vine-like flowers work well for this project. As for greenery, eucalyptus, ferns, or ivy can add a lush and organic feel to your design.
Make sure you have enough floral wire or floral tape to secure the flowers to the base. Scissors or floral cutters will come in handy for trimming the stems and removing any excess foliage. Additionally, if you plan on hanging your chandelier, you will need appropriate hanging hardware like fishing line or ribbon.
To add an extra touch of enchantment, consider incorporating hanging lights into your design. Fairy lights or string lights can be intertwined with the flowers for a magical glow. Lastly, if you want to add some extra flair, you can gather ribbons, beads, or crystals to adorn your chandelier.
Now that you have all the necessary materials, it’s time to move on to the next step – preparing the base for your flower chandelier.
Step 1: Prepare the Base
The base of your flower chandelier serves as the foundation for the entire design. It provides stability and support for the flowers and ensures that your chandelier hangs securely. There are a few different options for the base, so choose one that best suits your style and needs.
If you prefer a more natural and rustic look, you can use a wire wreath form as your base. These can be found at craft stores or online. Alternatively, you can create your own round base using flexible wire or even a sturdy embroidery hoop.
If you want a more polished and structured look, you can opt for a Styrofoam ball. This is especially useful if you want to create a spherical flower chandelier. Keep in mind that Styrofoam balls may require a bit more patience and precision when attaching the flowers.
Whichever base you choose, make sure it is clean and free of any dirt or debris. You can gently wipe it with a damp cloth if necessary.
Now that you have your base ready, proceed to the next step – attaching the floral foam.
Step 2: Attach the Floral Foam
Attaching floral foam to your base is essential as it will hold the stems of your flowers securely in place, ensuring they stay hydrated throughout the lifespan of your chandelier.
If you’re using a wire wreath form or a round base, simply cut the floral foam into small pieces or strips that fit snugly inside the openings or cavities of your base. Ensure that the foam is packed tightly to prevent it from shifting or moving when you start arranging the flowers.
If you’re using a Styrofoam ball as your base, you’ll need to cut the foam into a disk shape that fits the bottom of the ball. Fix the disk-shaped foam securely onto the bottom using adhesive or floral tape.
To attach the foam to the base, use floral wire or floral tape to secure it in place. Wrap the wire or tape around the foam and the base, ensuring a tight and stable hold.
Once the floral foam is securely attached, it’s time to move on to the fun part – choosing and trimming the flowers!
Step 3: Choose and Trim Your Flowers
Choosing the right flowers for your chandelier is crucial to create a stunning and cohesive design. Consider selecting a variety of flowers that complement each other in terms of color, size, and texture. Roses, hydrangeas, peonies, and cascading vine-like flowers work well for this project, but feel free to choose flowers that align with your personal style and the occasion.
Before you start arranging the flowers, it’s important to give them a fresh cut. Using sharp scissors or floral cutters, trim the stems at a diagonal angle. This allows the flowers to have a larger surface area for water absorption, maximizing their longevity.
Remove any excess foliage or thorns from the stems, leaving only the leaves that are closest to the flowerhead. This not only helps the flowers fit into the foam more easily but also creates a cleaner and neater overall look.
Keep in mind that different flowers have different stem lengths. Trim the stems accordingly, ensuring that they are long enough to be inserted into the floral foam and reach the water source but not too long that they exceed the desired length of your chandelier.
Additionally, consider the overall shape of your chandelier. You can create a more uniform look by cutting the flower stems at similar lengths or opt for a cascading effect by leaving some stems longer than others.
Take your time while trimming the flowers and experiment with different lengths and combinations. Remember, you can always trim them further if needed, but it’s harder to add length once they’ve been cut.
Now that you have your flowers trimmed and ready, let’s move on to the next step – arranging them on the base of your chandelier.
When making a flower chandelier, be sure to choose sturdy flowers and greenery that can hold up to being suspended. Consider using a wire or foam base to secure the stems and create a balanced arrangement.
Read more: How To Make A Balloon Chandelier
Step 4: Arrange the Flowers on the Base
Now comes the exciting part – arranging the flowers on the base of your flower chandelier! This is where your creativity can truly shine. You have the freedom to design and create a unique and enchanting arrangement.
Begin by selecting the focal point of your chandelier. This could be a standout flower or a group of flowers that will draw attention. Place it on the base, ensuring that the stem is inserted firmly into the floral foam. This will serve as the centerpiece of your arrangement.
Next, work your way outward from the focal point. Add the remaining flowers around it, evenly distributing them to create a balanced and visually pleasing design. Vary the heights and angles of the flowers to add depth and dimension to your chandelier.
Remember to consider the shape and size of your base. If you’re using a wire wreath form, you can attach the flowers facing towards the center and outward. For a Styrofoam ball, insert the flowers at different angles, covering the entire surface.
As you arrange the flowers, step back occasionally to assess the overall look and make adjustments if necessary. Play with the placement of the flowers until you’re satisfied with the arrangement.
Don’t forget to fill any gaps between the flowers with greenery or additional smaller blooms. This will create a fuller and more cohesive look.
Take your time during this step and let your creativity guide you. Remember, there’s no right or wrong way to arrange the flowers. It’s all about creating a design that reflects your personal style and vision.
Once you’re happy with the arrangement, it’s time to secure the flowers in place to ensure they stay intact when hanging or displayed.
Step 5: Secure the Flowers
After you’ve arranged the flowers on the base of your flower chandelier, it’s important to secure them in place to prevent any movement or displacement. This ensures that your chandelier remains intact and visually appealing.
One way to secure the flowers is by using floral wire. Cut small pieces of wire and wrap them around the stems of the flowers, ensuring they are firmly attached to the base. You can conceal the wire by tucking it under leaves or positioning it strategically among the flowers.
Alternatively, you can use floral tape to secure the stems. Starting from the base of each stem, tightly wrap the tape upwards, ensuring the flowers are tightly bound to the base. The green color of the floral tape blends seamlessly with the stems and leaves, making it less noticeable.
While securing the flowers, be mindful of the weight distribution and balance of your chandelier. Make sure the arrangement is secure but not so tight that it damages the flowers or restricts their access to water if using floral foam.
If you’re using a Styrofoam ball as the base, extra caution is needed to secure the flowers effectively. As you work your way around the ball, use floral wire or tape to anchor the stems firmly to the foam. Ensure the flowers are inserted deep enough to maintain stability.
Take a step back and assess the arrangement, making any necessary adjustments to ensure the flowers are secure and stable. Once you’re satisfied, it’s time to move on to the next step – adding any additional decorations, if desired.
Step 6: Add Additional Decorations (Optional)
Adding additional decorations to your flower chandelier can take it to the next level and add a personalized touch. This step is entirely optional, but can enhance the overall aesthetic and theme of your chandelier.
One popular choice is to incorporate ribbons, beads, or crystals into your design. You can tie ribbons around the base of the chandelier, allowing them to dangle and create a whimsical effect. Beads or crystals can be attached to the stems of the flowers or intertwined with the greenery to add sparkle and elegance.
If you’re going for a boho-chic look, consider adding feathers, dreamcatchers, or macramé accents to your chandelier. These elements can be hung from the base or interwoven among the flowers and greenery.
Another option is to incorporate natural elements like twigs, branches, or moss. These can be intertwined with the flowers or used as decorative accents to create a more organic and nature-inspired look.
Consider the overall theme and style you want to achieve with your flower chandelier. Whether it’s rustic, romantic, glamorous, or whimsical, the additional decorations should complement and enhance the overall design.
Remember to keep a balance between the additional decorations and the flowers themselves. You don’t want the extra elements to overpower or overshadow the beauty of the flowers.
Once you’ve added the desired decorations, step back and assess the overall look. Make any final adjustments or additions until you achieve the desired aesthetic.
Now that your flower chandelier is complete, it’s time to hang it and enjoy the beauty it brings to any space.
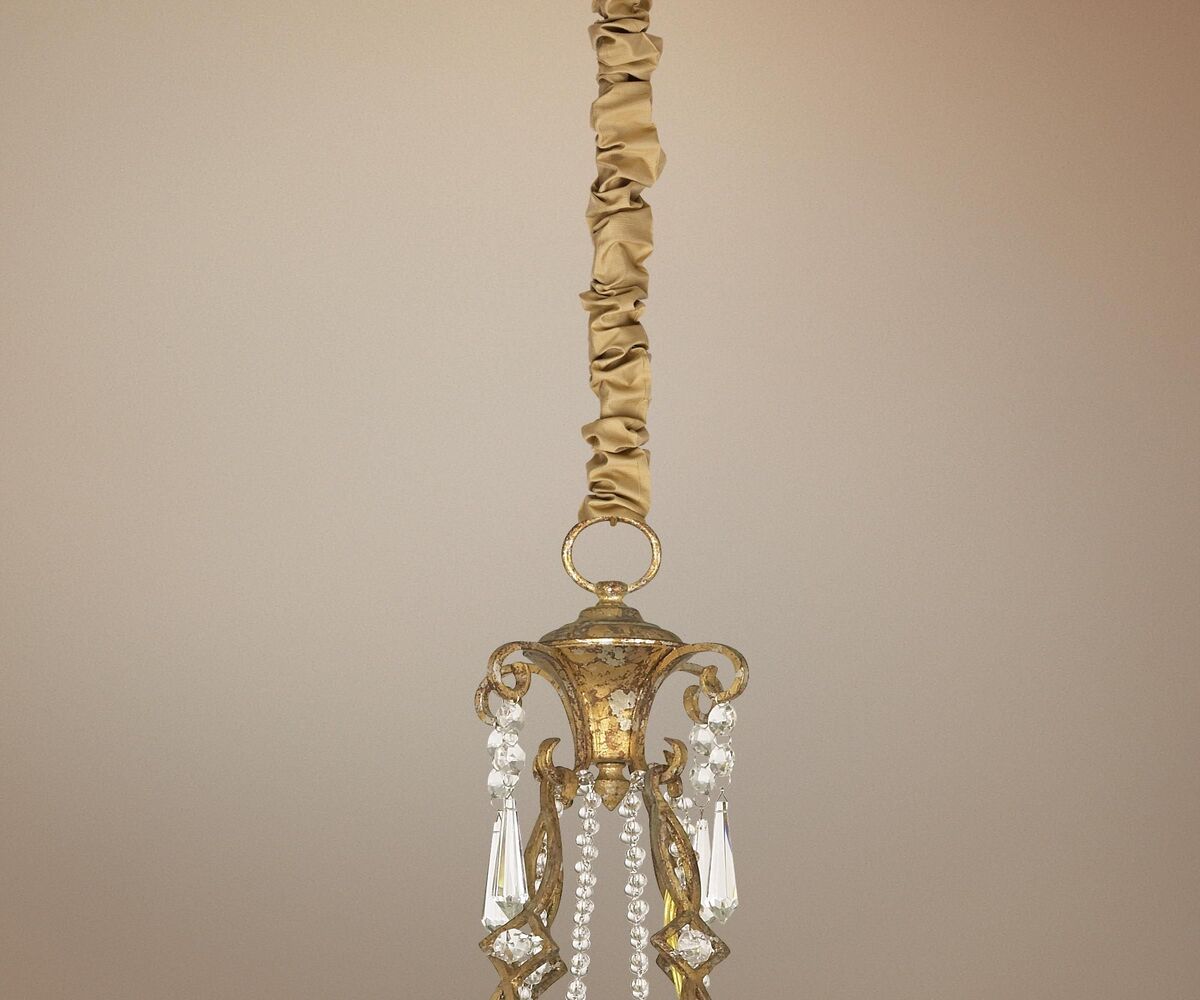
Step 7: Hang the Flower Chandelier
Now that your flower chandelier is fully prepared and adorned with all its beautiful elements, it’s time to find the perfect spot to hang it and bring your creation to life.
Start by determining the location where you want to hang your chandelier. It could be indoors, such as the center of a room, above a dining table, or in a hallway, or outdoors, like a garden or a covered patio. Wherever you choose, make sure it provides enough space for the chandelier to hang freely without any obstructions.
Inspect the area where you plan to hang your chandelier for proper support. Ensure that you have a secure hook or hanging mechanism in place that can support the weight of the chandelier. If you’re unsure about the weight, consult a professional to ensure safety.
If you’re hanging your flower chandelier indoors, you can use a sturdy ceiling hook or a decorative bracket. Make sure to follow the manufacturer’s instructions for installation and weight limits.
For outdoor settings, you might need to use a strong tree branch or a pergola as a natural support structure. Ensure that the location you choose is protected from harsh weather conditions that could damage the flowers.
Attach a strong fishing line or ribbon to the top of your chandelier, ensuring it is securely tied or looped around the hanging mechanism. Gently lift the chandelier and hang it from the designated spot, adjusting it to the desired height.
Step back and admire the beauty of your hanging flower chandelier. Take a moment to ensure that it hangs straight and is visually balanced in the space. Make any necessary adjustments to the height or positioning until you achieve the desired look.
Remember to take care of your flower chandelier by regularly misting the flowers with water and keeping them hydrated. Avoid exposing the chandelier to too much direct sunlight or extreme temperatures, as it could deteriorate the condition of the flowers.
Now, sit back, relax, and enjoy the enchanting ambiance created by your stunning flower chandelier.
Read more: How To Make A Beaded Chandelier
Conclusion
Congratulations! You’ve successfully made your own flower chandelier, turning your space into a captivating and enchanting haven. Creating a flower chandelier is not only a rewarding DIY project but also a beautiful way to bring nature and elegance into any setting.
Throughout this guide, we’ve taken you through the step-by-step process of making a flower chandelier – from preparing the base to hanging the final masterpiece. By carefully selecting and trimming your flowers, arranging them on the base, and securing them in place, you’ve created a unique and visually stunning centerpiece.
Remember, the key to a truly captivating flower chandelier is to let your creativity and personal style shine. Experiment with different flower combinations, incorporate additional decorations, and choose a hanging location that showcases your creation perfectly.
Whether you’re using your flower chandelier for a wedding, a special event, or as a permanent fixture in your home, it’s sure to make a lasting impression on all who see it. The natural beauty and elegance of the flowers, combined with the enchantment of hanging lights or additional decorations, create a mesmerizing ambiance that will delight and inspire.
Take the time to care for your flower chandelier by regularly misting the flowers, ensuring they remain hydrated and fresh. With proper care, your chandelier will continue to be a stunning focal point, bringing joy and beauty to your space.
Now that you have the knowledge and skills to create your own flower chandelier, let your imagination run wild and create more breathtaking designs. Share your creations with friends and family, or even consider turning it into a business by offering your talent for special events and occasions.
So, gather your materials, unleash your creativity, and let the beauty of a flower chandelier transform your space into a magical oasis.
Frequently Asked Questions about How To Make A Flower Chandelier
Was this page helpful?
At Storables.com, we guarantee accurate and reliable information. Our content, validated by Expert Board Contributors, is crafted following stringent Editorial Policies. We're committed to providing you with well-researched, expert-backed insights for all your informational needs.


0 thoughts on “How To Make A Flower Chandelier”