Furniture
How To Make A Chandelier Cord Cover
Modified: August 16, 2024
Learn how to make a stylish chandelier cord cover for your furniture. Transform your space with this easy DIY project.
(Many of the links in this article redirect to a specific reviewed product. Your purchase of these products through affiliate links helps to generate commission for Storables.com, at no extra cost. Learn more)
Introduction
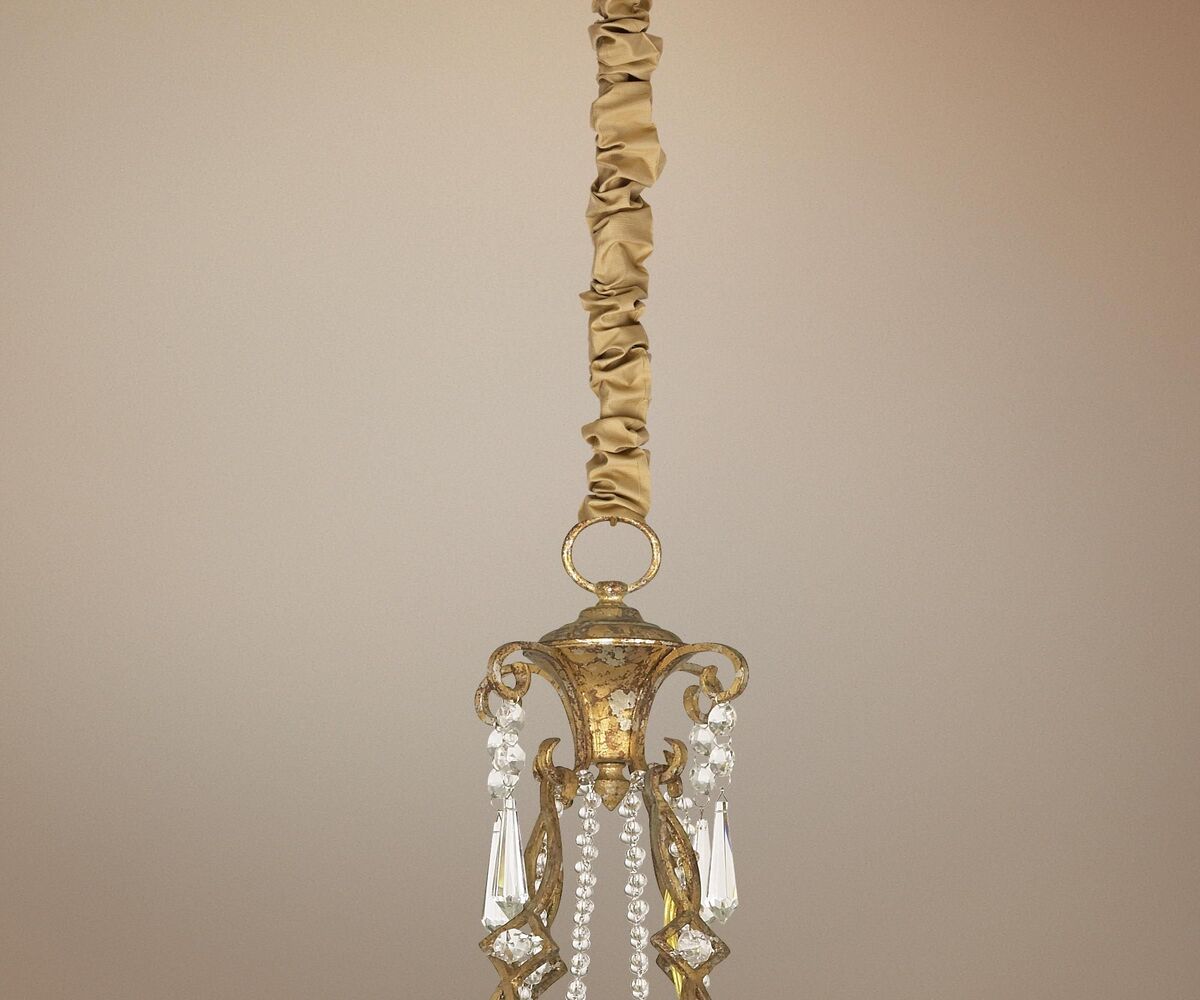
Chandeliers are a stunning addition to any space, adding elegance and sophistication to your home decor. However, the cords that hang from the chandelier can be unsightly and disrupt the overall aesthetic. Thankfully, there is a simple solution – making a chandelier cord cover.
A chandelier cord cover is a decorative sleeve that wraps around the electrical cord, hiding it from view and seamlessly blending it with the rest of your chandelier. Not only does it improve the appearance of your chandelier, but it also adds an extra layer of safety by protecting the cord from wear and tear.
In this article, we will guide you through the step-by-step process of making a chandelier cord cover. We will outline the materials you will need and provide detailed instructions to help you create a beautiful and functional cord cover for your chandelier.
Key Takeaways:
- Elevate your home decor and create a captivating environment by seamlessly integrating your chandelier cord with a DIY cord cover. Choose complementary fabric, secure with Velcro, and enjoy the elegant transformation.
- Transform your chandelier’s cord from unsightly distraction to seamlessly integrated part of your stunning lighting fixture. Protect the cord, enhance the aesthetic appeal, and effortlessly maintain the elegant look with a custom cord cover.
Materials Needed
Before you begin making your chandelier cord cover, gather the following materials:
- Fabric: Choose a fabric that complements your chandelier and complements the overall decor of the room.
- Measuring Tape: Essential for accurately measuring the length of your chandelier cord.
- Scissors: Used to cut the fabric to the desired size.
- Sewing Machine: While hand-sewing is an option, a sewing machine will provide a more secure and professional finish.
- Thread: Choose a thread color that matches or complements the fabric for a seamless look.
- Velcro Fasteners: These will be used to secure the cord cover in place.
- Pins: Useful for holding the fabric in place while sewing.
- Iron: Necessary for pressing the fabric and creating crisp edges.
Once you have all the materials ready, you can proceed to the next step of measuring and cutting the fabric.
Step 1: Measure and Cut the Fabric
The first step in making a chandelier cord cover is to measure and cut the fabric to the desired length. To do this, follow these steps:
- Start by turning off the power to the chandelier. This will ensure your safety while working with the cord.
- Use a measuring tape to measure the length of the chandelier cord from where it hangs down to the base or outlet where it is plugged in. Add an extra inch to each end for seam allowance.
- Using a pair of scissors, carefully cut the fabric to the measured length. Make sure to cut the fabric in a straight line to ensure neat and even edges.
Remember to handle the scissors with care and keep them away from children or pets. Take your time to ensure precise measurements and clean cuts.
Once you have cut the fabric to the desired length, you can move on to the next step of sewing the fabric together.
Step 2: Sew the Fabric
Now that you have your fabric cut to the appropriate length, it’s time to sew the fabric together to create the chandelier cord cover. Follow these steps:
- Prepare your sewing machine by threading it with a thread color that matches or complements your fabric.
- Take one end of the fabric and fold it over by about a quarter of an inch. Press it down with an iron to create a crease.
- Fold the same end over once more, this time by half an inch, enclosing the raw edge of the fabric. Press it down with the iron again to create a neat edge.
- Secure the folded edge in place with pins. This will ensure that the fabric stays in position as you sew.
- Repeat the folding and pinning process on the other end of the fabric.
- Set your sewing machine to a straight stitch and sew along the edge of the folded fabric, removing the pins as you go. Make sure to backstitch at the beginning and end to secure the stitches.
- Continue sewing along the length of the fabric until you reach the other folded end.
- Backstitch again to secure the stitches, then trim any excess thread.
Remember to sew slowly and keep your stitches as straight as possible. This will ensure a clean and professional-looking finish. Once you have sewn the fabric together, it’s time to move on to the next step of attaching the Velcro fasteners.
When making a chandelier cord cover, be sure to measure the length of the cord accurately before cutting the fabric to ensure a proper fit.
Step 3: Attach the Velcro Fasteners
Attaching Velcro fasteners to your chandelier cord cover will allow you to easily wrap it around the cord and secure it in place. Follow these steps to attach the Velcro fasteners:
- Measure and mark the midpoint of the chandelier cord cover.
- Take the soft side of the Velcro fastener and cut it to match the width of the cord cover.
- Position the soft Velcro strip on the inside of one end of the cord cover, aligning it with the midpoint mark you made.
- Sew the soft Velcro strip in place along the top and bottom edges, making sure to secure it firmly.
- Repeat the process with the hook side of the Velcro fastener, positioning it on the inside of the other end of the cord cover, aligning it with the midpoint mark.
- Sew the hook Velcro strip in place along the top and bottom edges, ensuring a strong attachment.
Make sure the Velcro strips are positioned correctly so that they will easily fasten together when you wrap the cord cover around the chandelier cord. Take your time to sew the Velcro securely, as this will ensure that the cord cover stays in place.
With the Velcro fasteners attached, you are now ready to move on to the next step of wrapping the cord cover around the chandelier cord.
Step 4: Wrap the Cord Cover around the Chandelier Cord
Now that you have your chandelier cord cover prepared with Velcro fasteners, it’s time to wrap it around the chandelier cord. Follow these steps:
- Start by turning off the power to the chandelier for your safety.
- Unwrap the chandelier cord, making sure it is free from tangles or knots.
- Take one end of the cord cover and open the Velcro fastener.
- Wrap the open end of the cord cover around the chandelier cord, ensuring that the fabric completely covers the cord.
- Press the Velcro fasteners together firmly to secure the cord cover in place.
- Smooth out any wrinkles or folds in the fabric to achieve a neat and seamless look.
- Repeat the process with the other end of the cord cover, ensuring that it overlaps with the first end for complete coverage.
By wrapping the cord cover around the chandelier cord, you effectively hide the unsightly cord and create a seamless appearance. Ensure that the cord cover is evenly distributed along the length of the cord for a balanced and polished look.
Once the cord cover is wrapped securely around the chandelier cord, you can move on to the final step of securing the cord cover in place.
Step 5: Secure the Cord Cover in Place
Now that you have wrapped the chandelier cord cover around the cord, it’s time to secure it in place to ensure it stays put. Follow these steps to secure the cord cover:
- Inspect the chandelier cord cover to ensure it is evenly distributed and covers the entire length of the cord.
- Once you are satisfied with the placement, gently pull on the cord cover to make sure it is taut and secure.
- Using small safety pins or fabric-friendly clips, pin the cord cover to itself at various points along the length. Make sure to place the pins discreetly to keep them hidden from view.
- Take a step back and assess the overall appearance of the chandelier cord cover. If needed, make any adjustments to ensure the fabric is smooth and wrinkle-free.
Securing the cord cover in place is crucial to maintain its aesthetic appeal and prevent it from sliding or shifting over time. The small safety pins or fabric clips provide an effortless and discreet method of securing the cord cover without compromising its appearance.
With the chandelier cord cover securely in place, you can now step back and admire the transformation that hides the unsightly cord and adds a touch of elegance to your chandelier.
Conclusion
Congratulations! You have successfully learned how to make a chandelier cord cover. By following the step-by-step instructions outlined in this article, you have transformed your chandelier’s cord from an unsightly distraction to a seamlessly integrated part of your stunning lighting fixture.
A chandelier cord cover not only enhances the aesthetic appeal of your chandelier but also provides an extra layer of protection for the cord, keeping it safe from wear and tear. Additionally, the ability to easily wrap and secure the cord cover in place allows for effortless maintenance and adjustments as needed.
Remember to choose a fabric that complements your chandelier and blends well with your overall decor. Sew the fabric carefully, ensuring straight lines and secure stitches. The addition of Velcro fasteners makes it easy to wrap the cover around the cord and achieve a seamless look.
Now that you have a beautifully covered chandelier cord, don’t forget to periodically inspect and clean the cord cover to keep it looking its best. Regular maintenance and care will ensure that your chandelier remains a focal point of elegance and style in your home.
Enjoy the newly transformed look of your chandelier and the ambiance it brings to your living space. Get creative and experiment with different fabrics and colors to match your personal style and enhance the overall decor of your room. With a chandelier cord cover, you can truly elevate your home decor and create a captivating environment.
Frequently Asked Questions about How To Make A Chandelier Cord Cover
Was this page helpful?
At Storables.com, we guarantee accurate and reliable information. Our content, validated by Expert Board Contributors, is crafted following stringent Editorial Policies. We're committed to providing you with well-researched, expert-backed insights for all your informational needs.


0 thoughts on “How To Make A Chandelier Cord Cover”