Furniture
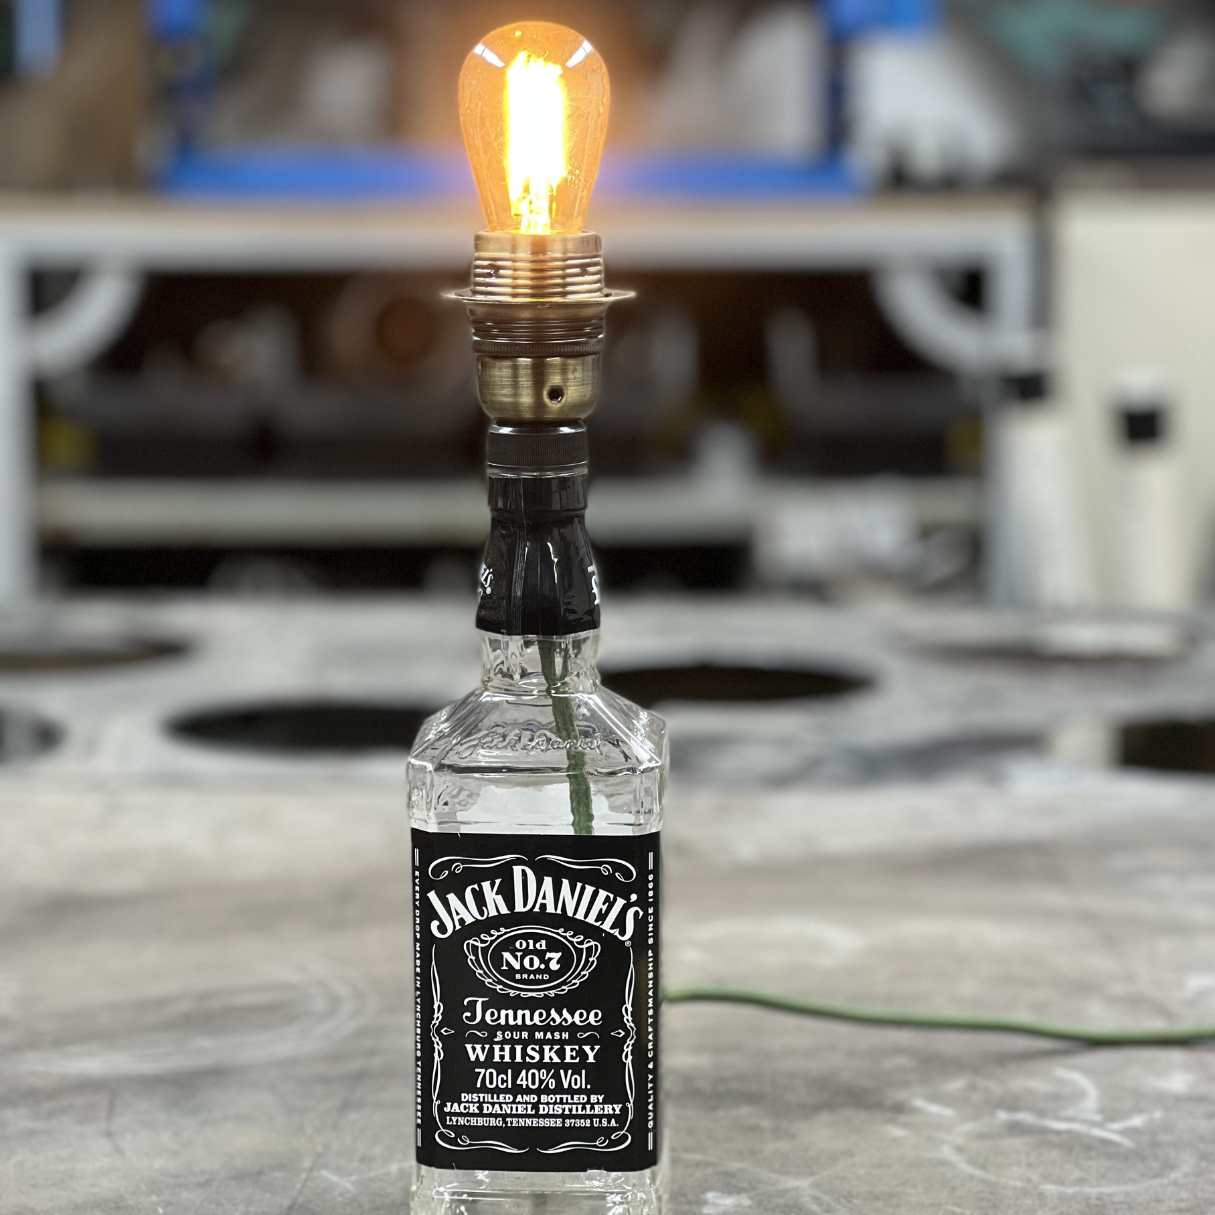
How To Make A Lamp Out Of A Liquor Bottle
Modified: October 19, 2024
Learn how to repurpose a liquor bottle and transform it into a unique furniture piece with this step-by-step guide on making a lamp.
(Many of the links in this article redirect to a specific reviewed product. Your purchase of these products through affiliate links helps to generate commission for Storables.com, at no extra cost. Learn more)
Introduction
Welcome to the world of DIY home decor! Are you looking to add a unique and stylish touch to your living space? Look no further than making a lamp out of a liquor bottle. This fun and creative project not only allows you to repurpose an old or empty bottle but also adds a personal touch to your home.
Creating a lamp out of a liquor bottle is a fantastic way to showcase your creativity and add a unique conversation piece to your interior design. Whether you’re a seasoned DIY enthusiast or just starting out, this project is both fun and rewarding.
In this article, we will guide you through the step-by-step process of making a lamp out of a liquor bottle. From selecting the perfect bottle to assembling and testing the lamp, we will cover all the essential steps. So, grab your tools and let’s get started on this exciting DIY project!
Key Takeaways:
- Transform empty liquor bottles into unique, eco-friendly lamps with a personal touch. Showcase creativity, repurpose, and add a conversation piece to your home decor.
- Follow step-by-step instructions to safely and creatively repurpose liquor bottles into stunning, functional lamps. Enjoy the rewards of DIY home decor and sustainable upcycling.
Read more: How To Store Liquor Bottles
Materials Needed
Before diving into the project, let’s gather all the necessary materials. Here’s what you’ll need:
- Liquor Bottle: Choose a bottle with a design or shape you love. Keep in mind that clear or translucent bottles work best for this project.
- Lamp Kit: You’ll need a lamp kit, which includes a socket, cord, and plug. These kits are easily available at hardware stores or online.
- Drill and Drill Bit: To create a hole in the bottle, you’ll need a drill. Make sure to use a drill bit suitable for drilling glass.
- Light Bulb: Select an LED or incandescent light bulb that fits the socket size of your lamp kit. Consider the wattage and color temperature for the desired ambiance.
- Electrical Tape: This will be used to secure the wiring and ensure safety.
- Wire Cutter and Wire Stripper: These tools will help trim and strip the lamp kit wire.
- Pliers: Pliers are useful for bending or adjusting wires.
- Adhesive: You may need adhesive to attach the lamp kit to the bottle. Epoxy or silicone-based adhesives work well for this purpose.
- Optional: Decorative Elements – If you want to add a personal touch to your lamp, consider adding decorative elements such as lampshades, ribbons, or charms.
Now that you have all the necessary materials, let’s move on to the step-by-step process of making a lamp out of a liquor bottle.
Step 1: Selecting the Liquor Bottle
The first step in creating your liquor bottle lamp is selecting the perfect bottle. This is where your creativity can shine, as you have the freedom to choose a bottle that reflects your style and personality.
When choosing a liquor bottle, keep the following factors in mind:
- Design: Look for a bottle with an interesting shape, embossed patterns, or unique labeling. This will add visual appeal to your lamp.
- Translucency: Opt for a clear or translucent bottle. This will allow the light to shine through and create a beautiful ambiance.
- Size: Consider the size of the bottle in relation to where you plan to place your lamp. You don’t want it to be too small or too large for the intended space.
Visit local liquor stores or search online for bottles that catch your eye. Don’t be afraid to experiment with different shapes and sizes. Remember, this is an opportunity to create a one-of-a-kind piece of decor.
It’s important to note that the bottle should be empty and thoroughly cleaned before proceeding with the project. Rinse it with warm soapy water and remove any remaining residue or labels. This will ensure a clean and polished finished product.
Once you’ve selected and prepared your bottle, you’re ready to move on to the next step: cleaning and preparing the bottle for the lamp conversion.
Step 2: Cleaning and Preparing the Bottle
Now that you have selected the perfect liquor bottle for your lamp, it’s time to clean and prepare it for the conversion process. Follow these steps to ensure your bottle is ready:
- Remove any labels or stickers: Soak the bottle in warm water for a few minutes to loosen the adhesive. Use a scrub brush or sponge to gently remove the labels and any sticky residue. For stubborn residue, you can use a bit of rubbing alcohol.
- Clean the bottle inside and out: Fill the bottle with warm soapy water and give it a good shake. Use a bottle brush to scrub the inside and remove any remnants. Rinse thoroughly to ensure all soap is removed.
- Dry the bottle: Allow the bottle to air dry completely. You can also use a clean cloth or paper towels to speed up the drying process.
It’s essential to have a clean and dry bottle to ensure a professional-looking lamp. Any leftover dirt, labels, or moisture can affect the final result and compromise the adhesive bond between the bottle and lamp kit.
Once your bottle is clean and dry, it’s time to move on to the next step: removing labels and residue.
Step 3: Removing Labels and Residue
After cleaning the liquor bottle, the next step in creating your lamp is to remove any lingering labels and residue. By taking the time to properly remove these elements, you’ll ensure a polished and professional-looking finished product.
Follow these steps to effectively remove labels and residue:
- Soak the bottle: Fill a sink or basin with warm water and submerge the bottle completely. Allow it to soak for about 15-20 minutes to loosen the adhesive.
- Scrape off the labels: Once the adhesive has softened, use a plastic scraper or your fingers to gently scrape off the labels. Start from one corner and work your way across the surface of the bottle. Be careful not to scratch or damage the glass.
- Use a solvent: If there is stubborn residue left behind, you can apply a solvent such as rubbing alcohol, Goo Gone, or nail polish remover. Soak a cloth or cotton ball in the solvent and rub it over the sticky area. This will help dissolve the residue and make it easier to remove.
- Scrub with a sponge or brush: For particularly stubborn residue, use a sponge or soft brush and some warm soapy water to scrub the affected area gently. Rinse the bottle thoroughly afterward.
- Dry the bottle: Once you have removed all labels and residue, use a clean cloth or paper towels to dry the bottle completely. Make sure there is no moisture left before moving on to the next step.
By following these steps, you can ensure that your liquor bottle is clean and free from any labels or residue. This will create a clean canvas for the rest of the lamp-making process. Now that the bottle is ready, it’s time to move on to Step 4: drilling a hole in the bottle.
When making a lamp out of a liquor bottle, make sure to use a proper lamp kit with a socket and cord designed for the weight and size of the bottle. This will ensure the safety and stability of the finished lamp.
Read more: How To Make A Wine Bottle Oil Lamp
Step 4: Drilling a Hole in the Bottle
Now that you have a clean and label-free liquor bottle, it’s time to create a hole for the lamp cord to pass through. This step requires caution and careful execution, as you’ll be drilling into glass. Follow these steps to safely drill a hole in the bottle:
- Prepare your work area: Find a stable surface to work on, preferably covered with a soft cloth or mat to prevent the bottle from slipping or scratching.
- Mark the drilling spot: Decide where you want the hole to be on the bottle. It’s typically best to choose a spot towards the bottom of the bottle, where it won’t interfere with the lamp’s stability.
- Use a diamond drill bit: Select a diamond drill bit suitable for glass drilling. These can be found at hardware stores or online. Attach the drill bit to your drill, making sure it’s secure.
- Apply lubrication: Lubricate the drill bit and the area you’ll be drilling with a small amount of water or glass cutting oil. This will help keep the glass cool and prevent it from cracking or shattering.
- Start drilling: Position the drill bit on the marked spot and apply gentle pressure. Begin drilling at a slow speed to allow the drill bit to create a groove in the glass. Be patient and maintain a steady hand.
- Continue drilling: Increase the drill speed gradually as you continue drilling. Keep the drill bit submerged in water or lubricant to cool it down and avoid overheating the glass. Apply even pressure and let the drill bit do the work.
- Take breaks if needed: If you notice any excessive heat or resistance, take short breaks to allow the glass to cool down.
- Finish drilling: Drill until the hole is the desired size. Once you’re close to completing the hole, decrease the drill speed to prevent any sudden breakage.
- Clean the bottle: Rinse the bottle with water to remove any glass fragments or debris. Dry it thoroughly before proceeding to the next step.
By following these steps, you can successfully drill a hole in your liquor bottle without damaging the glass. With the hole created, you’re ready to move on to Step 5: installing the lamp kit.
Step 5: Installing the Lamp Kit
Now that you have a hole drilled in your liquor bottle, it’s time to install the lamp kit. The lamp kit contains all the necessary components for wiring and powering your lamp. Follow these steps to successfully install the lamp kit:
- Gather the lamp kit components: Lay out all the components of the lamp kit, including the socket, cord, and plug. Familiarize yourself with each piece before proceeding.
- Feed the cord through the hole: Place the socket end of the cord through the hole in the liquor bottle, ensuring that the socket will rest securely on the inside of the bottle.
- Attach the socket: From the inside of the bottle, thread the socket onto the cord and pull it through until it’s snug against the bottle neck.
- Strip the wire ends: Use wire cutters and strippers to carefully strip the insulation from the cord. Follow the instructions provided with your lamp kit for the appropriate length of exposed wire.
- Connect the wires: Locate the corresponding wires from the socket and cord. Twist together the exposed copper wires, ensuring a secure connection. Use wire nuts or electrical tape to cover the twisted wires.
- Secure the socket: Push the socket assembly into the bottle, making sure it fits snugly. If needed, use adhesive or a retaining ring to secure the socket in place.
- Attach the plug: On the opposite end of the cord, attach the plug according to the manufacturer’s instructions. Make sure the wire connections are secure.
- Test the wiring: Before proceeding, it’s crucial to test the wiring. Plug in the lamp to ensure the bulb lights up properly. If it doesn’t, double-check your connections and troubleshoot as necessary.
Once you have successfully installed the lamp kit and tested the wiring, you’re ready to move on to Step 6: assembling the lamp.
Note: This step involves working with electrical components and wiring. If you are not experienced or comfortable with electrical work, it’s recommended to seek assistance from a professional electrician for this portion of the project.
Step 6: Assembling the Lamp
With the lamp kit installed and the wiring tested, it’s time to assemble your liquor bottle lamp. This step involves bringing together all the components and creating a cohesive and functional piece. Follow these steps to assemble your lamp:
- Select a lamp base: Choose a sturdy and stable lamp base that complements the design of your liquor bottle. This can be a decorative base, a wooden block, or any other object that provides stability.
- Attach the lamp base: Place the lamp base on a flat surface and position the drilled bottle on top. Ensure that the socket and cord fit comfortably within the lamp base.
- Secure the bottle to the base: Depending on the lamp base you’ve chosen, secure the liquor bottle in place using adhesive, a lamp finial, or any other method that provides stability without compromising the aesthetic.
- Add decorative elements: If desired, you can enhance the look of your lamp by adding decorative elements such as lampshades, ribbons, or charms. Be creative and choose elements that complement the overall design.
- Adjust the lamp angle: Depending on your preference, you can adjust the angle of the liquor bottle by gently bending the cord or using adjustable lamp hardware. This allows you to achieve the desired direction of the light.
As you assemble your lamp, pay attention to the overall aesthetics and functionality. Ensure that all components are securely attached, the lamp remains stable, and the wiring is properly hidden. Take your time to make adjustments and create a lamp that reflects your personal style and taste.
With the lamp fully assembled, you’re almost done! The final step is to test the lamp to ensure everything is working correctly. Let’s move on to Step 7: testing the lamp.
Step 7: Testing the Lamp
Congratulations on reaching the final step of creating your liquor bottle lamp! Now it’s time to test and ensure that everything is working as expected. Follow these steps to test your lamp:
- Plug in the lamp: Insert the plug into a functioning electrical outlet.
- Turn on the lamp: Switch on the lamp and make sure the light bulb illuminates.
- Check for any issues: Observe the lamp closely for any flickering, dimness, or unusual sounds. If you notice any issues, switch off the lamp immediately and review the wiring connections.
- Adjust the lighting: If needed, adjust the lamp angle or change the position of the bottle to achieve the desired lighting effect.
- Monitor the lamp’s heat: While the lamp is on, carefully check the temperature of both the bottle and the socket. Ensure that they do not become excessively hot, as this can indicate a potential safety issue.
If everything is working properly and the lamp is functioning as desired, then congratulations! You have successfully created a unique and custom-made liquor bottle lamp. Enjoy the beautiful ambiance and the satisfaction of completing a DIY project!
However, if you encounter any issues during the testing phase, it’s important to address them promptly. Double-check the wiring, make any necessary adjustments, or consider seeking assistance from an electrician if needed. Safety should always be a priority when working with electrical components.
Now that your lamp is tested and ready to go, find the perfect spot in your home to showcase your creative masterpiece. Your liquor bottle lamp will not only provide an enchanting glow but also serve as a conversation piece and a reflection of your personal style.
Thank you for joining us on this journey of creating a lamp out of a liquor bottle. Happy decorating!
Conclusion
Creating a lamp out of a liquor bottle is a fantastic DIY project that allows you to repurpose an empty bottle and add a unique touch to your home decor. Throughout this article, we’ve guided you through the step-by-step process of making your own liquor bottle lamp.
From selecting the perfect liquor bottle to cleaning and preparing it, drilling a hole, installing the lamp kit, and assembling the lamp, each step has its own challenges and rewards. By following the instructions and taking your time, you can create a beautiful and functional piece of decor.
Not only does making a liquor bottle lamp showcase your creativity, but it also offers a sustainable and eco-friendly option for upcycling. Instead of throwing away a bottle, you can transform it into a stunning and unique lighting fixture.
Remember, safety is crucial when working with electrical components. If you’re not comfortable with electrical work, seek assistance from a professional electrician to ensure everything is wired correctly and in accordance with safety standards.
Now that you have completed your liquor bottle lamp, take a moment to admire your work. Place it in a prominent spot in your home where it can be enjoyed and admired by you and your guests. Your creation will not only brighten up the space but also become a conversation piece and a reflection of your personal style.
Thank you for joining us on this DIY journey. We hope you found this article helpful and that you enjoy the beautiful ambiance created by your liquor bottle lamp. Happy decorating!
Frequently Asked Questions about How To Make A Lamp Out Of A Liquor Bottle
Was this page helpful?
At Storables.com, we guarantee accurate and reliable information. Our content, validated by Expert Board Contributors, is crafted following stringent Editorial Policies. We're committed to providing you with well-researched, expert-backed insights for all your informational needs.