Home>Outdoor Storage>50 Best Patio Privacy Screen For Ultimate Privacy

Outdoor Storage
50 Best Patio Privacy Screen For Ultimate Privacy
Modified: December 6, 2023
Patio privacy screens that guarantee 100% comfort and privacy! These are easy to set up, super affordable, and most importantly give you personal space.
(Many of the links in this article redirect to a specific reviewed product. Your purchase of these products through affiliate links helps to generate commission for Storables.com, at no extra cost. Learn more)
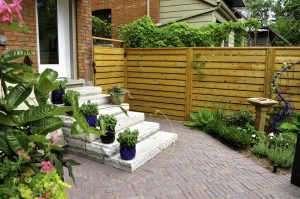
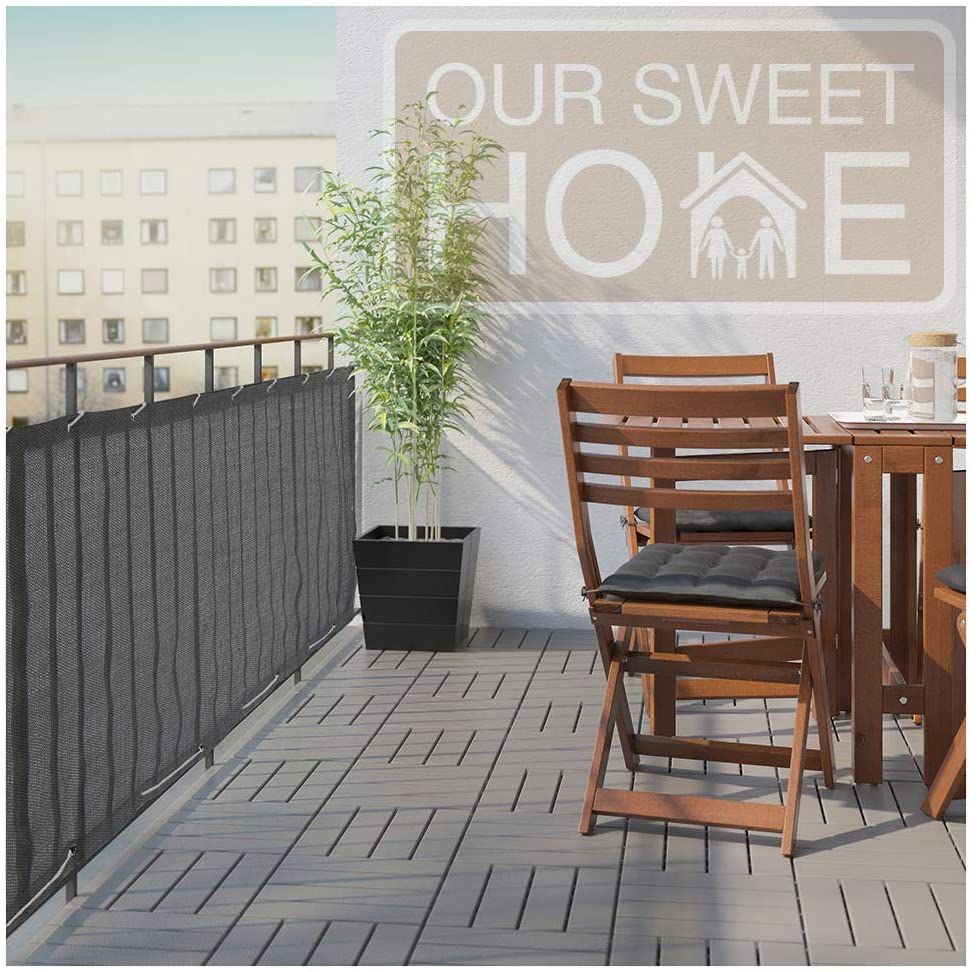
Good fences make good neighbors. But when that’s not enough, a pretty, new privacy screen may do the trick. Whether you’re enjoying skyline views from your apartment balcony or soaking up the sun on your deck in the suburbs, we’ve found a privacy screen tailor-made to fit your needs. The best part? Our patio privacy screens are equal parts fashionable and functional so you can keep prying eyes away from your outdoor space without sacrificing style. Here are some patio privacy screen ideas you are bound to love.
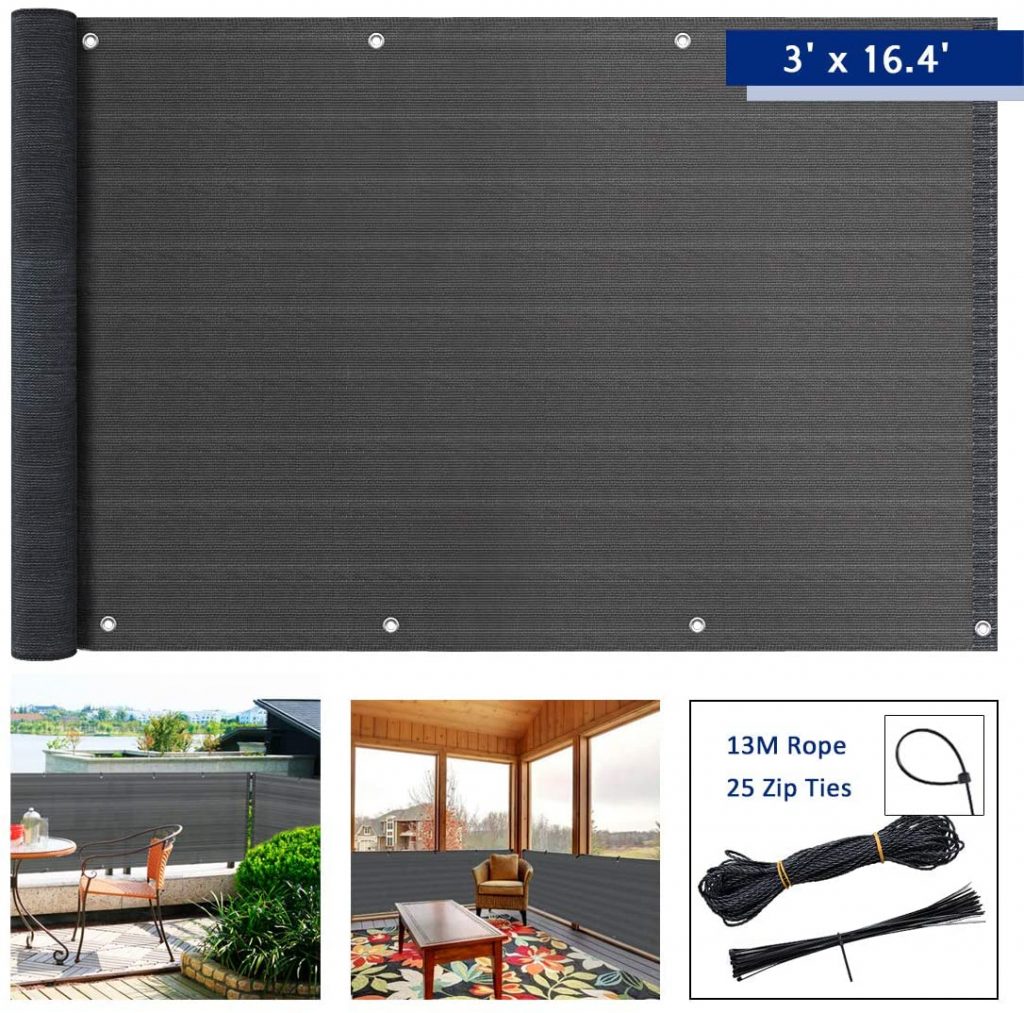
Enjoy the shade with this simple yet innovative product. Not only does it feature a sturdy build, it’s also long-lasting and waterproof. It’s perfect for either home or commercial use, and features a high-density woven polypropylene material design. With 60 ties included in the set, rest assured that you’ll be able to install it easily.
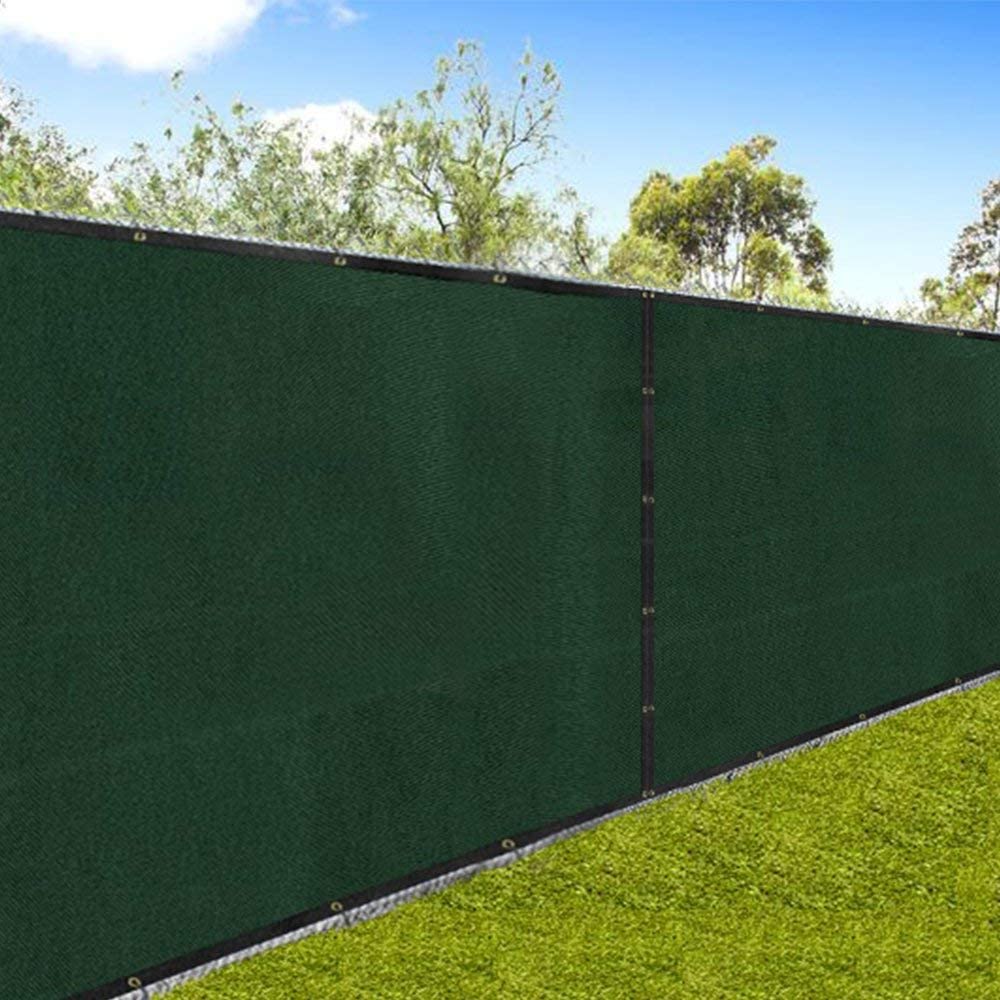
Make your patio a great hangout spot with this high-density polyethylene fence privacy screen. Super durable, it features 90% blockage and is also easy to install thanks to its cable zip ties. Choose your favorite from 7 pretty colors today.
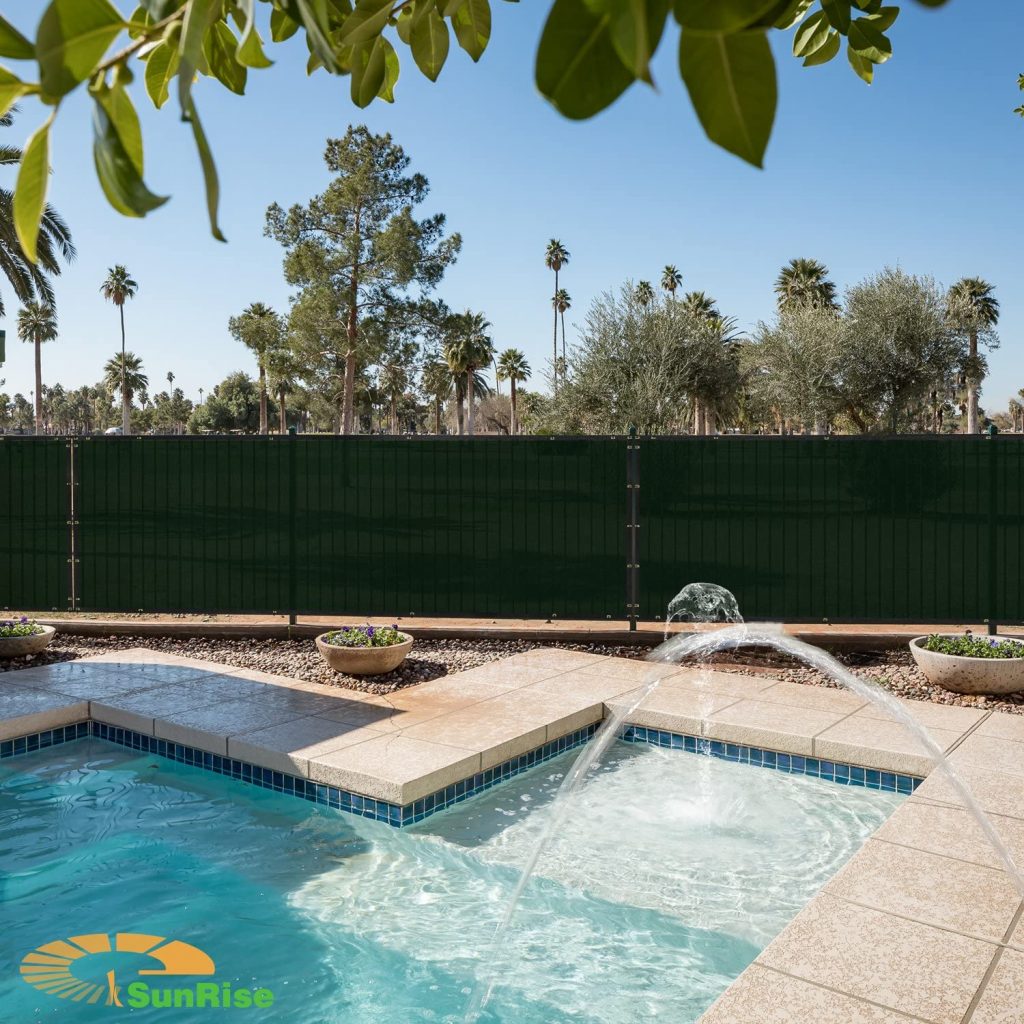
Make your patio great again with ALEKO’s water-resistant and UV-proof privacy screen, which can be attached to a fence to boost privacy. High-quality polyethylene mesh lowers visibility through the fence by 88 to 90 percent. Its rust-free aluminum grommets can be placed evenly on all four sides and subsequently attached to your fence with zip ties (included in the package).
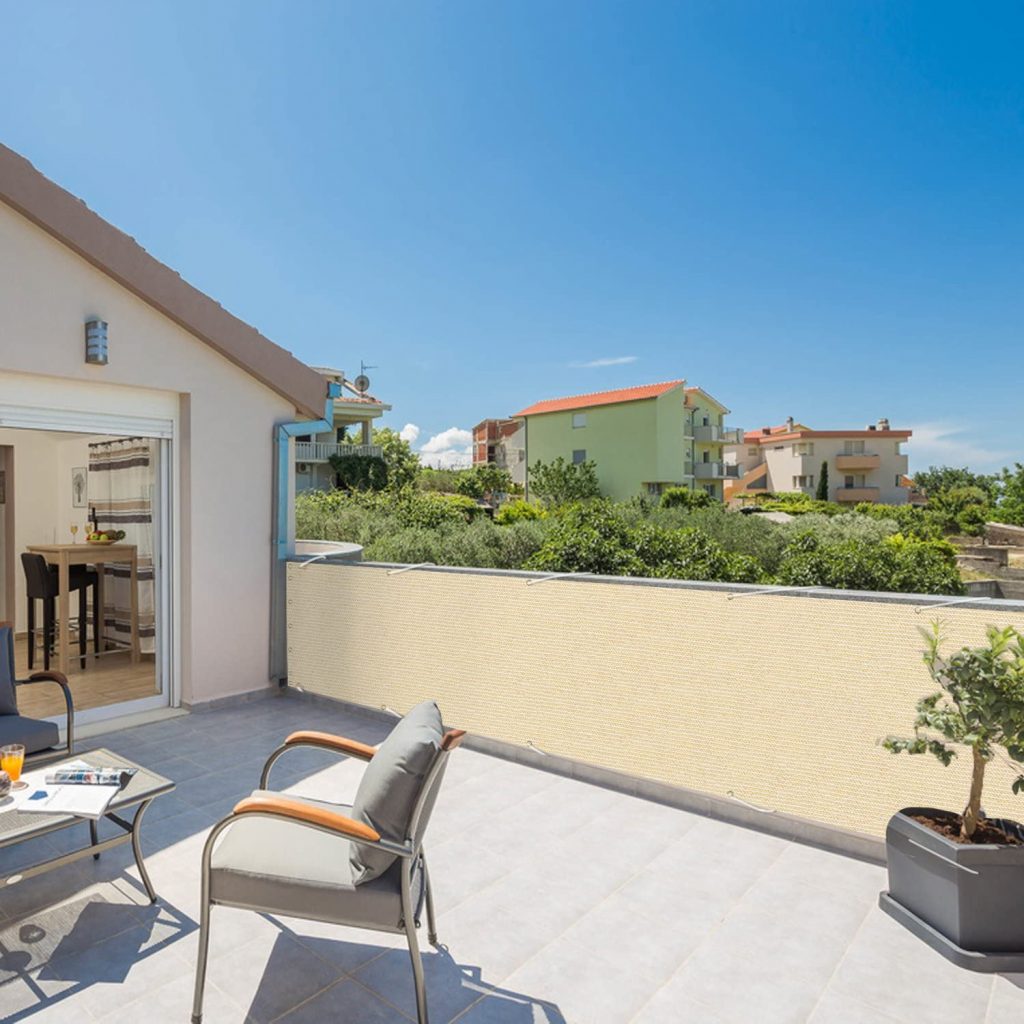
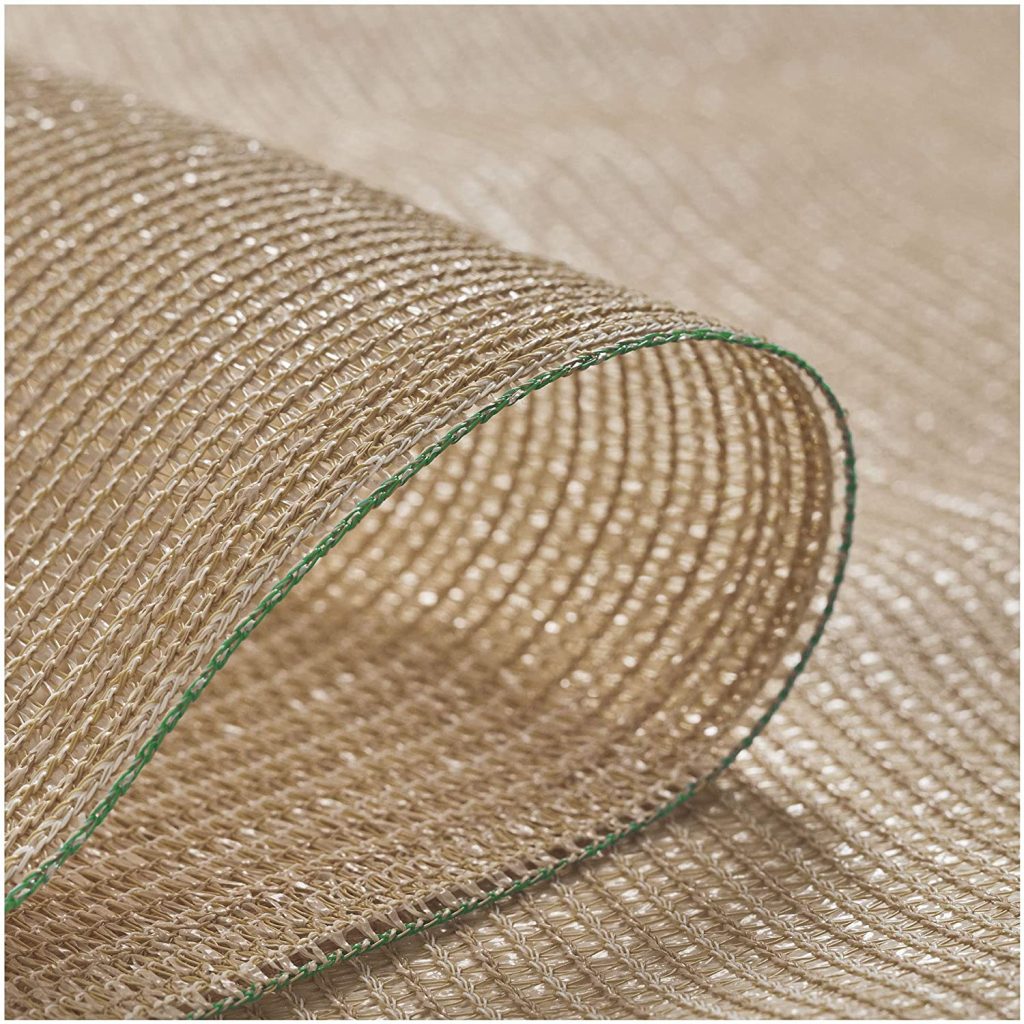
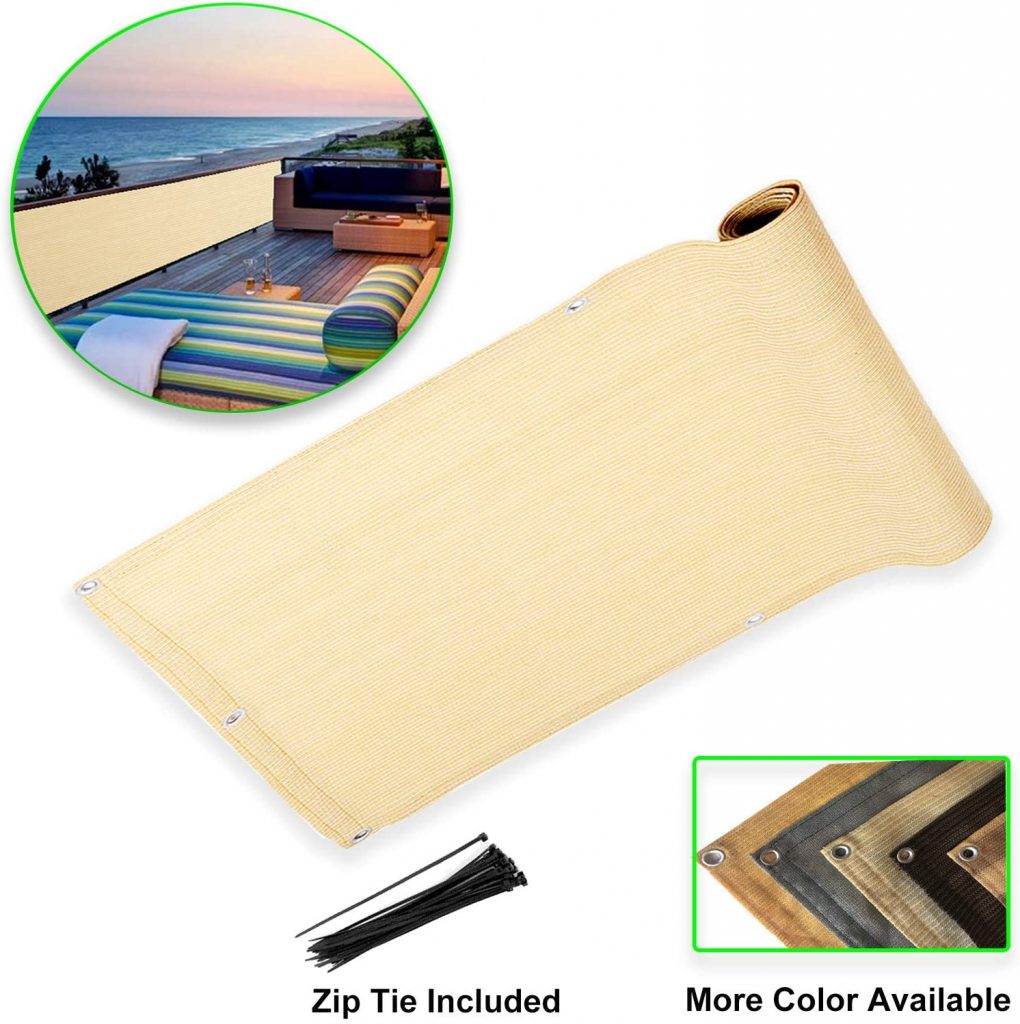
Easy to set up and use, we’re sure you’ll love this privacy screen as much as we do. Knitted with industry leading quality HDPE, its fabric is treated using UV technology to be fade-proof and durable. This beige product is versatile and can be used in many areas of your house, including balconies, pools and porches.
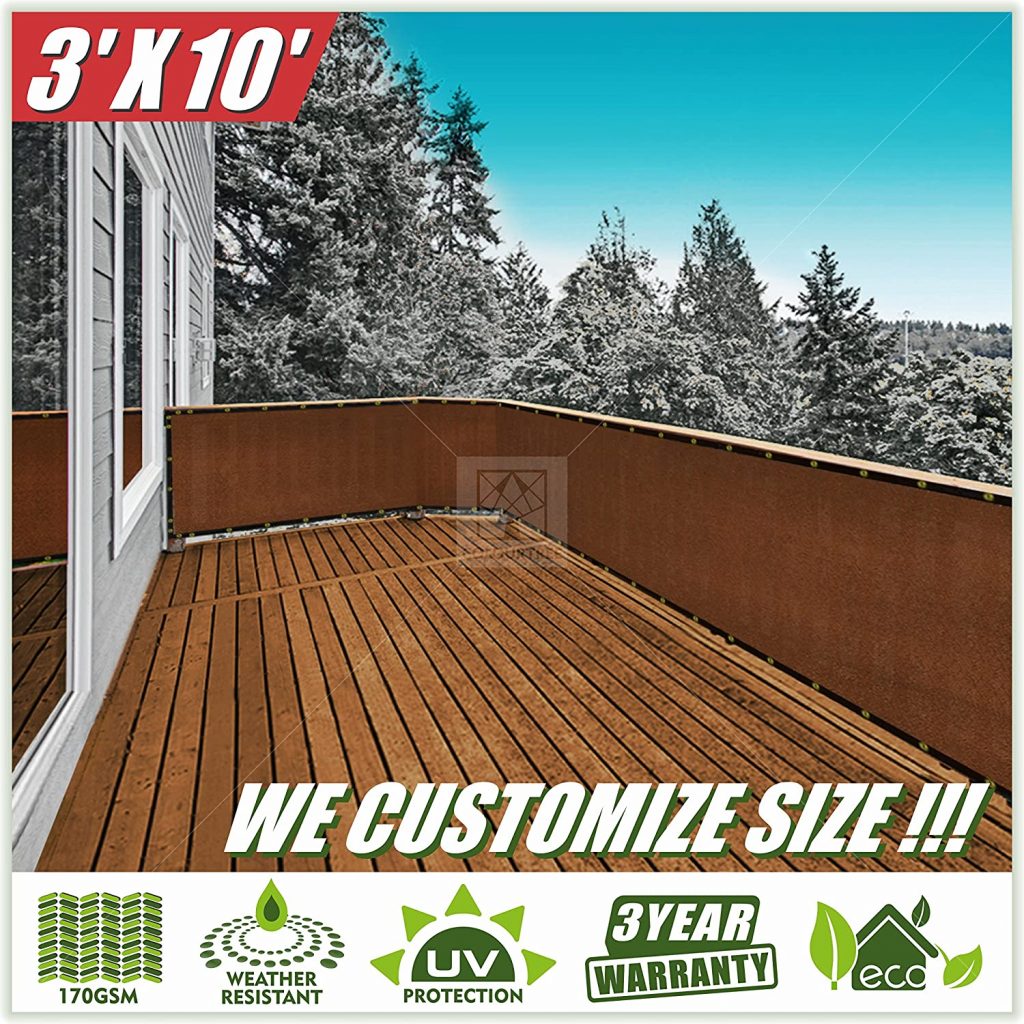
Well-made and easy to install, this is the only fence screen product on the market that is made of 170 GSM 100% virgin (Non-recycled) HDPE material. If 20000 hours of laboratory UV testing are anything to go by, it’s super durable and will last you for ages. It comes with an affordable price tag that makes it perfect for a variety of purposes/functions. Make this breathable patio privacy screen part of your home today.
When it comes to getting bang for your buck, it’s hard to beat this patio privacy screen from Zimo. Its balcony screen is made of HDPE, which can provide up to 99% reduction in visibility. Besides this, it can also be used to block strong gusts of wind and even snow. It holds its shape well and will make an excellent investment for the long term.
Easy to set up, achieve maximum privacy and protection with this option that is made from 180 GSM new high density polyethylene(HDPE) material. It has 88% blockage and allows breezes and light to pass through for a more comfortable space. This dependable Deck Shield Cover is perfect for use in your backyard, balcony and more.
If you want sturdy, you’ve got sturdy. This Oak Leaf balcony privacy screen will fit your 3inch-high fence in your garden, balcony, patio, apartments, porch, etc. perfectly. Made of 210 gsm HDPE fabric with reinforced edges, the balcony screen features 97% visibility blockage. It is also water-resistant.
The multi-functional DearHouse privacy screen cover will block out 95% of the sun and provide UV protection at the same time. The set includes 35 cable ties and is widely used in multiple places like roofs, warehouses and porch decks. The Balcony Privacy Screen Cover is water-resistant and durable to use! It can be the shade cloth/privacy screen/patio shield/sunscreen in different weathers, like strong sunshine sunlight, hot temperature, humidity, rain, snow. It is a cheap and easy way to build a safe little haven of your own!
Anti-aging and corrosion-resistant, this privacy screen is able to withstand the elements without any trouble. It’s easy to use and has a largely opaque appearance to prevent neighbours from snooping around. Easy to install and maintain, the Privacy Screen is made high-quality HDPE, and can survive temperatures from as long as -30 ° C to as high as 60 ° C, so you can stay worry-free throughout the seasons.
Easy to install and of excellent quality, the privacy screen cover will block out 90% of the sun. The Mesh Fence Privacy Screen is made of high-density, high-quality HDPE. Not only is it weather-resistant, it’s also UV-resistant and can withstand temperatures from -30 °C to + 60 °C. You’ll get shading net, protection cover, and an insulation net all in one product/package. The Privacy Cover is super versatile and can be used in many places.

Lightweight and UV-resistant, you’ll be hard-pressed to find a deal that’s better than this. 88% blockage hides your activities from nosy neighbours, and you won’t need to get a new one anytime soon as it’s highly durable. Knitted from 100% high quality pure polyethylene, it’s 90% UV-resistant and fits 8-ft tall fences perfectly.
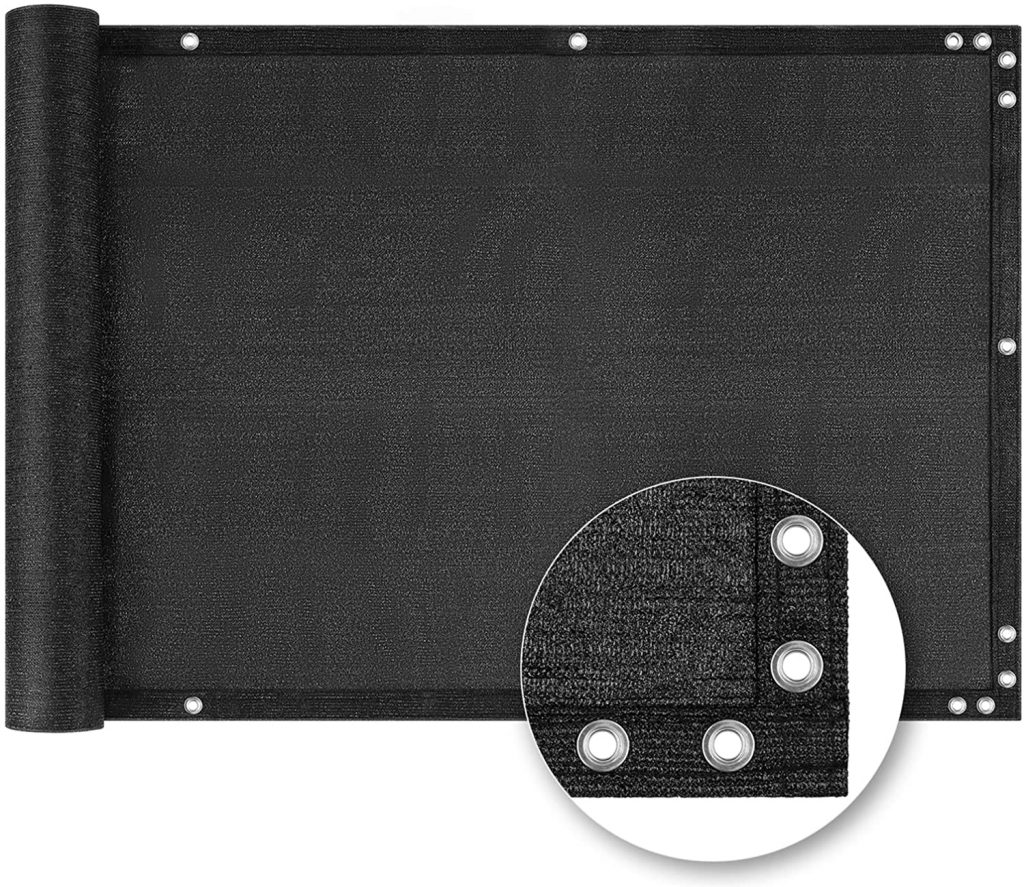
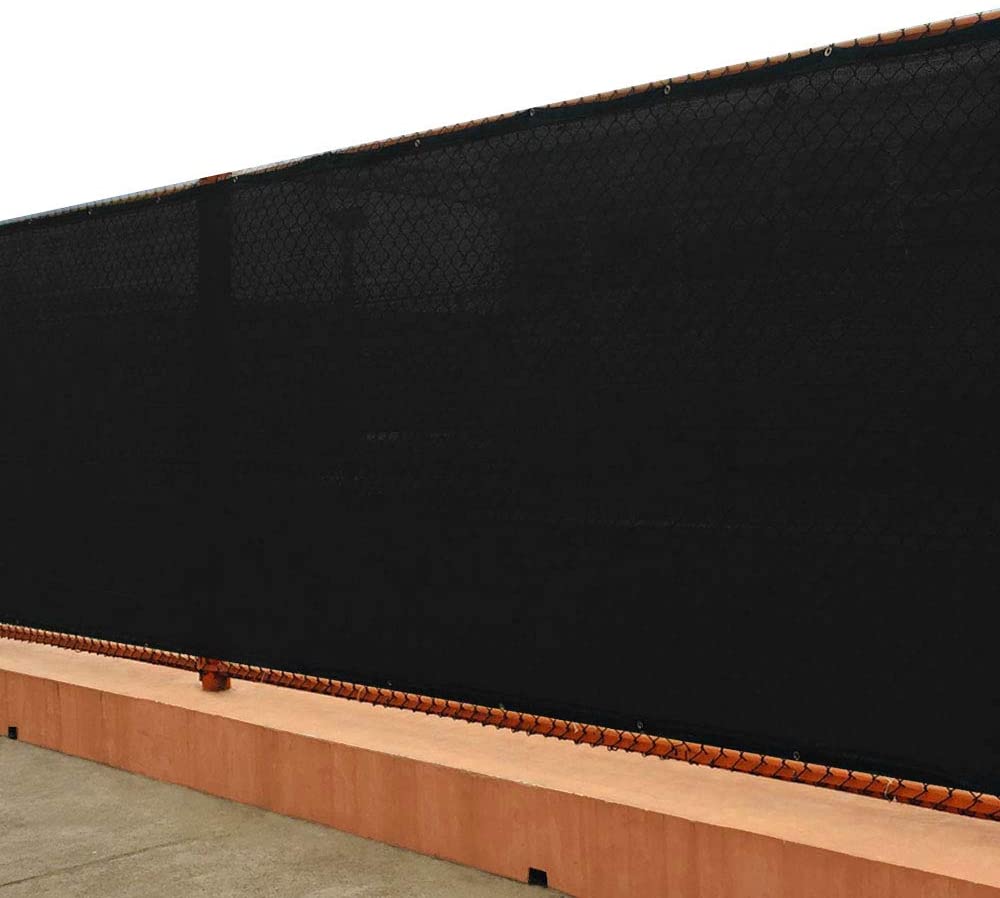
Perfect for Home, Court, Pool, Garden Yard or Construction,commercial grand. Brass RUST FREE grommets placed evenly on all 4 sides,3 grommets placement on every corner edge for extra strength.
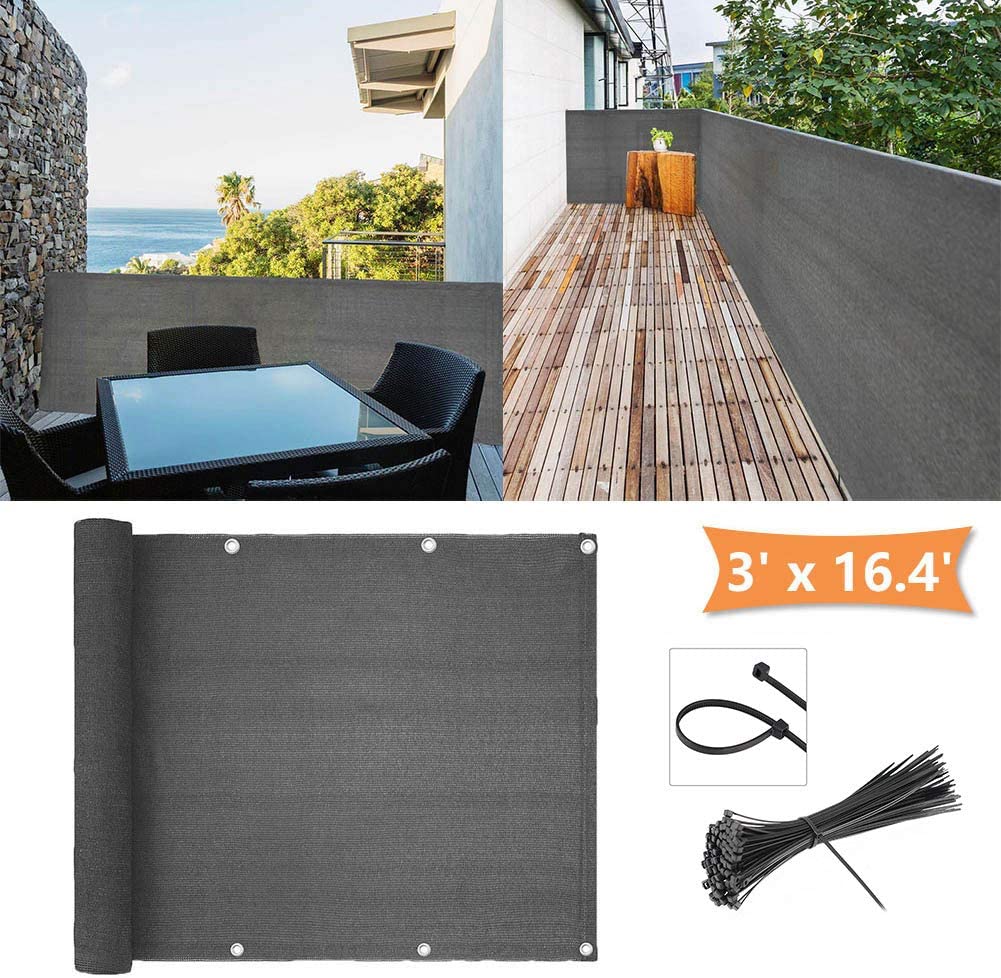
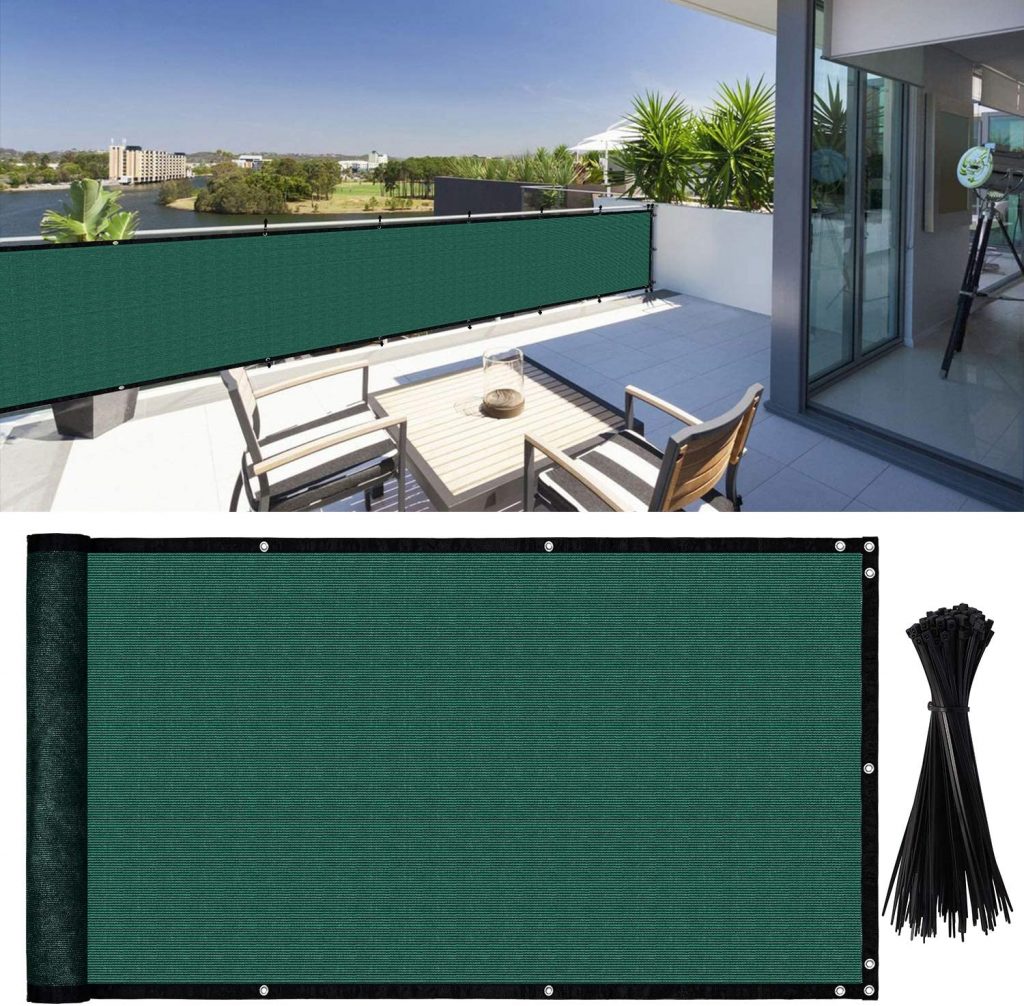
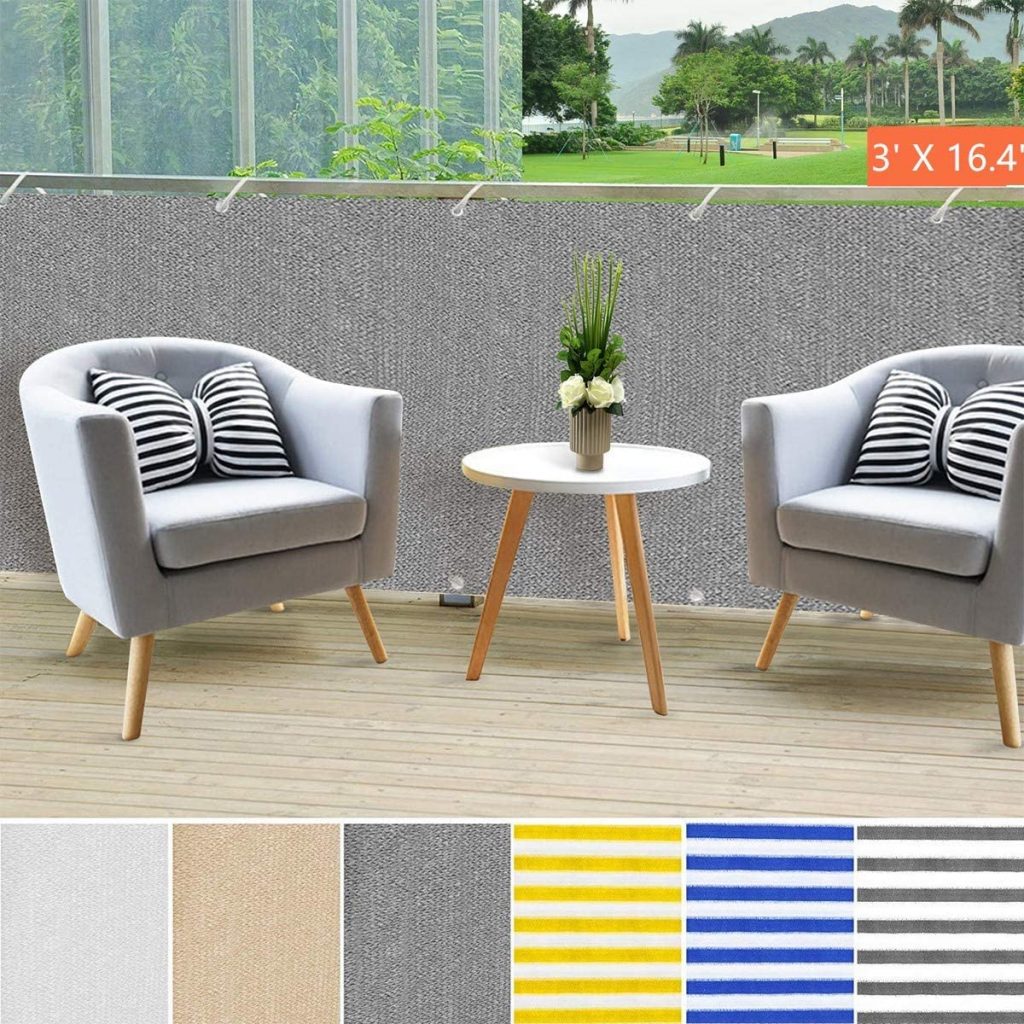
There’s no combination quite as safe as ___ and white.The balcony privacy screen is made from UV-stabilized HDPE to stand up to gusty wind, UV rays, resist fading, and retain strength for a long time. No combination is as stunning as classic and elegant grey with natural outdoor landscaping and many apartment styles to create a simple yet practical look. The balcony privacy screen will stop sun heat and provide up to 90% privacy. It allows outside air to pass through to ensure good ventilation for the balcony and can resist wind and rain to a certain extent. Can be used for balcony, welded wire fence, fence screening, chain link fence, patio, privacy barrier, outdoor paneling, porch, backyard, front yard, garden, deck and more.
Breathable and tear-proof, the Vicllax Shade Fabric is made of durable 185GSM HDPE material that will protect you from most UV rays. It comes in a set of 9 ropes that will allow it to be hung up easily. As it is made from shade fabric, it’s breathable and allows just enough light through to provide you with privacy from the outside world, without completely obscuring that beautiful view.
This PE creation can block 95% of harmful UV rays, lower temperatures, and create a cool area for anyone to enjoy. As its fabric is porous, it can help to create a comfortable space that’s especially perfect for summer outdoor activities. It can be folded and carried around anywhere you go. Bring your outdoor game to the next level by choosing one of these today. Have 4 pcs stainless steel D rings and 4 pcs 1.4m ropes , you can install it wherever you want. We recommend installing the awning at an angle of 20 to 40° to maximize drainage.
Never let anyone encroach your space with this patio privacy screen that effectively blocks 95% of UV and visibility, and maintains optimal air circulation at the same time. No more distracted dogs chasing after squirrels! Seals off the rest of the world so you can enjoy a bit of quality “me” time.
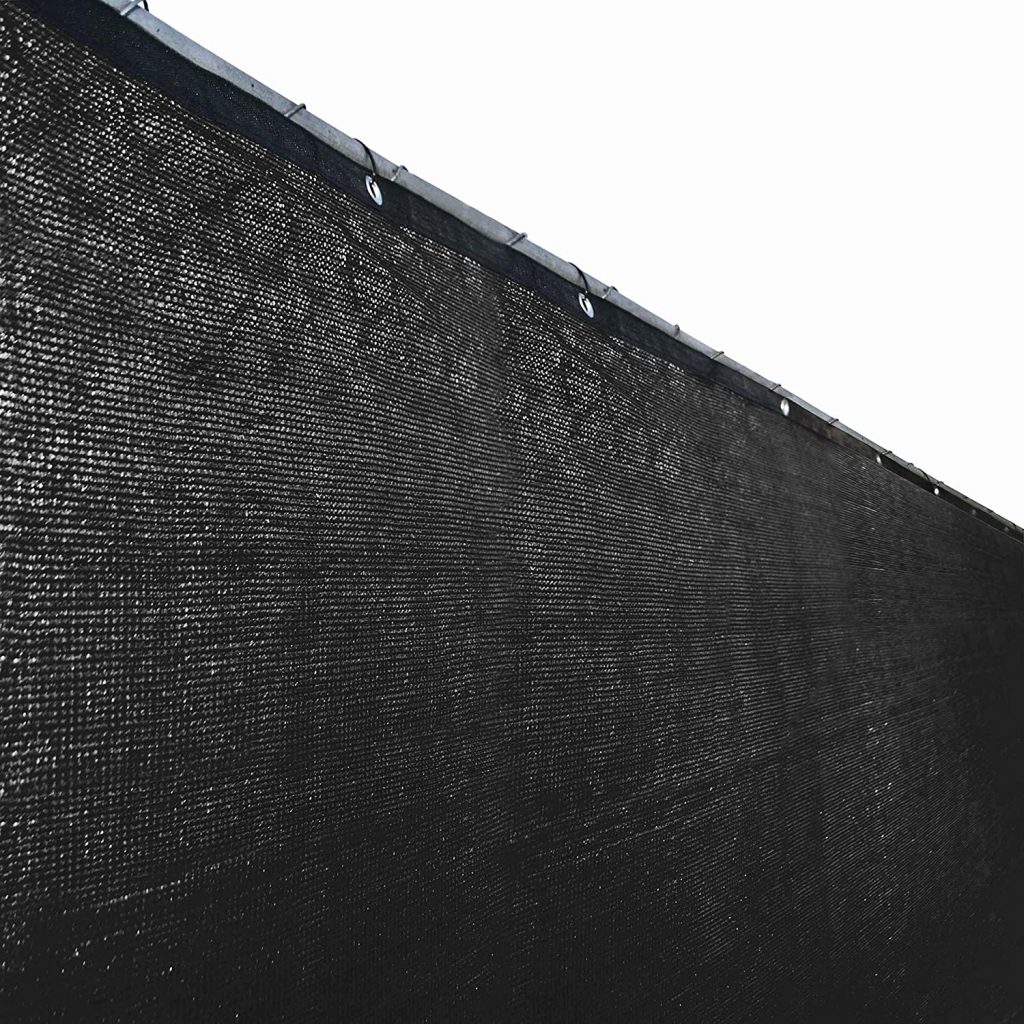
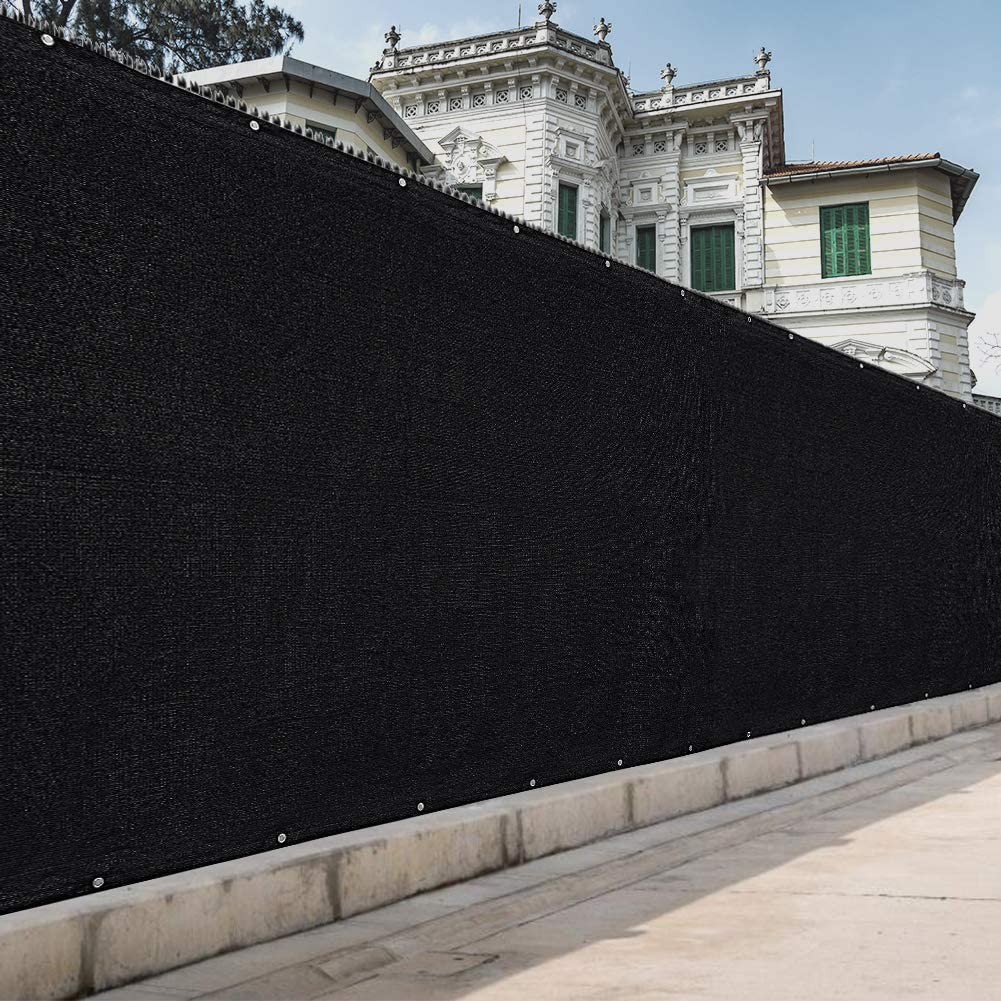
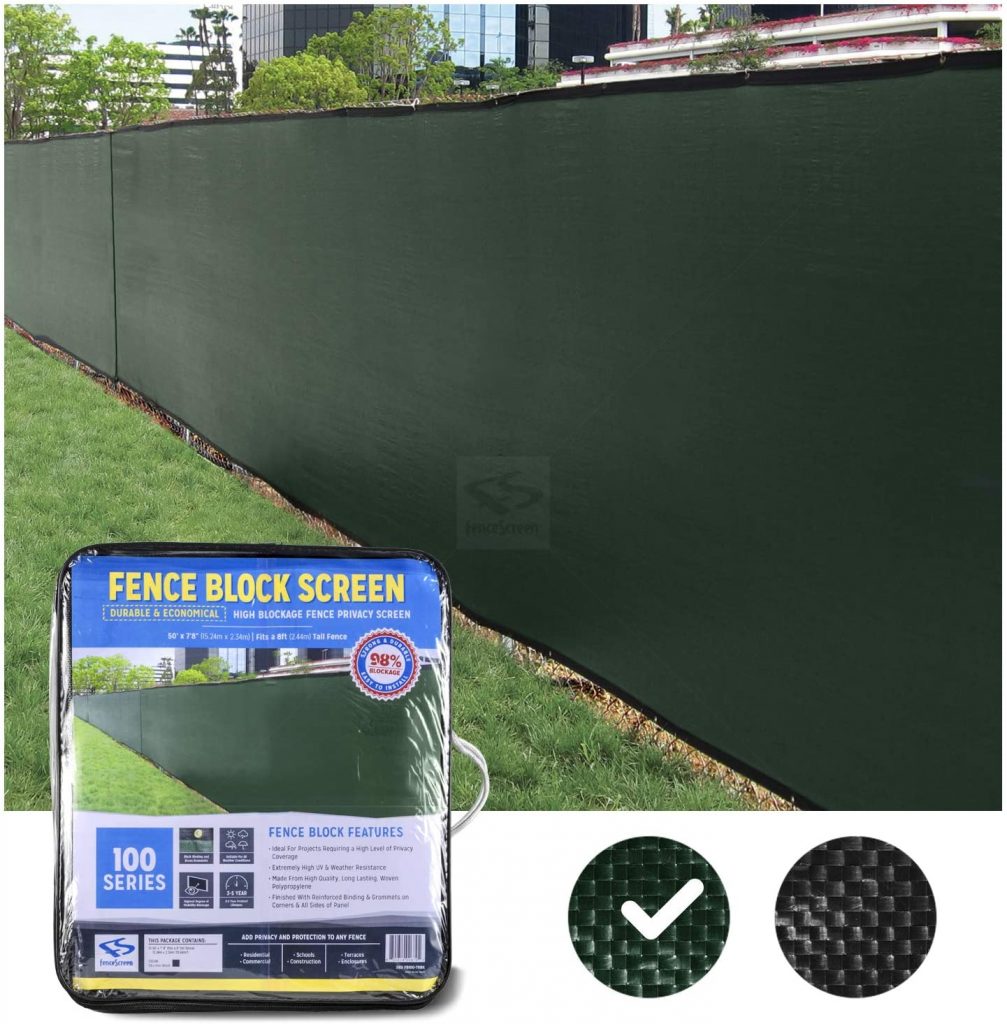
17. Amgo 4′ x 50′ Black Fence Privacy Screen

Want a stylish screen that does the work? Definitely try this fence privacy screen: not only is it easy to install, it also fits a 4 ft fence perfectly and can be secured using cable zip ties. Rest assured as it won’t burn a hole in your pocket, and it definitely pays off in the long run. Its edges are finished with heavy duty black bindings and stainless copper grommets, all stitching are reinforced, grommets are placed every 1 ft vertically, 2 ft horizontally, each corner has 4 grommets, easy to install with included cable zip ties.

HDPE balcony view protection with 22 aluminum eyelets. Easy to assemble, this privacy-securing option includes a total of 24 cable ties. High quality HDPE special cloth, tear resistance, weather resistance, UV resistance, fast drying, easy care. Measuring 5m long and 90cm tall, it’s the ultimate solution for your balcony, garden fence, patio or porch. It can be used for various purposes, among them as blind, sunshade and even protection against falling objects. Visual protection of balconies, covering garden fences, separating garden seats, cars and garbage storage. This shade fabric can filter out about 90% of ultraviolet rays, and the shading rate is about 85%.
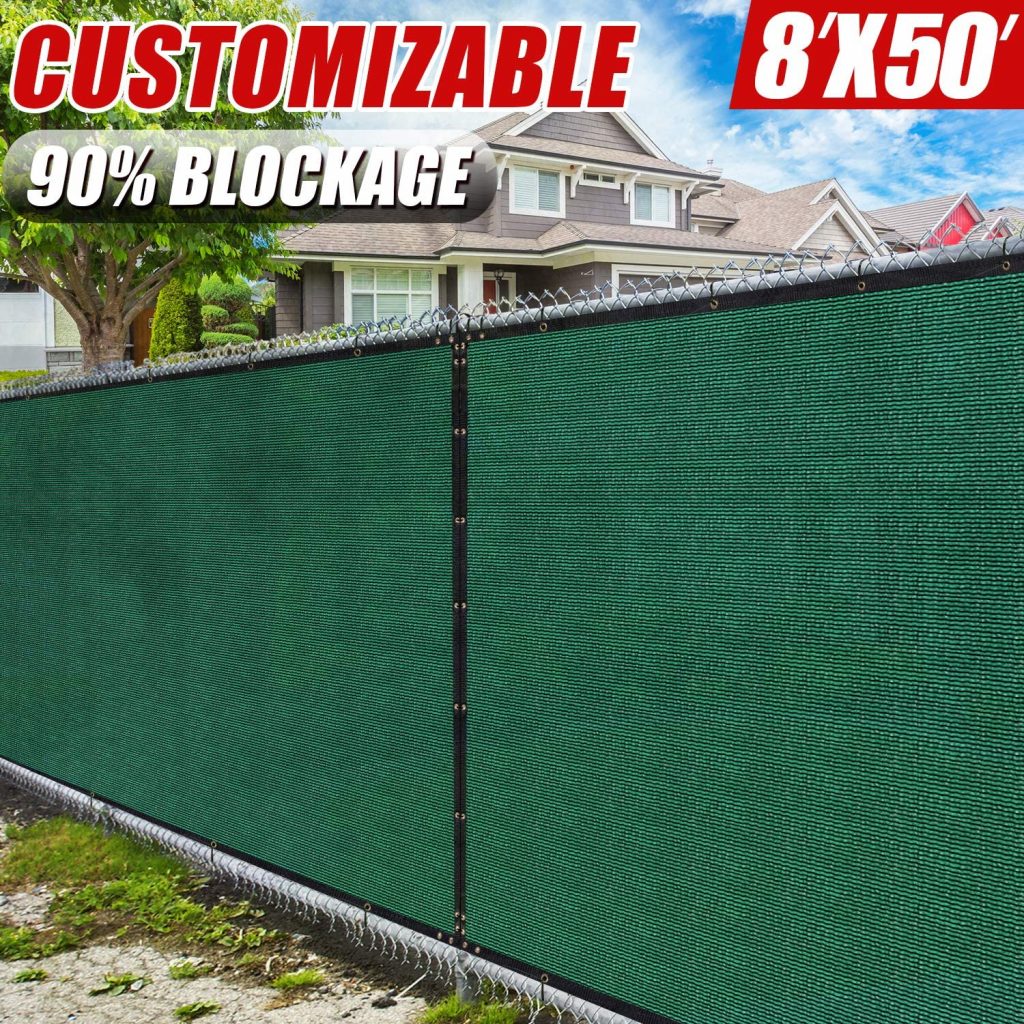
Thick and durable, protect yourself from up to 95% UV rays with this useful product. Choose from 4 different sizes of 6’x50′, 4’x50′, 6’x25′, 4’x25′ according to your needs/preferences. Equipped with an aluminum buckle for every 50cm fence, the package also includes zip ties for easy installation. It is ideal for creating privacy, offering UV protection and facilitating airflow. Perfect for use at home, court, pool, yard, farm or construction.
If you are looking for a product to last you for a long time, Sunny Guard privacy screen will give you the best results. It is made of 160GSM high density polyethylene fabric, which can effectively protect you from harmful UV rays. Whether it’s for your balcony, construction site, or garden fence, it’s suitable and easy to install. For each product, we use the edge to make it stronger, and every 19.7 inches, we use aluminum holes to make it easier to install.
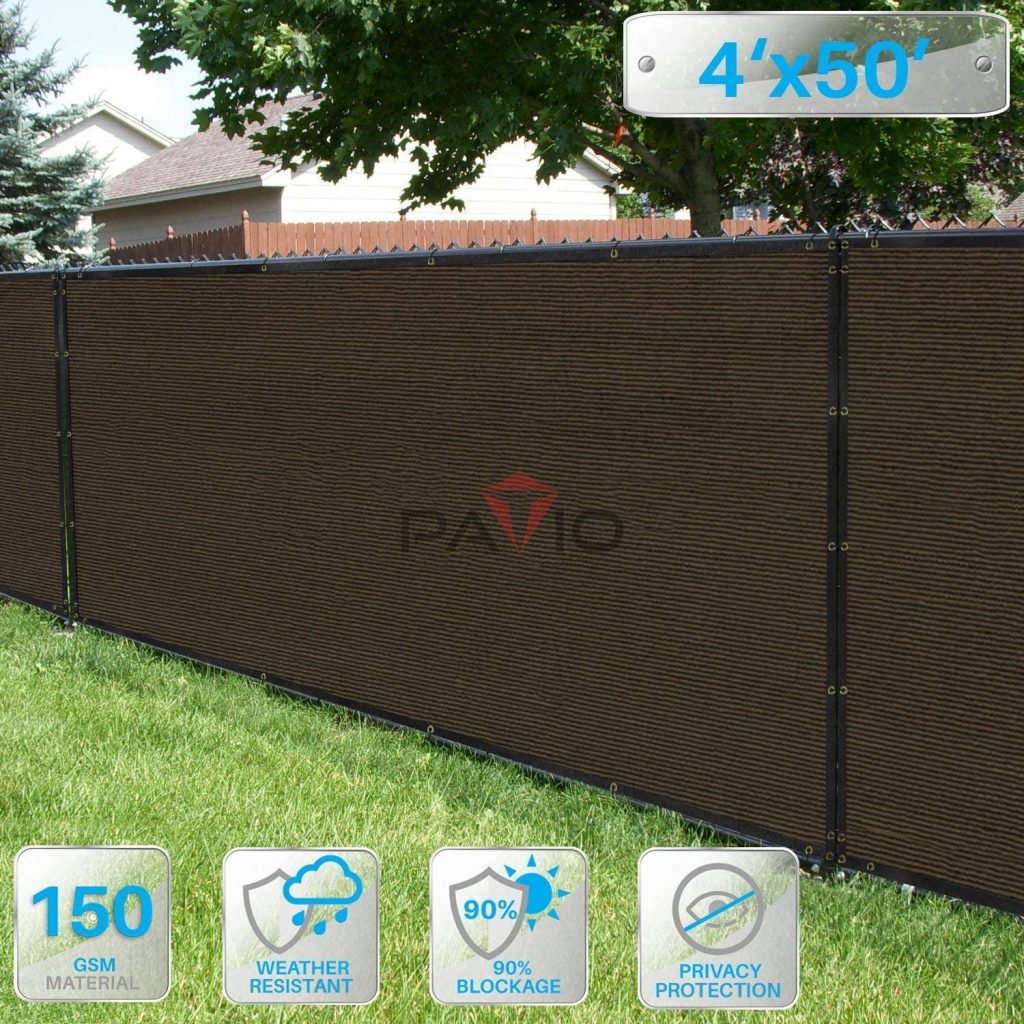
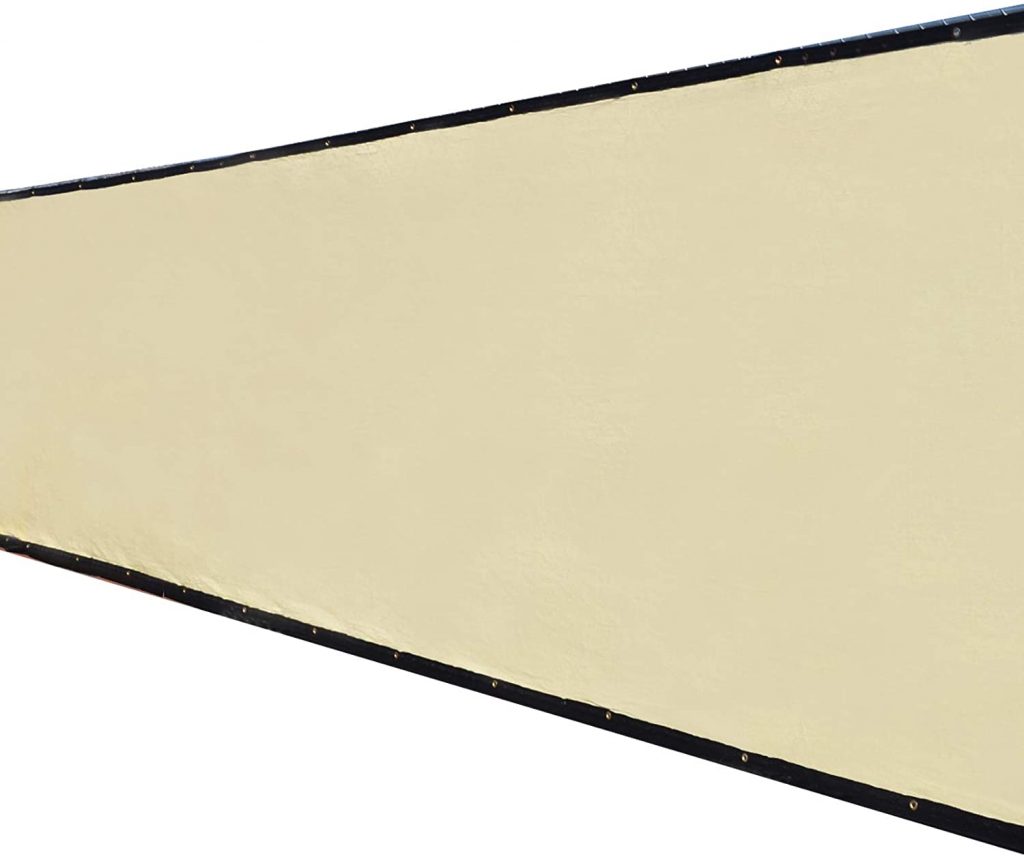
If you’re looking for an excellent long-term investment, this product is it: it measures exactly 50′ long x 3’8″ tall, making it a perfect fit for a fence that’s 4 ft tall. Constructed of new high density material- polyethylene, allows maximum air to go through. It will have no issue surviving extreme weather conditions thanks to its 2.5″ enforced binding. Your search for the perfect patio privacy screen ends here!
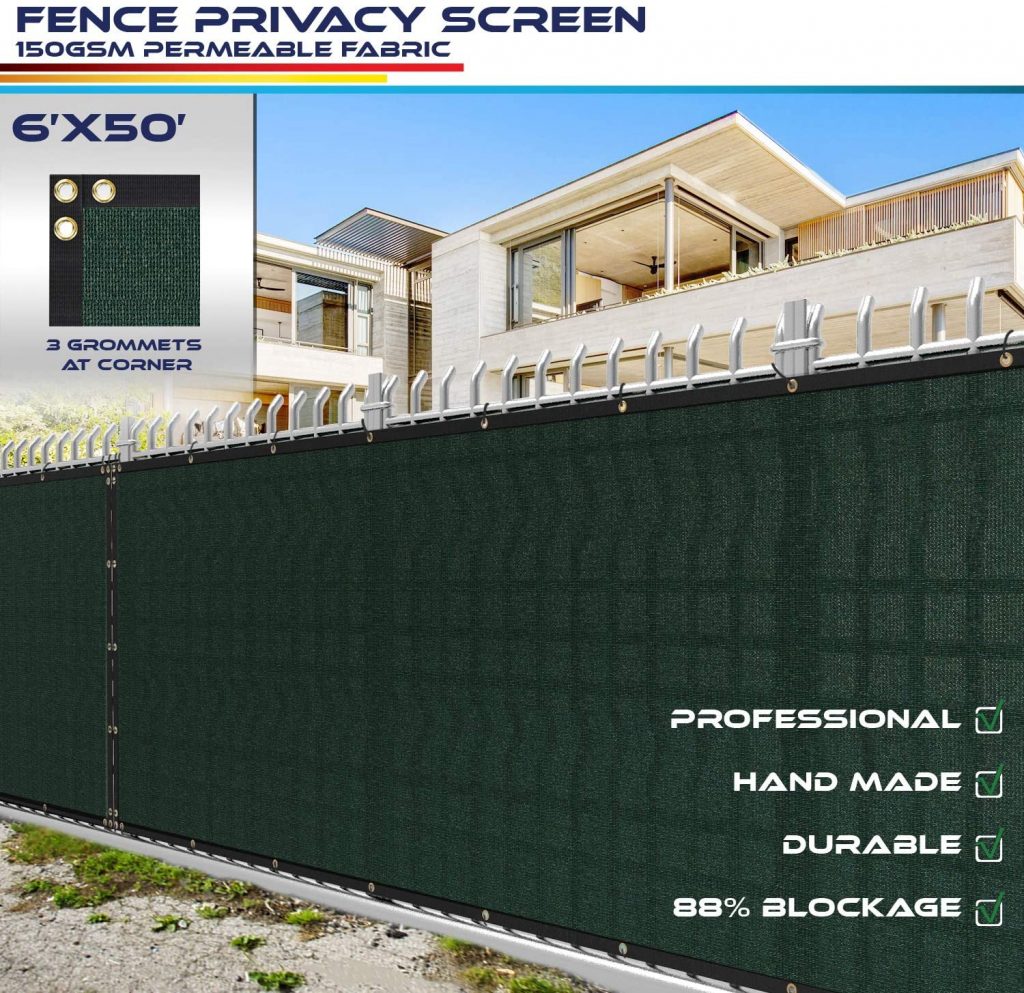
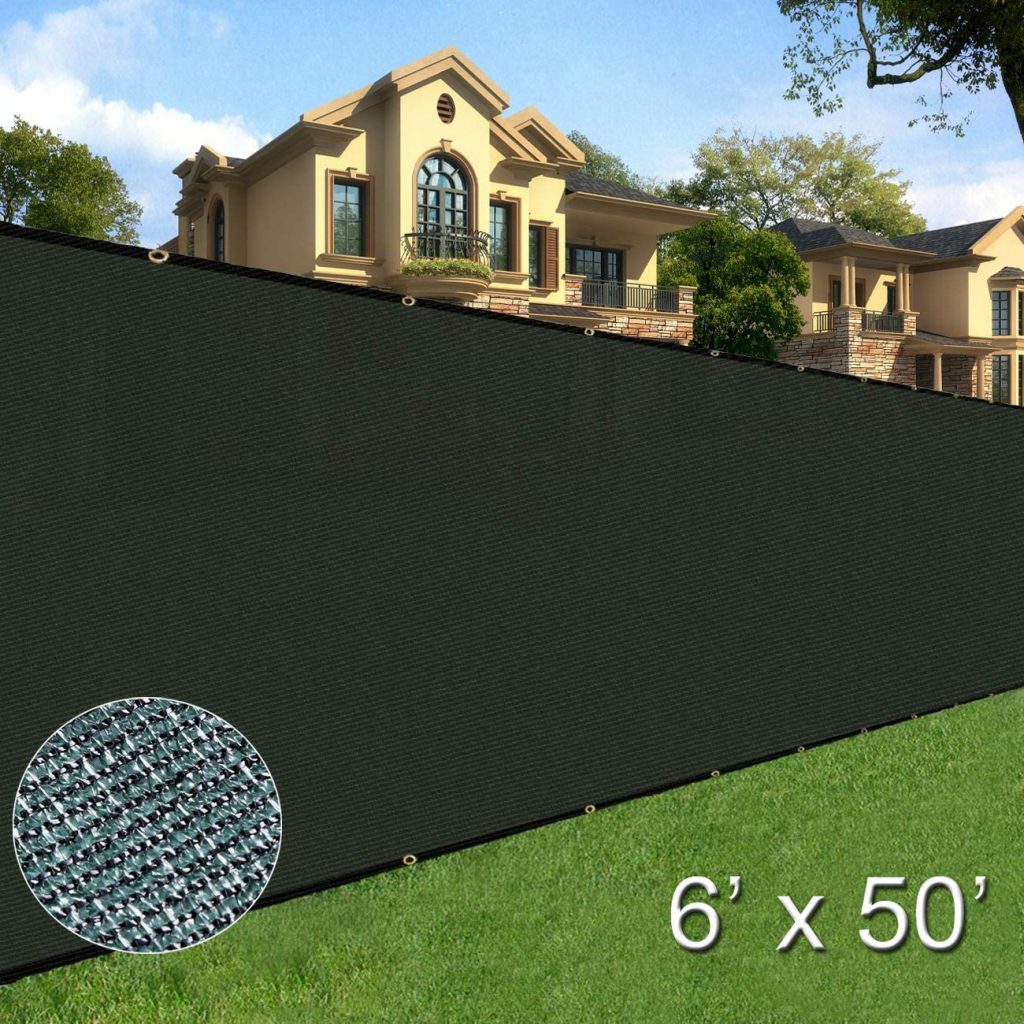
As its name implies, it’s time to give your patio an UPGRADE! Fence screen measures exactly 50′ long x 5′ 8” tall, just right for a fence that’ s 6 ft tall. fence privacy screen is constructed of 150 GSM non-recycle high density polyethylene (HDPE). From formal to casual, UPGRADE has it all, so take your pick. UPGRADE privacy fence screen can block harmful UV rays and decrease visibility up to 85%-90%. The fence screens are fully capable of protecting your plants and flowers from harmful UV rays and provide excellent protection.
Cooling and mold-resistant, this durable patio privacy screen can block up to 90% UV rays and doesn’t tear nor fray. Get a nice view of the outside world without having people snoop in on your private life. It features fabric that is able to reduce temperatures significantly, and all edges are covered with reinforced binding. Double grommets on each corner reduces tearing and retains strength. Overall, it’s the ideal shade solution to make your space cool.
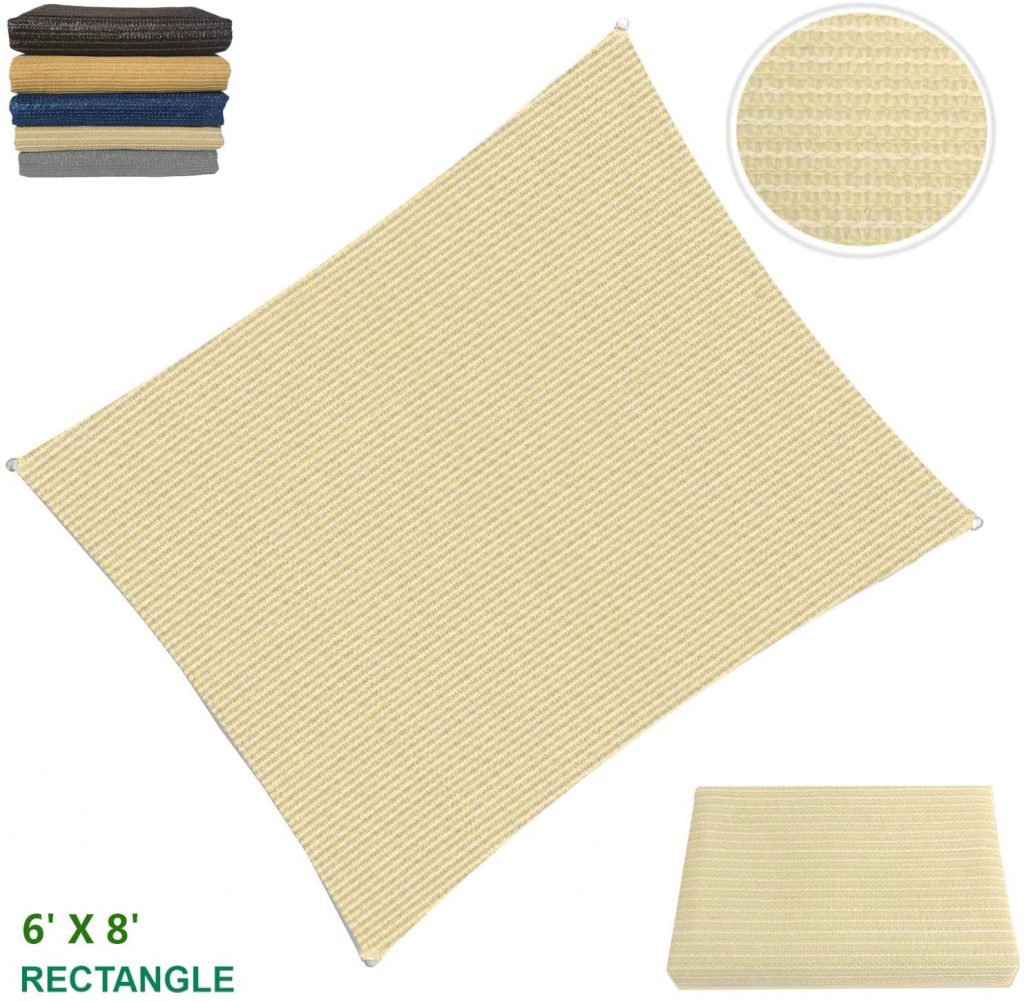
Set up your new sun shade sail in next to no time. This 185GSM New HDPE (high-density polyethylene) is easy to clean, non-toxic, and prevents water from accumulating. Blocks 95% of harmful UV rays while effectively reducing heat, providing cool, perfect for gardens, patios, lawns, swimming pools, bbq areas, driveways or other outdoor areas.

Durable and easy to install, this comes in a whooping 11 different colors to suit your preferences. Only High-Density Polyethylene materials are used to create our Privacy Fence screen. Durable and easy to maintain, they provide superb visibility blockage (86 – 88%) and UV protection. Here’s something that will never break the bank.
You can count on this patio privacy screen to do its job any day. With excellent visibility and UV ray-blocking capabilities, it can reduce the impact of gusty winds. Prioritizing visibility, sun blockage and air flow, this economical and attractive outdoor privacy allows smooth air passage. These hold up well even with constant use and are definitely worth every cent you pay.
Featuring 2.5″ binding and rust-free grommets, this 50′ long x 3′-10″ tell screen looks and works great. Visibility Blockage: 88% High quality polyethylene knitted design privacy screen. Aluminum RUST FREE grommets placed evenly 12” / 24” O.C. on all 4 sides. Double grommets on every corner edge for extra strength.
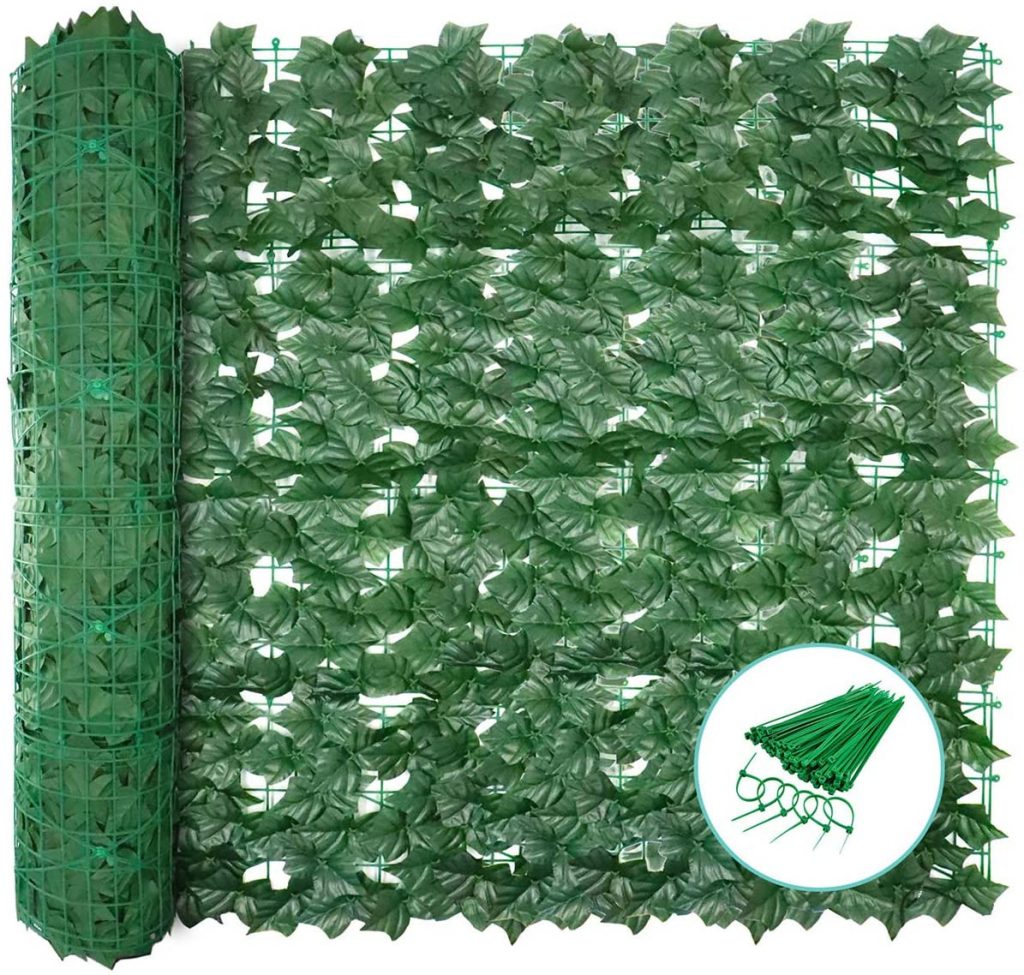
The Privacy Fence Trellis made from Top-quality P.E. materials 100% free of toxic chemicals. Its realistic-looking artificial leaves block harmful UV rays and are resistant to wear and tear. Lightweight and easily-assembled, it can be maintained simply by using a water house to rinse off any existing dirt or dust.

UV stabilised and with high-blocking ability, this 50′ long x 5’8″ tall black fence is made from 100% High quality PURE virgin polyethylene and fits perfectly 6ft tall fences perfectly. Visibility blockage: 88% 140GSM. material for maximum UV stabilization. It’s strong, stable and does exactly that it’s supposed to do.
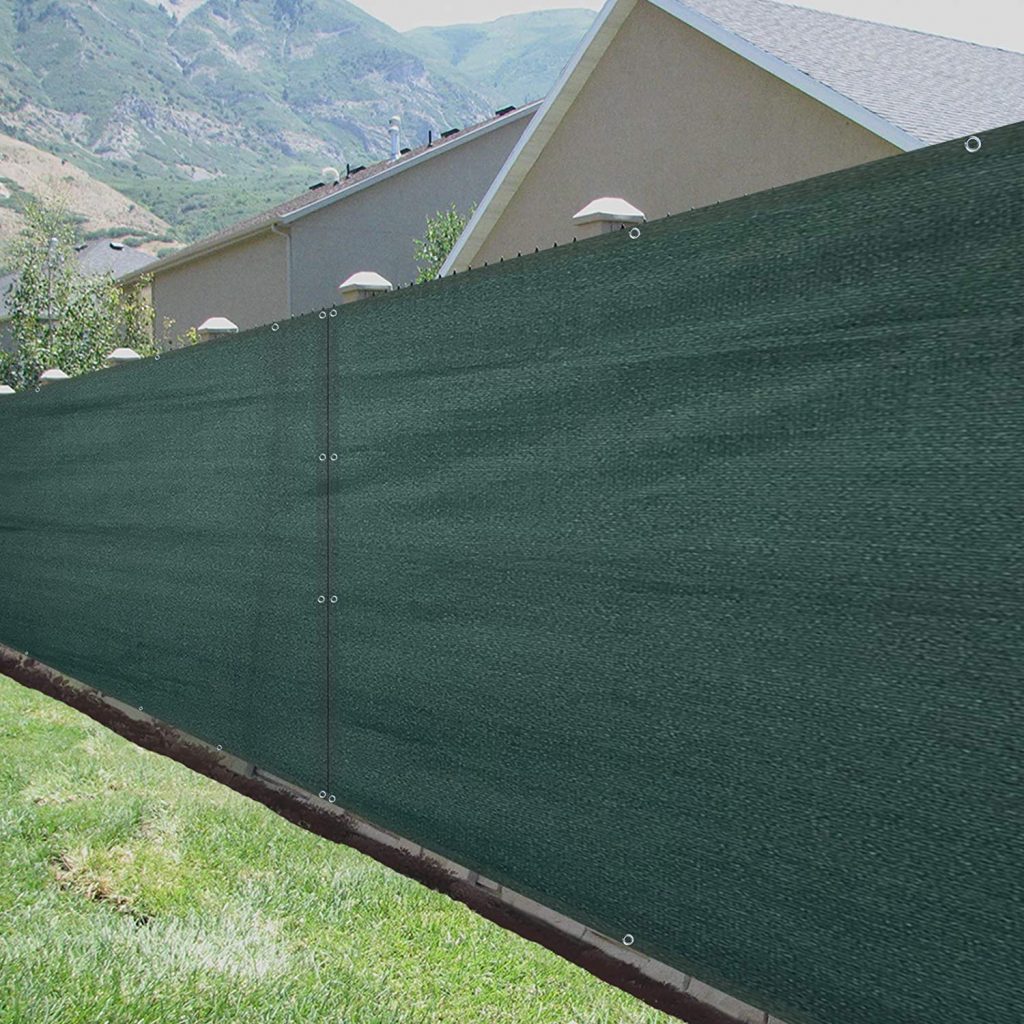
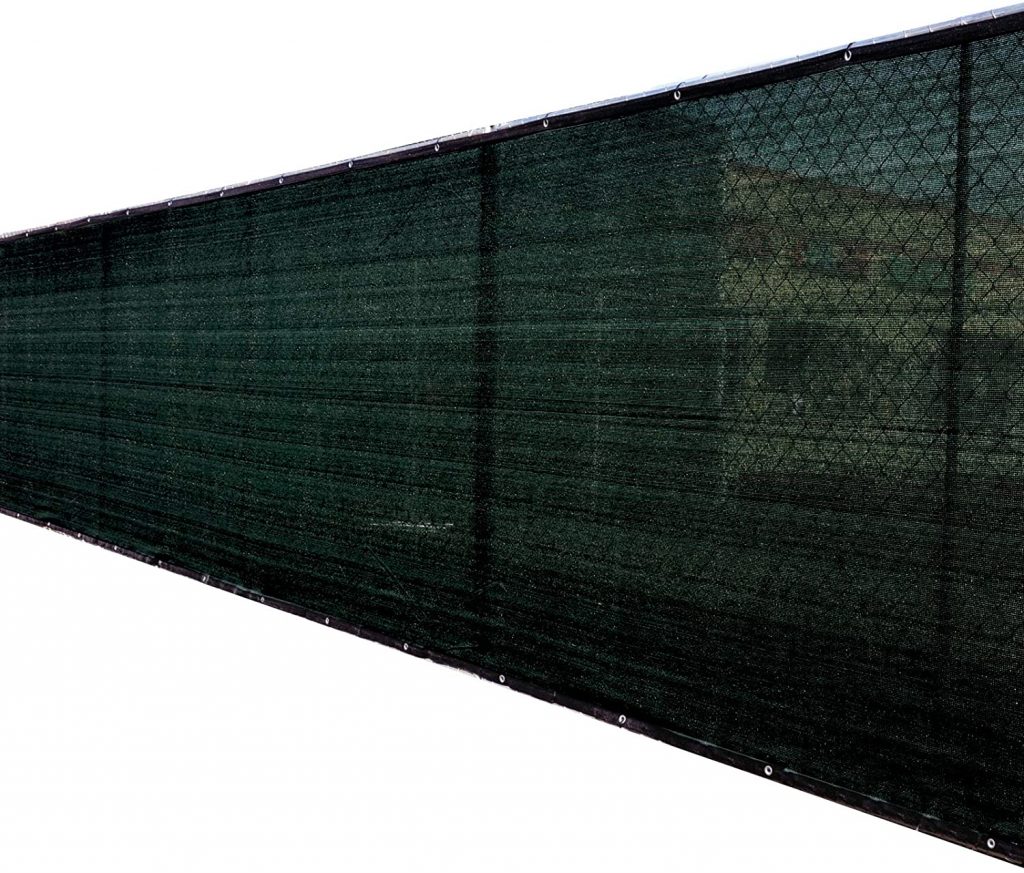
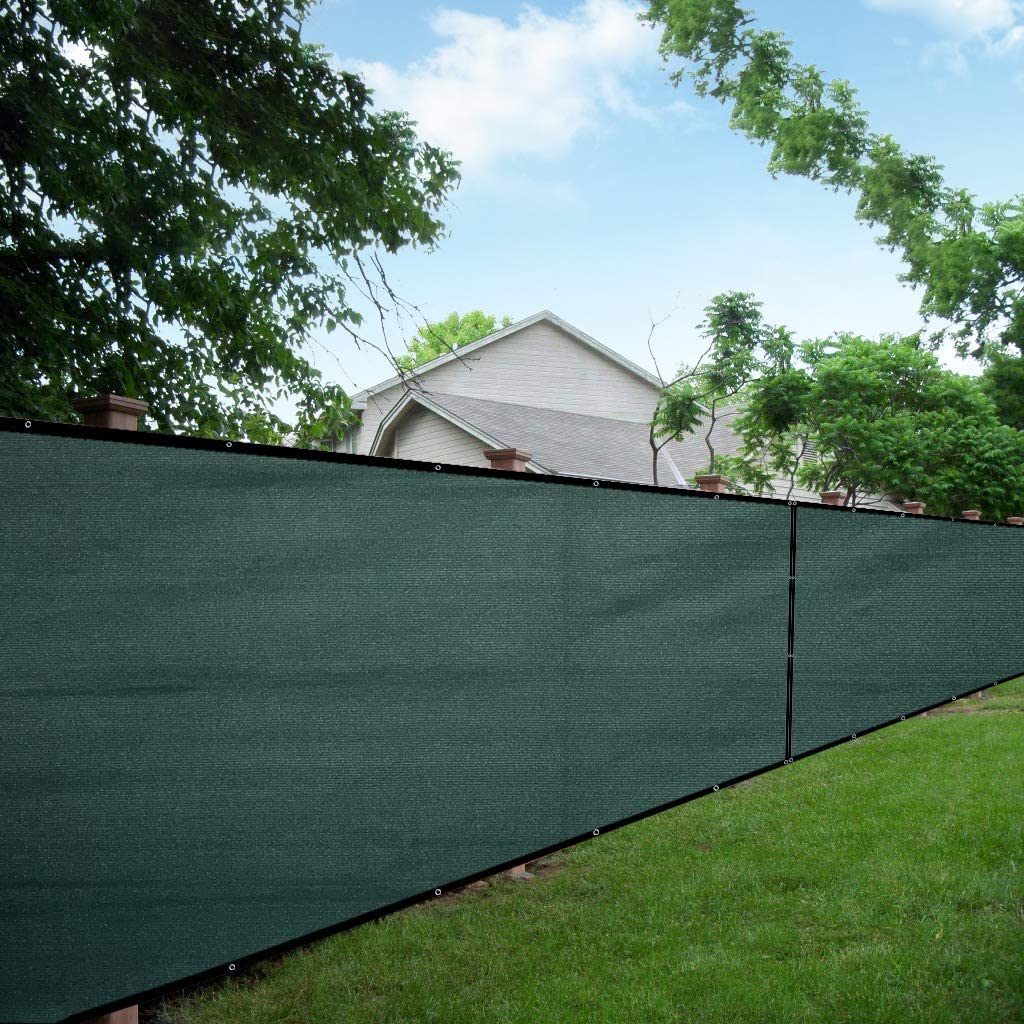
Featuring a never-rust, never-corrode build, the 5ft-8in Tall x 50ft Long Green Privacy Fence Screen is a reliable choice for not just your patio, but other areas such as pools and backyards. They are able to fit 8-ft fences.
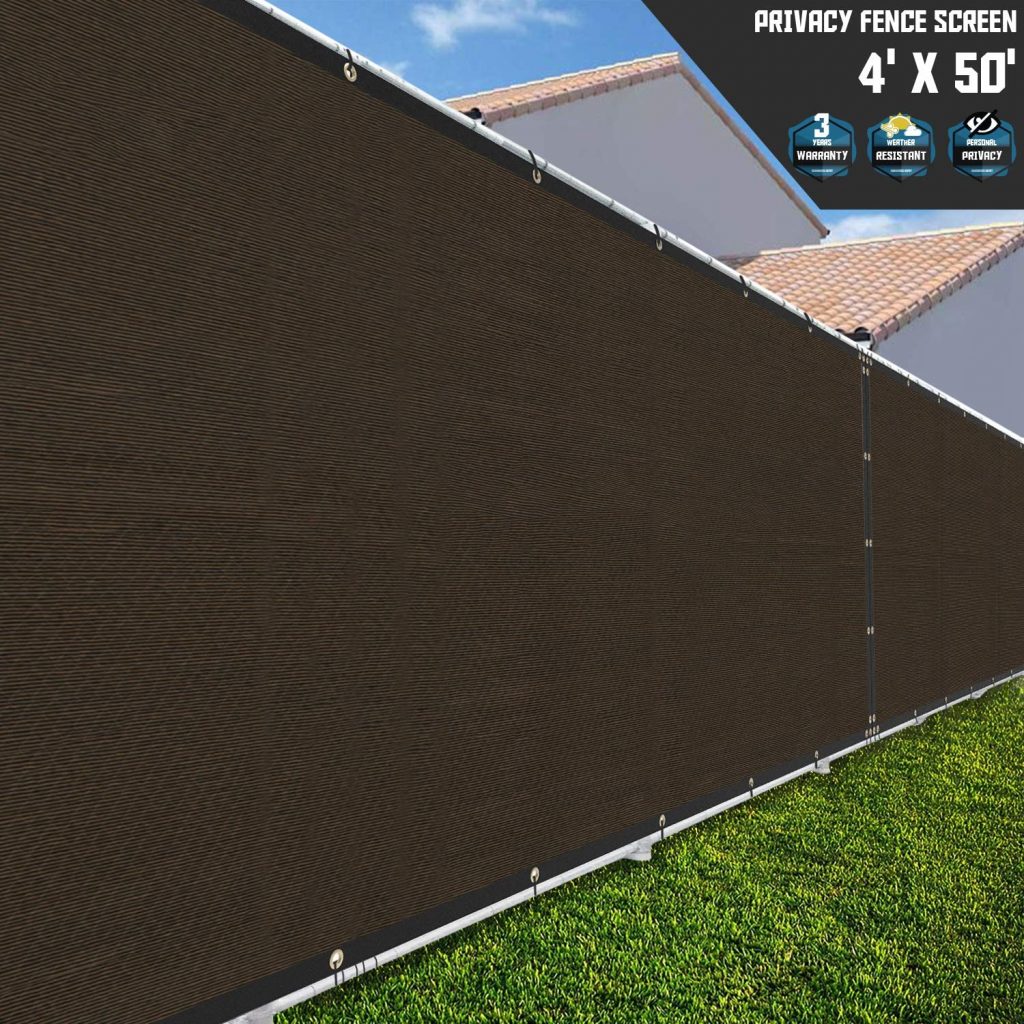
At 3’8” tall and 50 feet long, this fence is suitable for a 4 feet height fence panel, The fabric used is not a solid brown, but rather an interwoven mixture of light to dark brown shades. Knitted with 100% High quality PURE polyethylene material for maximum UV stabilization.
DearHouse privacy screen cover will block off 95% of the sun and provides UV protection. We provide you with 35 pieces black zip ties. The Privacy Cover is widely used in Porch Deck, balconies, warehouses, etc. The Fence Screen can be a Shading net, a Sunscreen Insulation net, which can be used for privacy protection, Sun Shade, Windproof, Cooling, anti-storm, moisturizing, others. The Balcony Privacy Screen Cover is water resistant and durable to use! It can be the shade cloth/privacy screen/patio shield/sunscreen in different weathers, like strong sunshine sunlight, hot temperature, humidity, rain, snow!
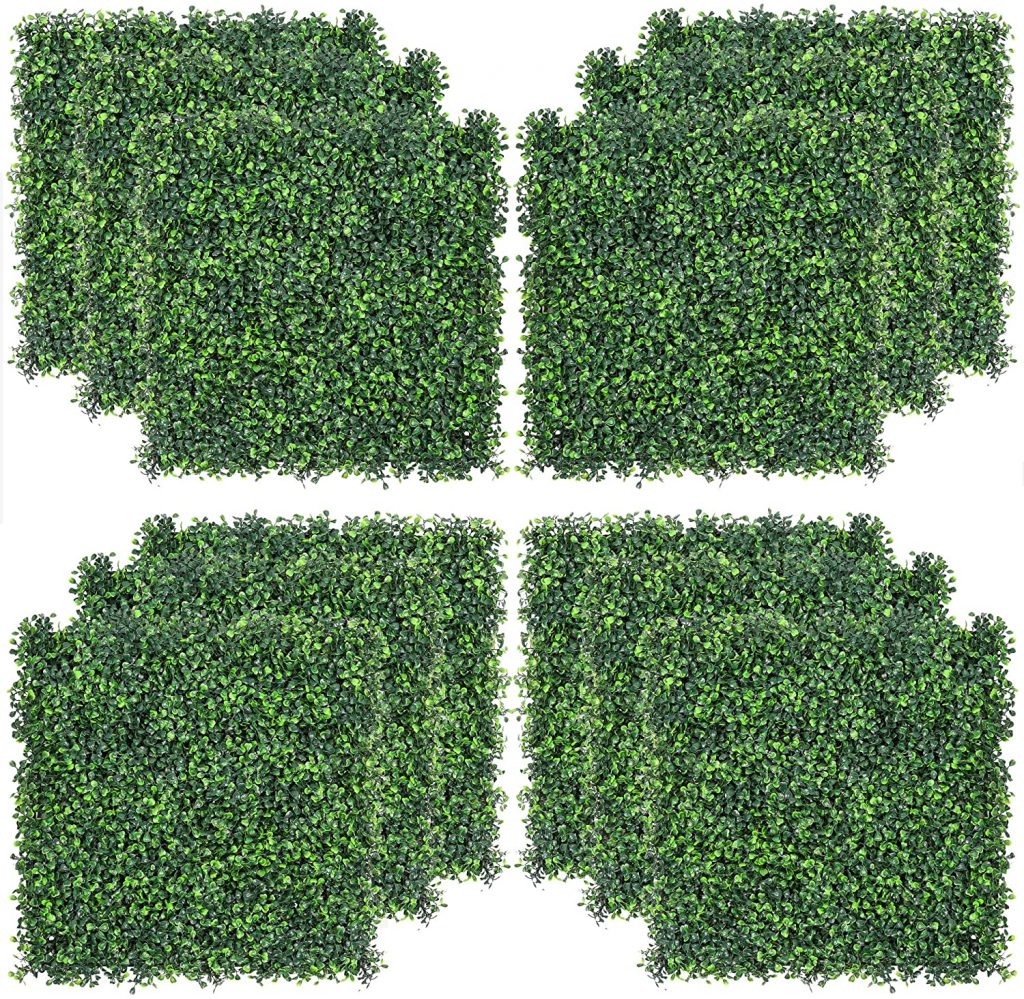
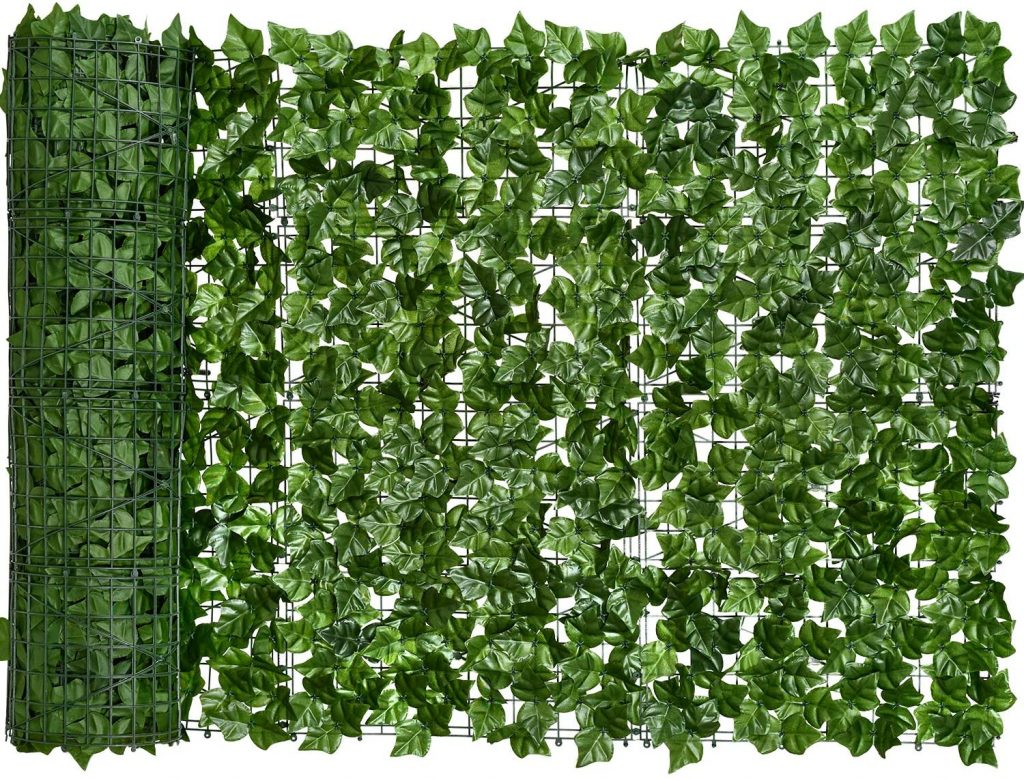
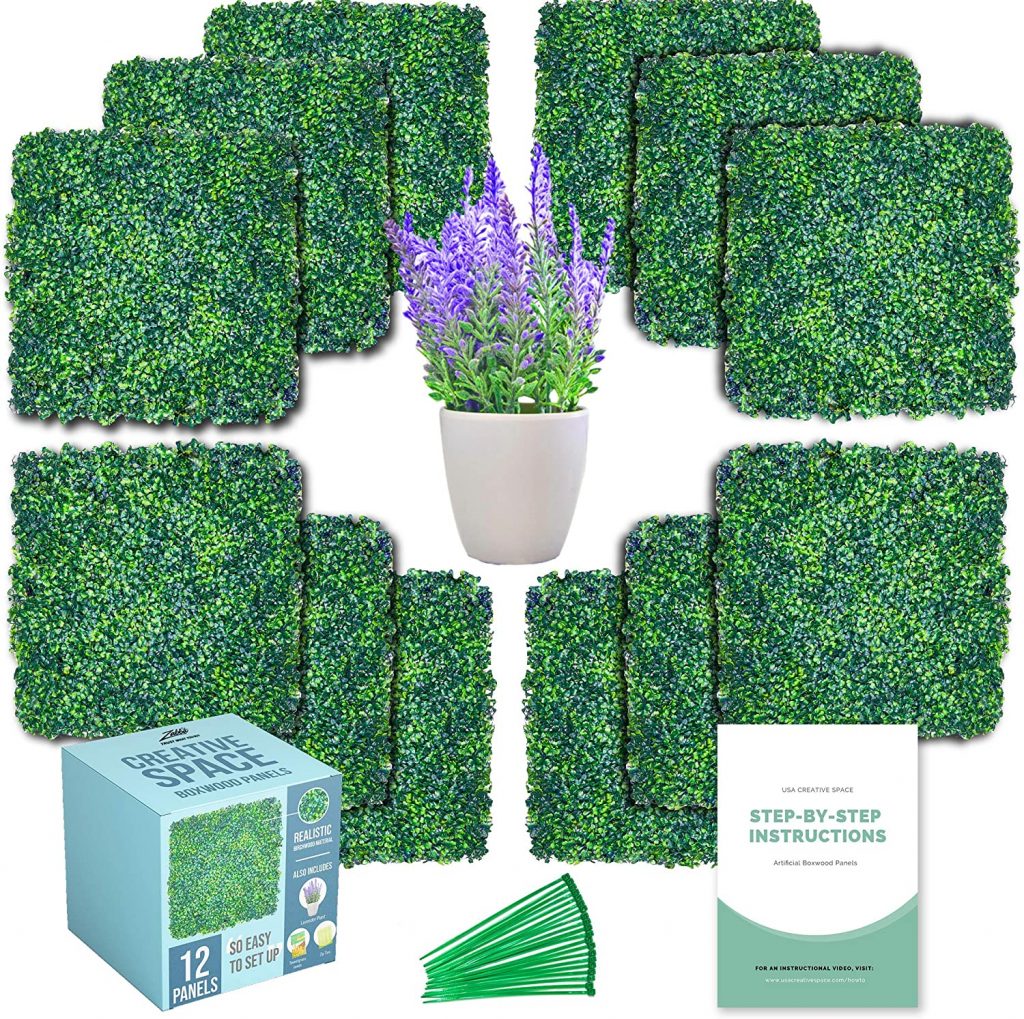
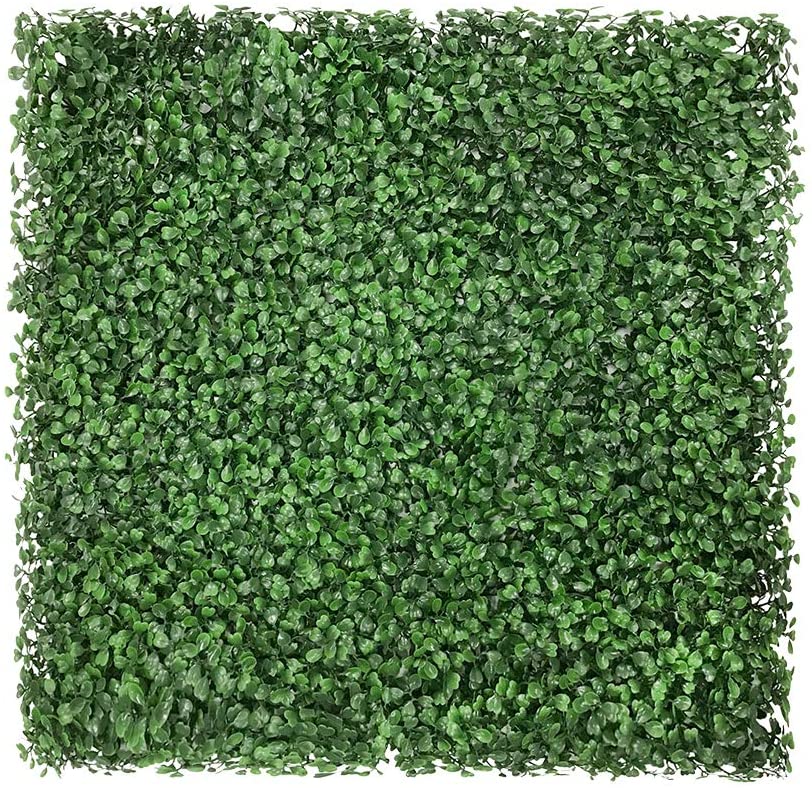
Each greenery leaf panel provides 20″ x 20″ of coverage and is available as a single panel. Greenery panels look great on walls, fences, and more. Perfect for residential and commercial Indoor or Outdoor Garden Decor. The greenery panel has 19 grids per row, which is different from the 17 grids on the market. It looks more dense and more realistic. Each panel features interlocking connectors for easy do-it-yourself installation. Greenery panels are made of new PE material, soft to the touch. If the leaves are squeezed, just flip the leaves gently to restore the restore their appearances.
Perfect for home, pool, garden and more, this item fits perfectly for onto a 4-ft tall fence and blocks out 88% of objects/people on the other side. It’s made from high-quality material and comes with a 3-years limited warranty for greater ease of mind. Fabricated with 2’8” black binding with double reinforced fabric on all edges for maximum life span.
Complement your home with this innovative product! These patio paradise privacy fence screens are made of 100% pure brand new high quality pure polyethylene. These fence screens provide durability, are high in privacy rating, and improve air flow circulation. Not only does it not ruin the aesthetics of the space, it adds functionality as well.
There’s nothing quite as annoying as nosy neighbours trying to pry, so don’t let them get their way with this privacy over chain link fence, which keeps out people and animals alike. No maintenance is required as this is resistant to the elements.
Quickly assemble your dream garden-screen with this 100% realistic option that covers 33 sq. ft. of space with a 4-5 layered surface, 400 stitches per mat, coming in an exquisite dark green color. It’s a more “natural” yet cheap option to protect you from the glaring sun. Create your own little sanctuary today!
This balcony privacy screen ensures that your area is kept private. It’s easy to use, weatherproof, and works as described. Use it for condo/apartment balconies, backyards patio and gathering areas, pools and patios, or anywhere you need a bit of privacy. Balcony privacy cover even if harsh weather easy to clean and dries super fast, made from hdpe also making it tear proof. and Patio privacy cover help keep dogs from barking at everything that moves. Economical and attractive outdoor privacy that allows maximum air passage. Retain material strength. Provides 90% sunshine protection. Helping to protect your eyes and skin from damage caused by the sun.
KANAGAWA privacy fence screen is constructed of 150 GSM UV protected non-recycled hdpe fabric with durable brass Grommets on each side. The Fence Privacy Screen measures exactly 50′ Long x 5’8″ Tall, perfect fit for a fence that’s 6 ft tall. The unique knit design of the fencing screen provides 90% visibility blockage to protect privacy in your yard. It allows air and wind to pass through and stretches tight for a wrinkle-resistant look.
Safety is first with Cardinal Gates: keep your little ones safe from openings on your deck or patio with this patio privacy screen. You can choose from either black or white, and the roll comes in a 15′ row. Rest assured that it will last for a long time, as it is more than 7 times thicker than standard Cardinal Gates deck netting. UV-rated and guaranteed to last for years, you can’t go wrong with this product.
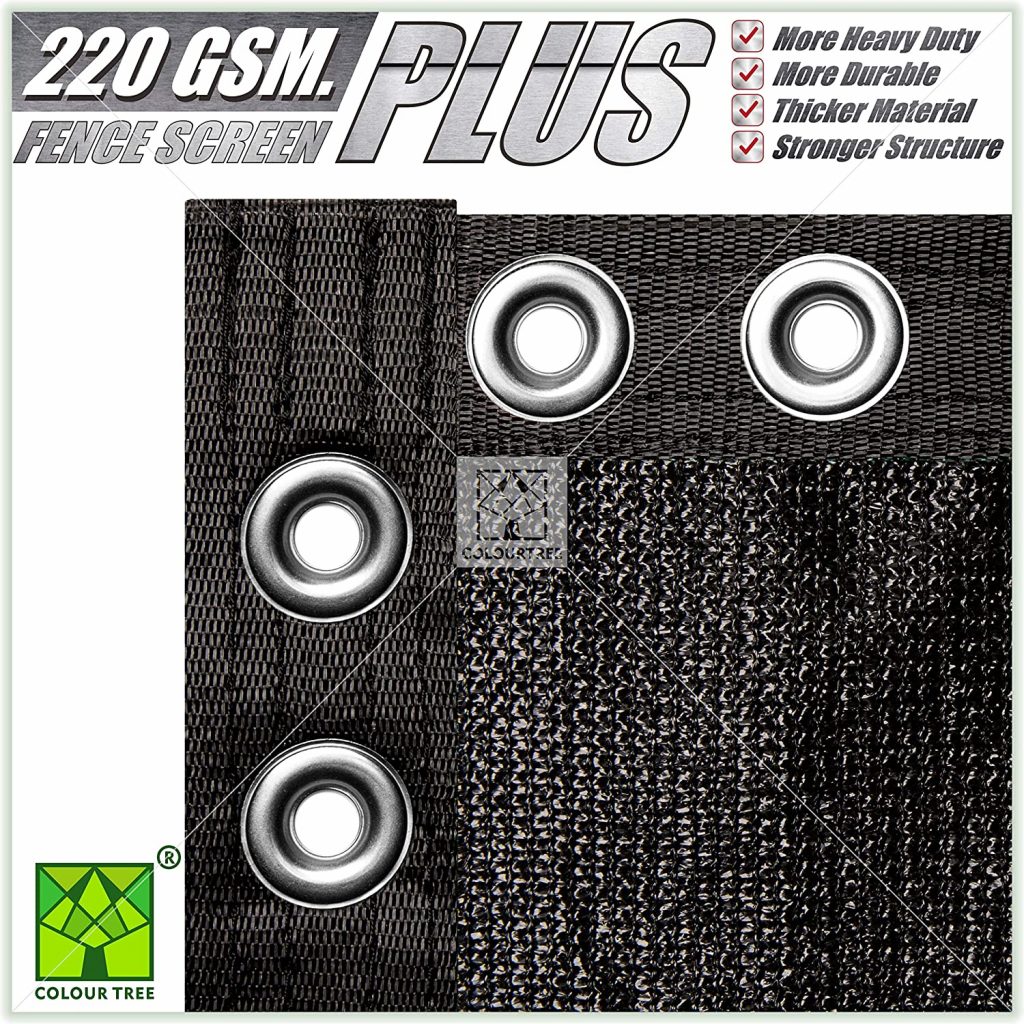
Durable? You bet. This is the only fence screen on the market that is made of 160 GSM 100% virgin (Non-recycled) HDPE material so far. The fabric has gone through intensive testing of up to 20000 hours, and proven itself to be a cut above the rest. Block them out and sunbathe in peace.
Great quality and easy usage go hand-in-hand with this 200 GSM new high density polyethylene(HDPE), which allows breezes and light to pass through it for a more comfortable space. The fabric used blocks out light and obscures objects from view for 100% privacy. The product measures 50’long×5’9”tall, and is suitable for 6ft height fence panel or chain link fence. 3.5 cm flat double-needle edging makes it stronger and more durable all around. Corrosion-resistant aluminum buckles are evenly distributed around the fence and anti-oxidation treatment of fence screen, which is more durable and extends product life. Privacy Screen can be used in all seasons, under all kinds of weather conditions like snow, wind, rain etc.
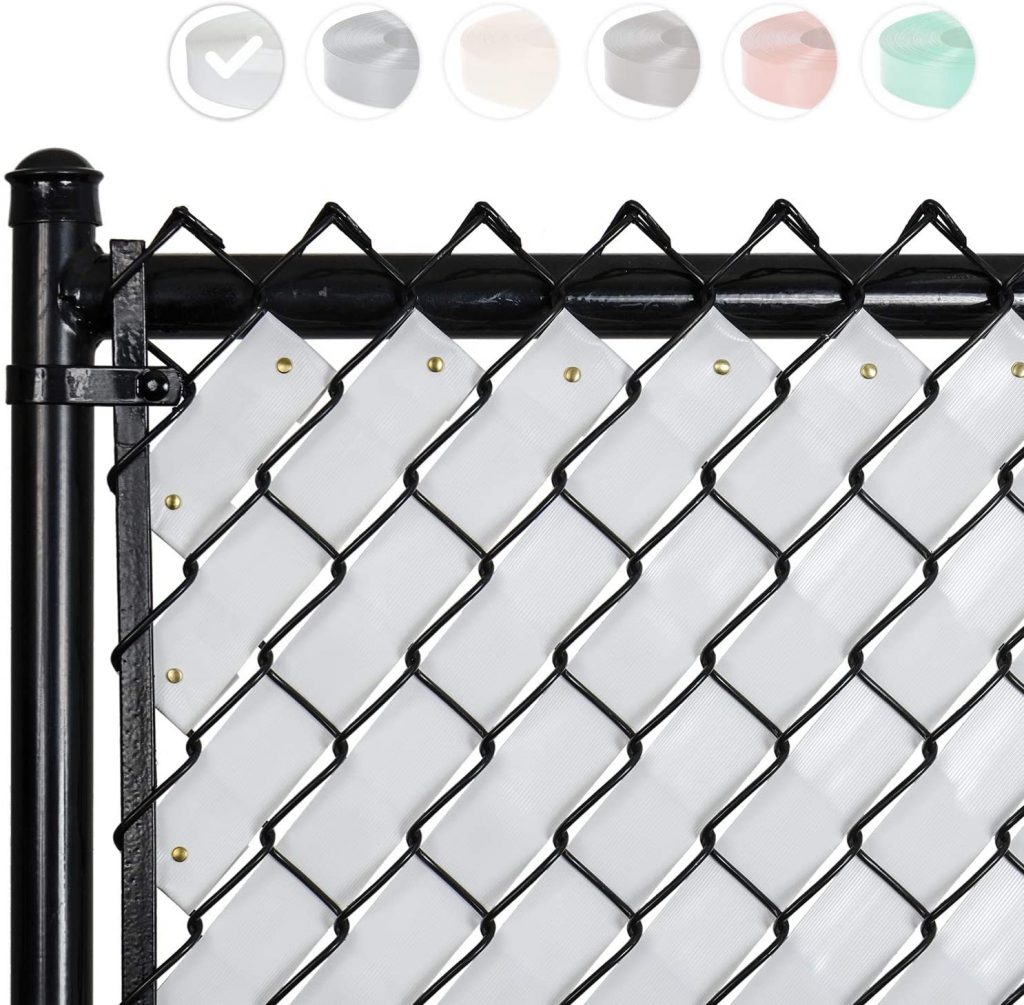
Fenpro Fence Privacy Tape is extruded from Low Density Polyethylene (LDPE), color pigments, and ultra violet (UV) inhibitors, specifically designed to protect from the harmful effects of the sun and lengthen the life of the product. For nearly two decades Fenpro carried a complete line of high-quality fence tape, fence slats, and hedge slats that can fit your chain link fence. Fenpro’s fence slats are designed to offer great privacy and security without compromising the integrity of your fence and bring color to your bland fence.
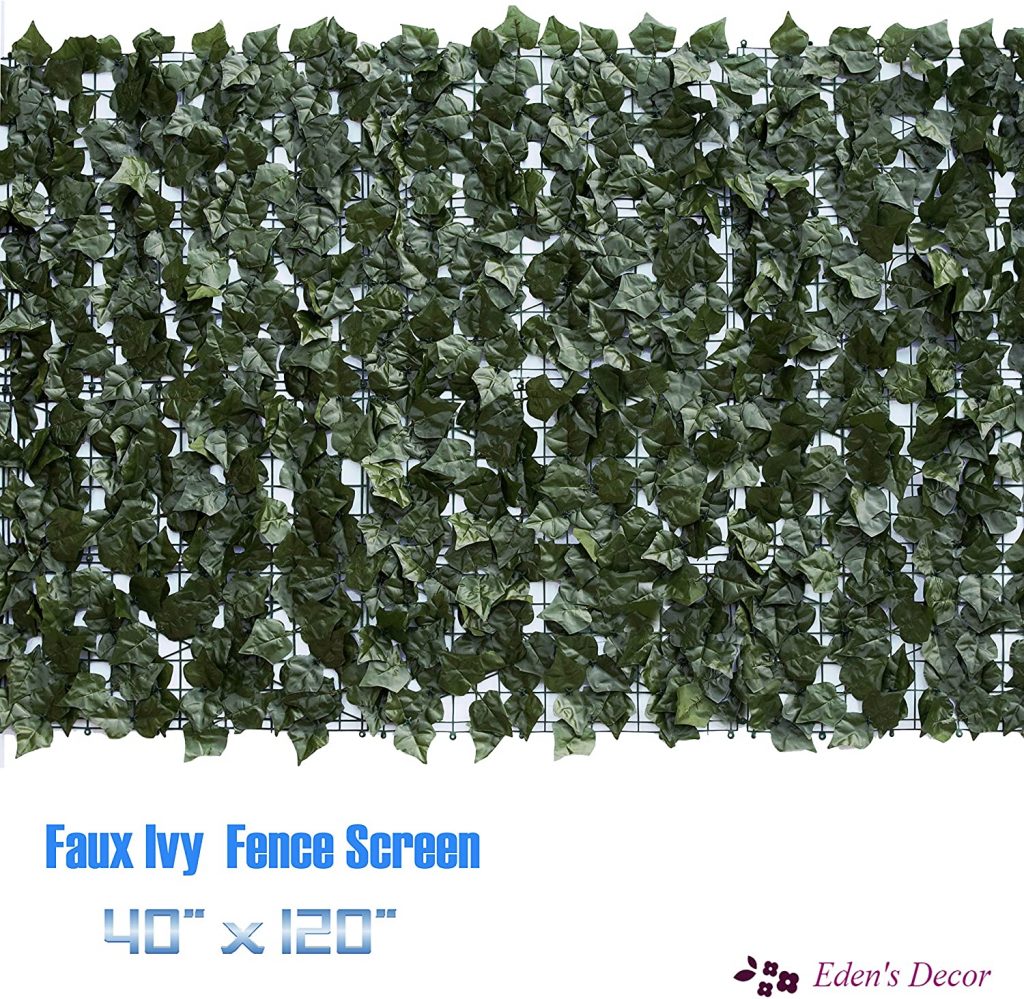
Eden’s Privacy Fence Trellis made from Top-quality P.E. materials 100% free of toxic chemicals. Realistic-looking artificial leaves block harmful UV rays and are resistant to wear and tear. Easy to clean & can be rinsed off with garden hose, Faux Ivy Leaf Screen excellent for patio, balcony, deck, and backyard. Can use for indoor decoration, will fully match & compliment your home design & furniture. Light to carry & easy to install, can be easily attached to any frame or chain-linked fence. Provides you enhanced privacy & decorates your living space.
Faux Buxus Privacy Artificial Greenery Plant Screen panels for Indoor Outdoor Backyard Garden Decoration made of 100% fresh PE so it lasts longer compared to recycled material. Size: 20” x 20” tiles. Decoration that can be applied to any surface. Simulates a natural outdoor appearance of luscious greenery without the hassle of the upkeep. Odorless and cost effective compared to most other landscaping projects.
Ecoopts’ boxwood hedge faux tile panels are made of new PE High Density Polyethylene (HDPE) for durability and UV protection perfect as décor for both indoor and outdoor. They do not wither or fade, even under harsh outdoor conditions, unlike others that use recycled plastic and wither within a few months of outdoor use. No tall claims – we are tested and certified for light aging under UV exposure.
The balcony screen is made of 100% HDPE, which can provide up to 99% reduction in visibility. The best privacy solution for your balcony, deck, patio, pool, porches, & fences. Stops dogs from barking & pets and children from slipping through railings.Tear-resistant, weather-resistant, UV- resistant, fast drying, it protects your privacy and is suitable for all weather conditions, like hot weather, windy, rain, snow, cold etc.You can use it to protect your dog crate, shade cloth, camping, pool shade, car shade etc. Special protects plants from direct sun while allowing water and air through, no need to remove mesh shade when watering.
The artificial ivy leaves look natural and can provide a blooming, earthy feeling for every indoor or outdoor space. You can add a touch of green to your home anytime, anywhere. Longad’s artificial ivy leaves can effectively resist aging and UV rays, so they can remain evergreen for several years like new. The roots of the leaves are firmly grasped on the back plate, and they will not fall easily even in extreme weather.
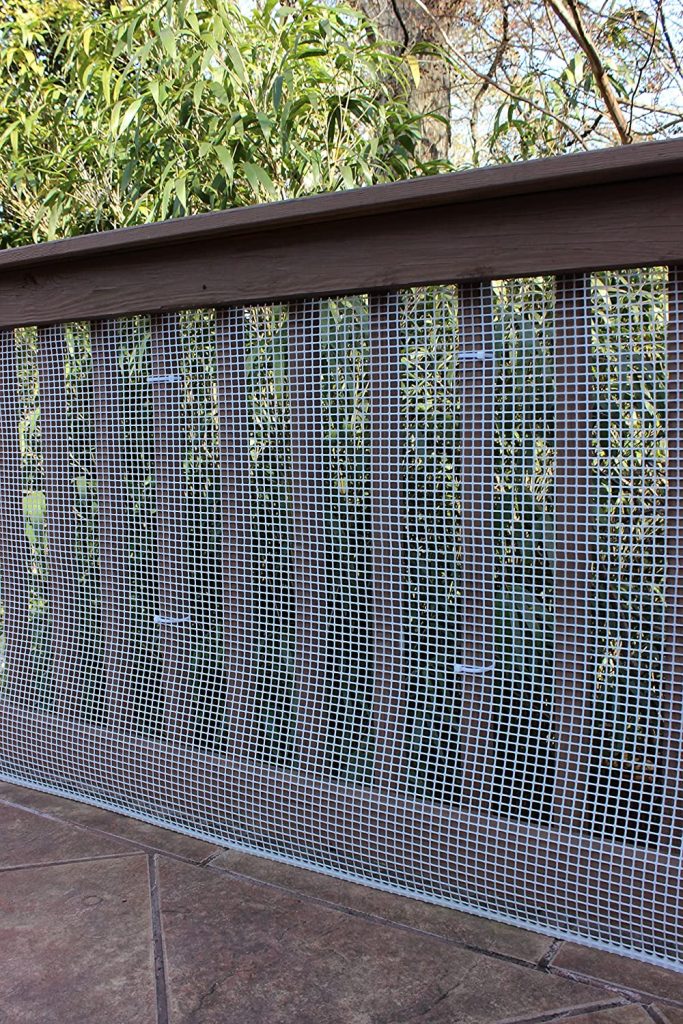
Privacy ivy fences are placed close enough to protect your privacy while decorating your home. Leaves are tightly attached to the mesh panel strategically. So while blocking the sun, it also maintains adequate ventilation and light. You only need the cable ties provided to install, no other tools are needed. The special back panel design allows you to cut or splice these artificial ivy to the shape as you like.
Made of 100% polyethylene and is 50′ long x 5’8″ tall, Fits perfectly for 6ft tall fence, Visibility Blockage: 93%. 100% High quality PURE virgin polyethylene material for maximum UV stabilization. Thick Aluminum ANTI RUST grommets placed evenly 12” vertically and 24” horizontally apart on all 4 sides.Double grommets placement on every corner edge for extra strength.Fabricated with 2.5” black binding with double reinforced fabric on all edges for maximum life span.
For your Backyard Deck, Patio, Balcony, Pool, Porch, Fence, Railing, Gardening: use our top-quality 180 GSM privacy screen. Hand-stitched right here in southern California with the utmost precision! Eden can tailor-make it to accommodate your individual gardening and backyard needs, making sure it fits perfectly by building you a relaxing private space for you and your family!
Very easy to assemble by yourself without any further assistance and also for re-installation elsewhere if needed, Aluminum grommets come with every 25 inches to help facilitate assembly, 10-inch zip ties included as a gift with every purchase.
Was this page helpful?
At Storables.com, we guarantee accurate and reliable information. Our content, validated by Expert Board Contributors, is crafted following stringent Editorial Policies. We're committed to providing you with well-researched, expert-backed insights for all your informational needs.

0 thoughts on “50 Best Patio Privacy Screen For Ultimate Privacy”