Home>Furniture>Outdoor Furniture>How To Regrout Patio Slabs
Outdoor Furniture
How To Regrout Patio Slabs
Modified: August 17, 2024
Learn how to regrout your patio slabs and refresh your outdoor furniture. Follow our step-by-step guide to achieve a beautiful and sturdy outdoor space.
(Many of the links in this article redirect to a specific reviewed product. Your purchase of these products through affiliate links helps to generate commission for Storables.com, at no extra cost. Learn more)
Introduction
Welcome to our comprehensive guide on how to regrout patio slabs! Over time, the grout between outdoor patio slabs can wear away, crack, or become discolored. This not only affects the aesthetic appeal of your patio but can also compromise its structural integrity. Regrouting your patio slabs is a simple yet effective way to restore their beauty and functionality, ensuring they stand the test of time.
In this guide, we will walk you through the step-by-step process of regrouting your patio slabs. From preparing the surface to applying the new grout and adding the finishing touches, we’ll cover everything you need to know to achieve professional-quality results.
Before we begin, it’s important to gather the necessary tools and materials. Having everything on hand will streamline the regrouting process and ensure you have a successful outcome.
Key Takeaways:
- Refresh your patio by regrouting slabs. Follow safety precautions, prepare the surface, remove old grout, clean, apply new grout, and finish with maintenance for long-lasting beauty and durability.
- Maintain your regrouted patio by regular cleaning, using mild solutions, protecting from heavy objects, monitoring for damage, reapplying sealant, ensuring proper drainage, and addressing stains promptly.
Read more: How To Clean Patio Slabs
Tools and Materials Needed
To regrout your patio slabs, you will need the following tools and materials:
1. Safety Gear: Safety should always be a priority. Make sure to wear gloves, safety glasses, and a dust mask to protect yourself from any potential hazards.
2. Grout Removal Tool: A grout removal tool, such as a grout saw or a rotary tool with a grout removal attachment, will help you easily remove the old grout from between the patio slabs.
3. Scrub Brush: A stiff-bristled scrub brush or a wire brush is essential for cleaning the surface of the patio slabs and removing any loose debris or grout remnants.
4. Grout Mix: Choose a grout mix that is suitable for outdoor use and matches the color of your existing patio slabs. You can find grout mixes in various colors and formulations at your local home improvement store.
5. Grout Float: A grout float is a rubber tool used to apply the grout evenly and smoothly into the joints between the patio slabs. It helps ensure proper coverage and a professional finish.
6. Sponge: A large, clean sponge is necessary for wiping away excess grout and cleaning the surface of the slabs.
7. Bucket and Water: You will need a bucket filled with clean water to mix the grout and rinse your tools and sponge.
8. Sealant: Once the grout has fully cured, it’s recommended to apply a sealant to protect your patio slabs from moisture, stains, and UV damage. Choose a sealant specifically designed for outdoor use.
9. Knee Pads: Working on your patio slab can be physically demanding, so wearing knee pads will provide extra cushioning and protection.
10. Rags or Towels: Keep some rags or towels handy to wipe away excess grout and clean up any spills or messes during the regrouting process.
Now that you have all the necessary tools and materials, it’s time to move on to preparing the patio slabs for regrouting.
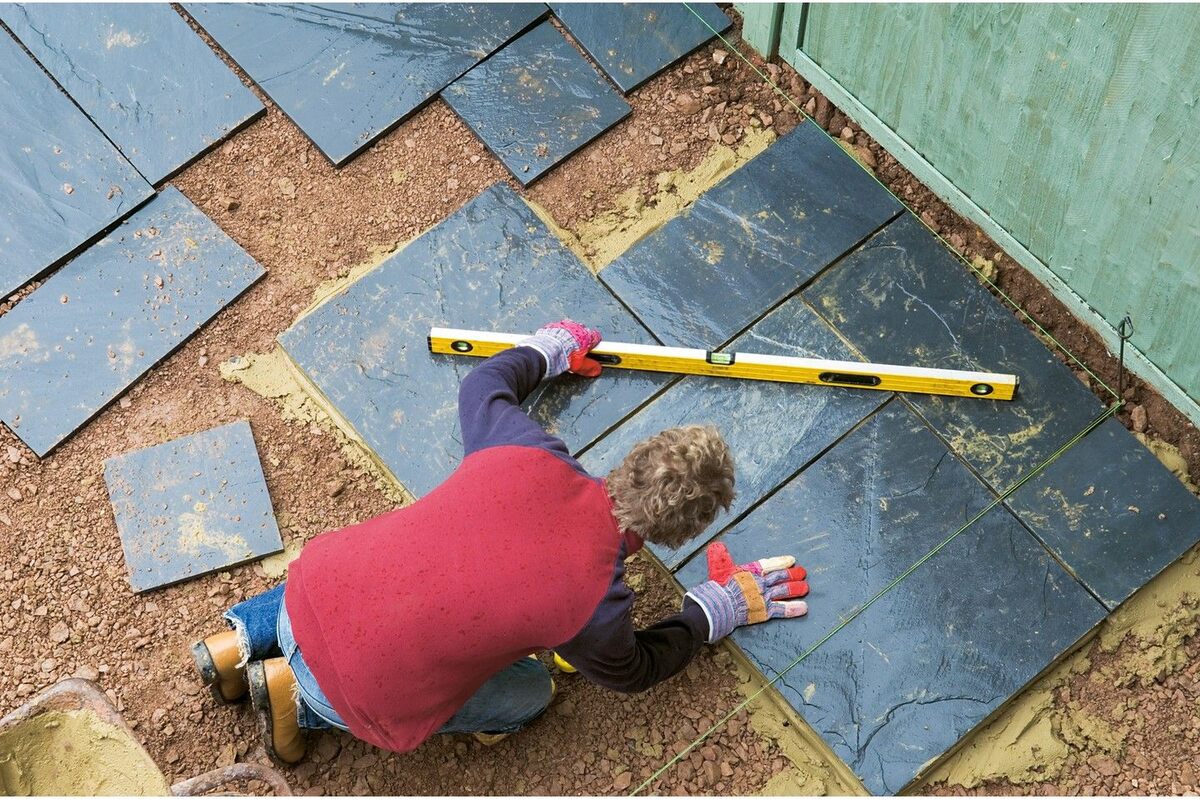
Preparing the Patio Slabs
Before you begin regrouting your patio slabs, it’s crucial to prepare the surface properly. This ensures optimal adhesion and longevity of the new grout. Follow these steps to prepare the patio slabs:
- Clear the Area: Remove any furniture, plants, or decorations from the patio to create a clear workspace.
- Clean the Slabs: Sweep or use a leaf blower to remove loose debris, dirt, and leaves from the patio slabs. You can also rinse the surface with water for a more thorough cleaning.
- Inspect for Damage: Check the patio slabs for any cracks, chips, or loose pieces. If you come across any damage, repair or replace the affected slabs before proceeding with the regrouting.
- Allow the Slabs to Dry: Make sure the patio slabs are completely dry before moving on to the next step. This may take a few hours, depending on the weather conditions.
- Protect Surrounding Areas: Use painter’s tape or plastic sheeting to protect any adjacent surfaces, such as walls or plants, from unintentional grout splatters or damage.
By taking the time to properly prepare the patio slabs, you’ll create a clean and stable surface, setting the foundation for a successful regrouting project. Now that the preparation is complete, it’s time to remove the existing grout.
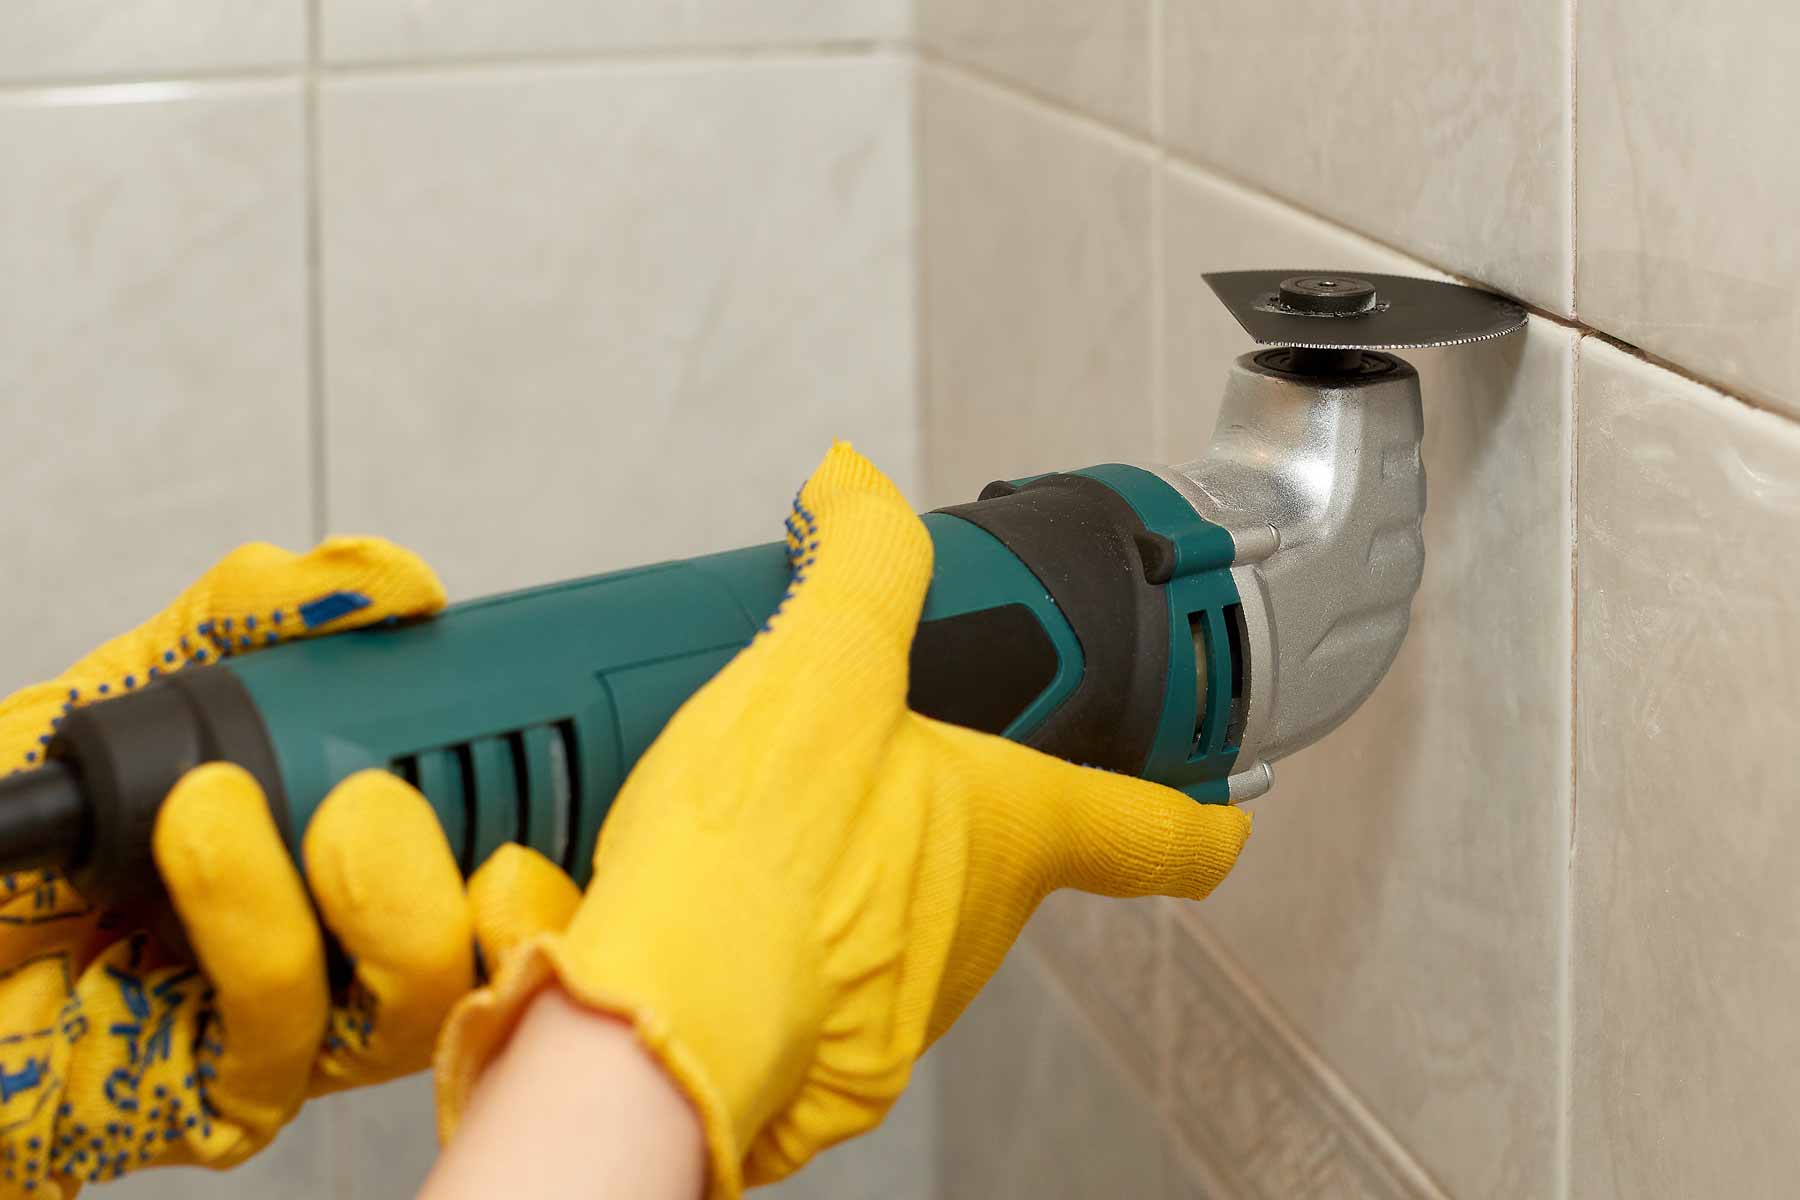
Removing the Existing Grout
Before you can apply the new grout, it’s essential to remove the existing grout from between the patio slabs. Here’s how you can do it:
- Choose a Grout Removal Method: There are a few methods you can use to remove grout, including a grout saw, a rotary tool with a grout removal attachment, or a manual grout removal tool. Select the method that suits your preferences and the condition of the grout.
- Protect Yourself: Wear safety glasses and a dust mask to protect your eyes and respiratory system from the dust created during the grout removal process.
- Start Removing the Grout: Working one section at a time, hold the grout removal tool at a 45-degree angle and carefully scrape along the grout lines, applying moderate pressure. Be cautious not to damage the patio slabs.
- Remove the Loose Grout: Use a brush or a vacuum to remove the loose grout debris from the joints and the surface of the slabs. This will help create a clean and debris-free workspace for the new grout.
- Inspect for Stubborn Grout: After removing the majority of the grout, some stubborn grout may remain. In this case, gently tap the slabs with a rubber mallet to loosen the remaining grout. Be careful not to hit the slabs too hard and cause damage.
- Clean the Joints: Use a small brush or a toothbrush to clean the joints, ensuring they are free from any residual grout or debris. This will help the new grout adhere properly.
Removing the existing grout is a crucial step in the regrouting process. It allows for a clean and fresh start, ensuring the new grout bonds effectively. Now that the grout has been removed, it’s time to move on to the next step—cleaning the surface.
Cleaning the Surface
After removing the old grout, it’s important to thoroughly clean the surface of the patio slabs. This ensures that the new grout adheres well and provides a seamless finish. Follow these steps to clean the surface:
- Wipe Away Dust: Using a clean, dry cloth or a brush, wipe away any dust or debris from the patio slabs. This will provide a clean surface for the next step.
- Prepare a Cleaning Solution: Mix a mild detergent or a grout cleaner with water in a bucket according to the manufacturer’s instructions.
- Scrub the Surface: Dip a scrub brush or a sponge into the cleaning solution and scrub the patio slabs thoroughly. Pay close attention to the grout joints, as they tend to accumulate dirt and grime.
- Rinse with Clean Water: Once the patio slabs are scrubbed, rinse them with clean water to remove any residue or cleaning solution. You can use a hose or a bucket of water for this step.
- Dry the Surface: Allow the patio slabs to air dry completely before moving on to the next step. This will ensure that there is no moisture left, which can hinder the grout’s adhesion.
By properly cleaning the surface, you remove any dirt, grime, or cleaning residue, creating an ideal environment for the new grout to bond effectively. With the surface cleaned, it’s time to move on to mixing the new grout.
When regrouting patio slabs, make sure to thoroughly clean out the old grout and debris before applying new grout. Use a grout saw or rotary tool to remove the old grout, and then apply the new grout evenly to ensure a strong and durable finish.
Read more: How To Lay Patio Slabs On Grass
Mixing the New Grout
Now that the surface is clean and prepared, it’s time to mix the new grout. Follow these steps to ensure a proper mix:
- Read the Instructions: Carefully read the manufacturer’s instructions on the grout package. Different grout mixes may have specific mixing ratios or requirements.
- Gather the Materials: Prepare the grout mix, a bucket, and clean water. Make sure to use a mixing paddle attachment for a drill or a trowel for hand mixing.
- Add Water to the Grout Mix: Slowly add the recommended amount of clean water to the bucket. It’s best to start with a smaller amount and gradually add more if needed. Always follow the manufacturer’s instructions for the appropriate water-to-grout ratio.
- Mix the Grout: Use a drill with a mixing paddle or a trowel to blend the grout and water thoroughly until it reaches a smooth and consistent paste-like consistency. This process typically takes a few minutes of mixing.
- Allow the Grout to Rest: Let the mixed grout rest for a few minutes to allow the additives to activate. Avoid mixing the grout excessively during this time.
- Check the Consistency: After the resting period, check the consistency of the grout. It should be easy to spread and workable while still holding its shape. If it is too dry or too runny, adjust the water or grout accordingly and remix as needed.
Properly mixing the grout ensures that it has the correct consistency and will perform optimally during the application process. Now that your grout is mixed, it’s time to move on to the next step—applying the new grout.
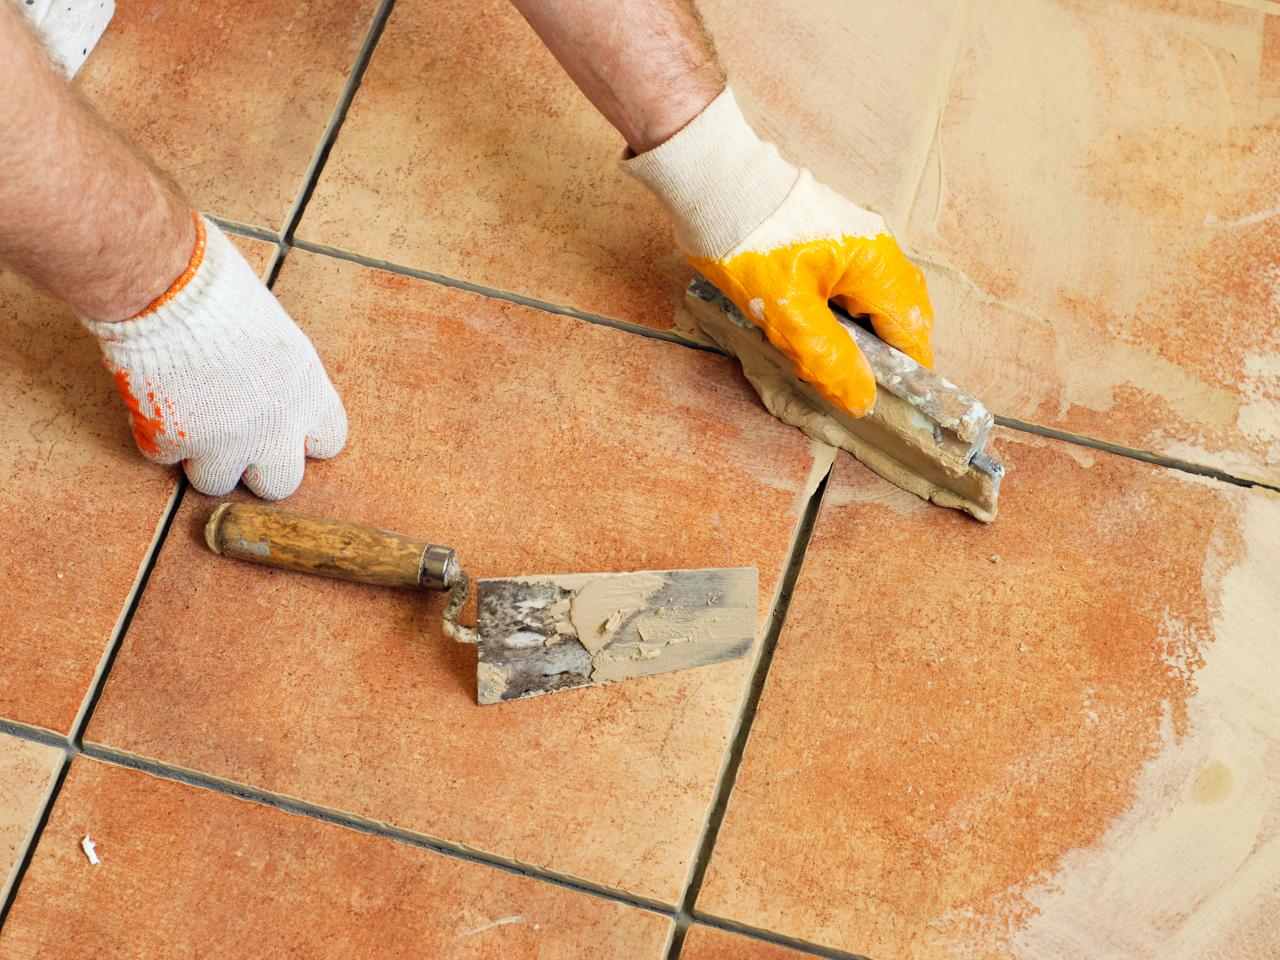
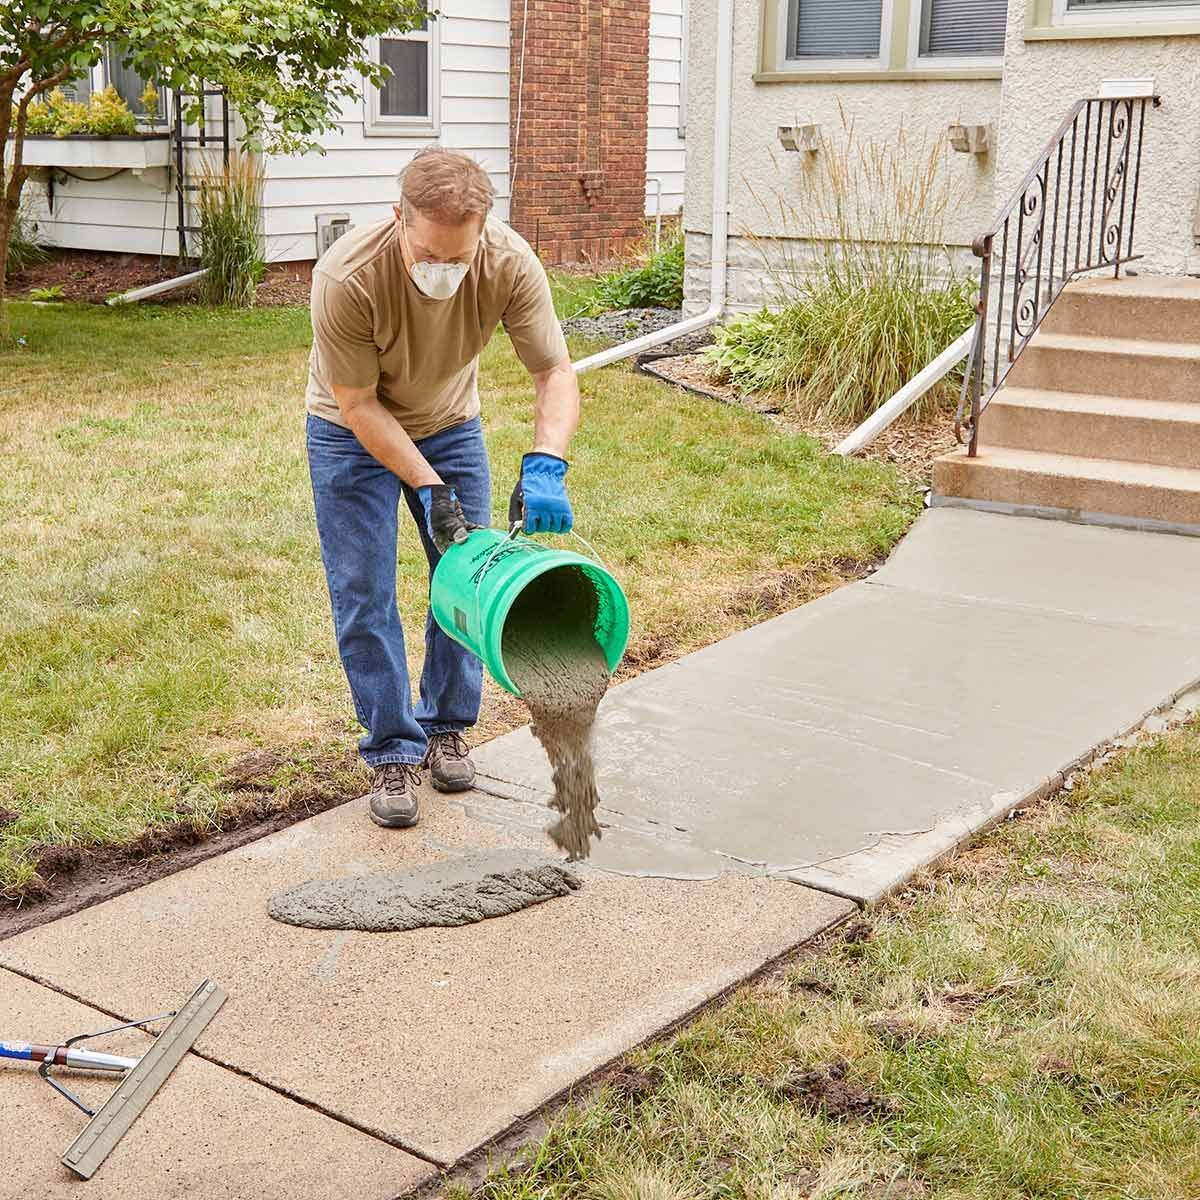
Applying the New Grout
With the new grout mixed and ready, it’s time to apply it to the patio slabs. Follow these steps to ensure a smooth and successful grouting process:
- Scoop a Portion of Grout: Using a grout float or a rubber spatula, scoop a portion of the mixed grout onto the float.
- Spread the Grout: Hold the grout float at a 45-degree angle and press the grout into the joints between the patio slabs. Move the float back and forth diagonally across the joints to ensure even distribution.
- Pack the Joints: Use the edge of the grout float to pack the grout into the joints firmly. This helps eliminate any air pockets and ensures a strong bond.
- Clean Excess Grout: Once the joints are filled, use the edge of the grout float to scrape off any excess grout from the surface of the slabs. Collect the excess grout and dispose of it properly.
- Smooth the Grout: Gently glide the grout float over the joints to smooth out the grout lines and create a level surface.
- Clean the Surface: While the grout is still moist, use a damp sponge to gently wipe away any grout haze or residue from the slabs. Rinse the sponge frequently to ensure a clean surface.
- Allow the Grout to Cure: Follow the manufacturer’s instructions for the recommended curing time of the grout. During this time, protect the grouted area from foot traffic or excess moisture.
Applying the new grout requires attention to detail and precision. Take your time to ensure that the grout is applied evenly and the joints are properly filled. Once the grout has cured, it’s time to add the finishing touches to complete the regrouting process.
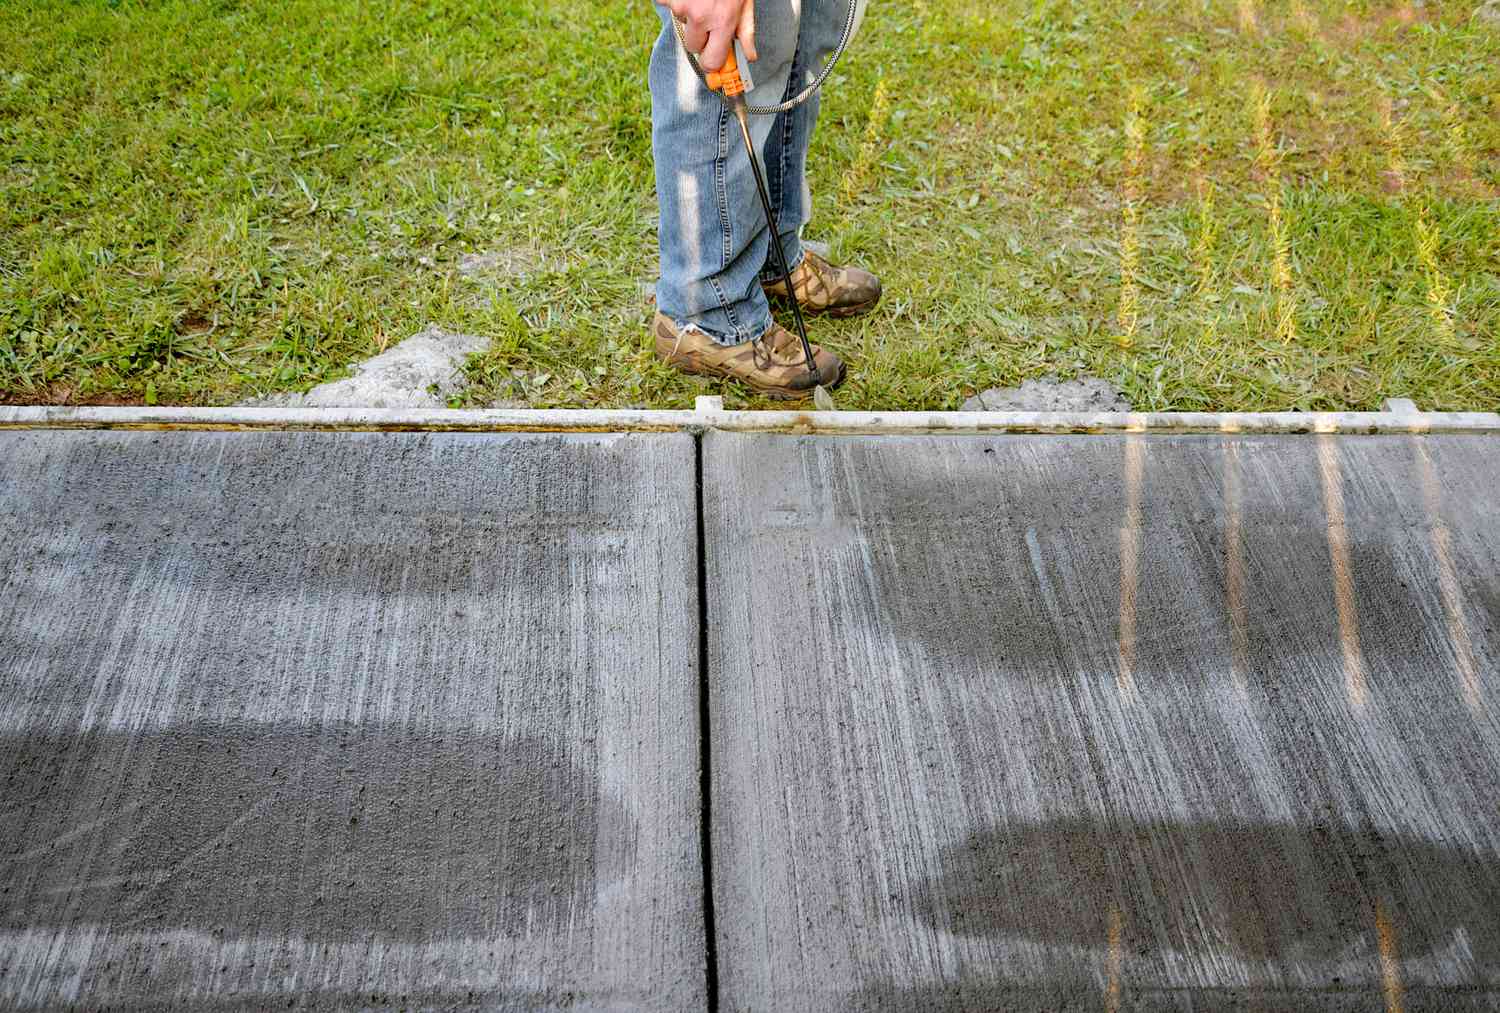
Finishing Touches
Now that the new grout has cured, it’s time to add the finishing touches to complete the regrouting process and enhance the appearance of your patio slabs:
- Inspect the Grout Lines: After the grout has fully cured, inspect the grout lines for any unevenness or voids. If needed, apply additional grout to fill in any gaps or imperfections.
- Smooth and Shape the Grout Lines: Use a grout finishing tool or a small tool, like a craft stick, to smooth and shape the grout lines. This will give them a clean and professional look.
- Clean the Surface: Use a clean, damp sponge or cloth to wipe away any remaining grout haze or residue from the surface of the slabs. This will reveal the true color and texture of the patio slabs.
- Apply Grout Sealer: Once the grout and surface are clean and dry, consider applying a grout sealer to protect the grout from water, stains, and UV damage. Follow the manufacturer’s instructions for application techniques and drying time.
- Restore Furniture and Decorations: Return any furniture, plants, or decorations to your patio once the grout sealer has dried completely. This will help bring life back to your outdoor space.
By paying attention to these finishing touches, you’ll ensure that your regrouted patio slabs not only look great but also have enhanced durability and longevity. Regular maintenance is key to keeping your patio looking its best.
Maintenance Tips
Proper maintenance is essential to extend the lifespan of your regrouted patio slabs and keep them in optimal condition. Here are some maintenance tips to follow:
- Regular Cleaning: Sweep or use a leaf blower to remove debris and leaves from the surface of the patio regularly. This prevents the buildup of dirt and helps maintain the appearance of the grout.
- Use Mild Cleaning Solutions: When cleaning your patio, use mild detergent or specifically formulated grout cleaners. Harsh chemicals may damage the grout or discolor the patio slabs.
- Protect from Heavy Objects: Avoid dragging heavy objects across the patio slabs, as it can cause damage to the grout. Use furniture pads or sliders when moving heavy items to prevent scratches or cracks.
- Monitor for Signs of Damage: Periodically inspect the grout and patio slabs for any signs of cracks, chips, or loose pieces. Address any issues promptly to prevent further damage or water penetration.
- Reapply Sealant: Over time, the sealant on the grout may wear off. Follow the manufacturer’s recommendations and reapply sealant as needed to protect the grout from moisture and stains.
- Proper Drainage: Ensure proper drainage around your patio to prevent water from pooling or seeping under the slabs. Proper drainage helps prevent moisture-related damage to the grout and slabs.
- Address Stains Promptly: If you notice any stains on the grout, clean them as soon as possible. Prompt action prevents stains from becoming set and difficult to remove.
By following these maintenance tips, you’ll be able to preserve the appearance and integrity of your regrouted patio slabs, ensuring their long-lasting beauty and functionality.
Read more: How Thick Should A Concrete Patio Slab Be
Conclusion
Congratulations on successfully regrouting your patio slabs! By following the step-by-step process outlined in this guide, you have restored the beauty and functionality of your outdoor space. Regrouting not only improves the appearance of your patio, but it also strengthens the joints between the slabs, prolonging their lifespan.
Remember to always prioritize safety by wearing protective gear during the regrouting process. Take the time to properly prepare the patio slabs, remove the old grout, and clean the surface before applying the new grout. Pay attention to detail during the application process to achieve even and well-packed grout lines.
After the grout has cured, don’t forget the finishing touches – smoothing the lines, cleaning the surface, and applying a grout sealer, if desired. Regular maintenance, such as cleaning and inspecting the patio, will help preserve the quality of the grout and slabs for years to come.
Enjoy your rejuvenated patio space and the beauty it brings to your outdoor living. Take pride in your regrouting efforts and showcase your masterpiece to friends and family.
Thank you for choosing our comprehensive guide on how to regrout patio slabs. We hope this information has been helpful and that you can enjoy your renewed patio for many years of outdoor enjoyment!
Frequently Asked Questions about How To Regrout Patio Slabs
Was this page helpful?
At Storables.com, we guarantee accurate and reliable information. Our content, validated by Expert Board Contributors, is crafted following stringent Editorial Policies. We're committed to providing you with well-researched, expert-backed insights for all your informational needs.


0 thoughts on “How To Regrout Patio Slabs”