Home>Gardening & Outdoor>Outdoor Entertaining>How To Refinish A Picnic Table
Outdoor Entertaining
How To Refinish A Picnic Table
Modified: October 20, 2024
Learn how to refinish a picnic table for outdoor entertaining. Follow our step-by-step guide to revitalize your outdoor space.
(Many of the links in this article redirect to a specific reviewed product. Your purchase of these products through affiliate links helps to generate commission for Storables.com, at no extra cost. Learn more)
Introduction
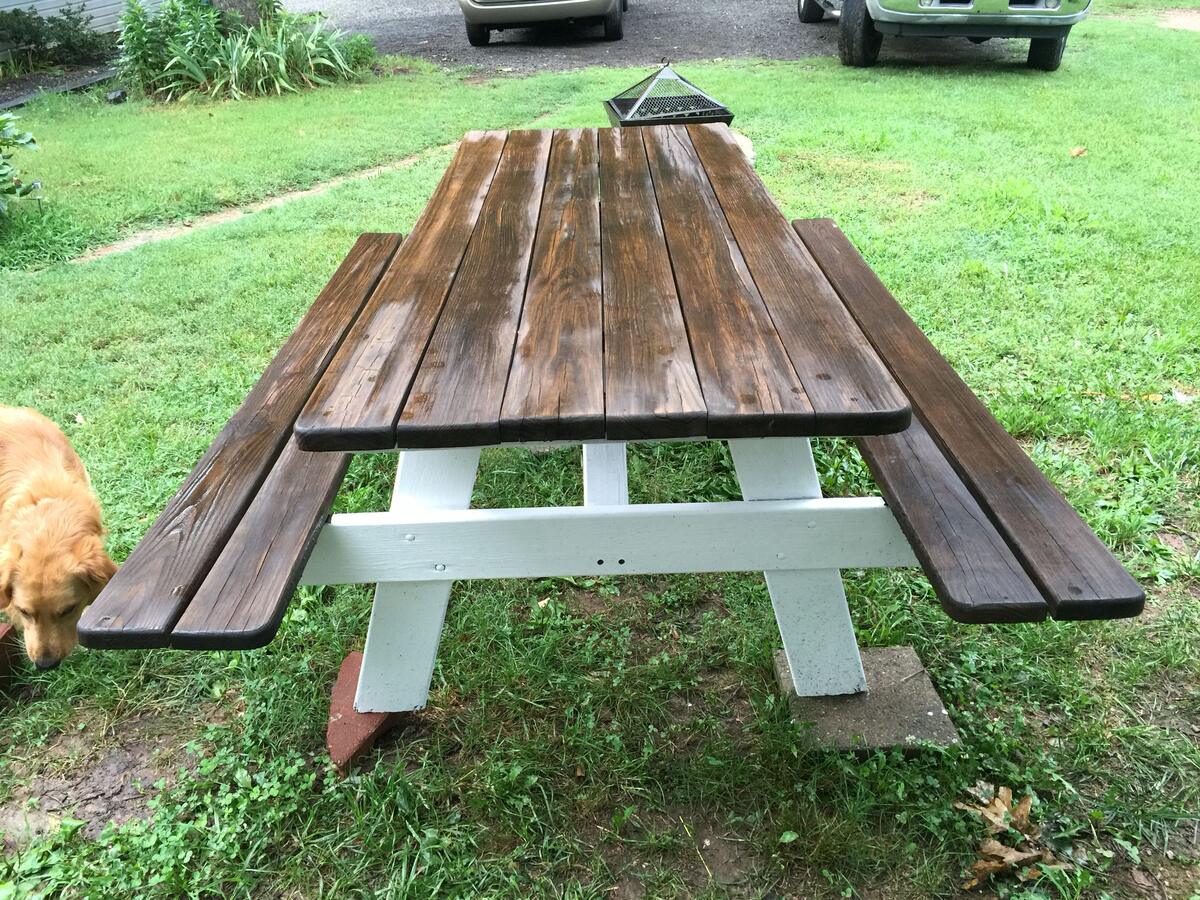
Welcome to the ultimate guide on how to refinish a picnic table! If your outdoor gatherings are missing that extra touch of charm due to a weathered and worn picnic table, fret not. With a little bit of effort and some simple materials, you can breathe new life into your outdoor entertaining space by refinishing your picnic table.
Refinishing a picnic table is a fantastic way to revitalize your outdoor area without breaking the bank. Not only does it provide an opportunity to showcase your DIY skills, but it also allows you to unleash your creativity by choosing the perfect stain and finish to complement your outdoor decor. Whether you're a seasoned DIY enthusiast or a novice looking to embark on your first project, this step-by-step guide will equip you with the knowledge and confidence to tackle this rewarding endeavor.
So, roll up your sleeves, gather your supplies, and let's dive into the process of transforming your weathered picnic table into a stunning focal point for your outdoor entertaining space. Let's get started!
Key Takeaways:
- Revitalize your outdoor space by refinishing a picnic table with simple materials and DIY skills. Unleash creativity with stain choices to complement your decor.
- Transform a weathered picnic table into a stunning focal point for outdoor entertaining. Embrace DIY ingenuity and create lasting memories in your outdoor oasis.
Read more: How To Refinish A Veneer Dining Table
Materials Needed
Before embarking on the journey of refinishing your picnic table, it’s essential to gather the necessary materials. Here’s a comprehensive list of items you’ll need to ensure a successful and satisfying refinishing project:
- Sandpaper: Look for a variety pack with different grits, including coarse, medium, and fine, to effectively sand the table’s surface.
- Electric Sander (Optional): While not mandatory, an electric sander can expedite the sanding process, especially for larger picnic tables.
- Wood Stain: Choose a high-quality, weather-resistant wood stain in a shade that complements your outdoor aesthetic.
- Paintbrushes or Cloth: Depending on your preference, you can use paintbrushes or soft cloths for applying the wood stain.
- Wood Sealer: Opt for a durable, UV-resistant wood sealer to protect the picnic table from the elements.
- Protective Gear: Ensure you have safety goggles, a dust mask, and gloves to safeguard yourself during the refinishing process.
- Cleaners and Rags: Gather mild wood cleaners, water, and clean rags for thorough cleaning before refinishing.
- Scraper or Putty Knife: These tools will come in handy for removing old paint, varnish, or stubborn debris from the table’s surface.
- Drop Cloth or Tarp: Protect your work area by laying down a drop cloth or tarp to catch any drips and prevent staining surrounding surfaces.
- Optional Accessories: Depending on your preferences, you may also want to consider wood filler, a paint sprayer, or decorative hardware to customize the table further.
By ensuring you have all the necessary materials at your disposal, you’ll be well-prepared to tackle each step of the refinishing process with confidence and ease. Now that you’re equipped with the essential supplies, it’s time to move on to preparing the picnic table for its stunning transformation.
Preparing the Picnic Table
Before diving into the refinishing process, it’s crucial to prepare the picnic table properly. This preparation phase sets the foundation for a successful and long-lasting refinished surface. Follow these steps to ensure your picnic table is primed and ready for the next stages:
- Clean the Surface: Begin by thoroughly cleaning the picnic table with a mild wood cleaner and water. Use a clean rag to wipe away dirt, grime, and any remnants of old finish. This step is essential for ensuring the new stain adheres properly to the wood.
- Inspect for Damage: Carefully examine the table for any signs of damage, such as cracks, splinters, or loose boards. Address any structural issues by applying wood filler to cracks and sanding down rough spots to create a smooth surface.
- Remove Old Finish: If the picnic table has remnants of old paint or varnish, use a scraper or putty knife to gently remove the old finish. This step is crucial for allowing the new stain to penetrate the wood effectively.
- Protect Surrounding Areas: Lay down a drop cloth or tarp to protect the ground underneath and surrounding areas from potential drips and spills. This simple precaution will save you from additional cleanup later on.
- Allow for Drying Time: After cleaning and inspecting the picnic table, allow ample time for the wood to dry completely. This is particularly important before proceeding to the next step of sanding the surface.
By meticulously preparing the picnic table, you’re setting the stage for a successful refinishing process. This thoughtful approach ensures that the subsequent steps, such as sanding and staining, will yield exceptional results. Now that the table is clean and ready, it’s time to move on to the crucial step of sanding the surface to achieve a smooth and pristine foundation for the new finish.
Sanding the Surface
Once the picnic table is thoroughly cleaned and prepared, the next step in the refinishing process is sanding the surface. This crucial step not only smooths out imperfections but also allows the wood to absorb the stain evenly, resulting in a professional-looking finish. Follow these steps to achieve a beautifully sanded surface:
- Select the Right Grit: Begin with a coarse-grit sandpaper to remove any stubborn remnants of old finish or deep-seated imperfections. Gradually progress to medium and then fine grits to achieve a smooth and uniform surface.
- Use an Electric Sander (Optional): If you have a large picnic table or prefer a more efficient approach, an electric sander can expedite the sanding process. Ensure you move the sander in the direction of the wood grain for optimal results.
- Focus on Edges and Corners: Pay special attention to the table’s edges and corners, as these areas can be challenging to sand thoroughly. A sanding block or folded sandpaper can help navigate these intricate spots with precision.
- Remove Sanding Residue: After sanding, use a clean, damp cloth to wipe away the sanding residue and ensure the surface is free of dust and debris. This step is crucial for achieving a flawless application of the wood stain.
- Inspect for Smoothness: Run your hand over the entire surface to ensure it feels uniformly smooth. Any rough patches or imperfections should be addressed by additional sanding until the entire table feels velvety to the touch.
By diligently sanding the picnic table, you’re creating an ideal canvas for the subsequent application of wood stain. The smooth and meticulously sanded surface will allow the stain to penetrate the wood evenly, resulting in a rich and lustrous finish. With the sanding phase complete, it’s time to move on to the exciting step of applying the wood stain to transform the picnic table’s appearance.
Before refinishing a picnic table, make sure to thoroughly clean and sand the surface to remove any old finish or rough spots. This will ensure a smooth and even application of the new finish.
Applying the Stain
With the picnic table meticulously cleaned and sanded to perfection, it’s time to infuse it with a rich and enduring wood stain. This transformative step will not only enhance the table’s natural beauty but also provide essential protection against the elements. Follow these guidelines to achieve a flawless application of the wood stain:
- Choose the Right Stain: Select a high-quality wood stain that complements your outdoor aesthetic and provides the level of protection required for your climate. Whether you prefer a transparent, semi-transparent, or solid color stain, ensure it’s designed for exterior use and offers UV resistance.
- Apply Evenly: Use a paintbrush or soft cloth to apply the wood stain in the direction of the wood grain. Ensure the stain is applied evenly, allowing the natural beauty of the wood to shine through while providing a consistent hue across the entire surface.
- Work in Sections: To maintain control and achieve uniform coverage, work on the picnic table in manageable sections. This approach prevents the stain from drying too quickly and ensures a seamless finish without lap marks.
- Wipe Off Excess Stain: After applying the stain to a section, use a clean cloth to wipe off any excess stain. This step not only prevents drips and streaks but also allows the wood to absorb the stain effectively, enhancing its durability and visual appeal.
- Allow for Drying Time: Once the entire picnic table is stained, allow it to dry thoroughly according to the manufacturer’s recommendations. This drying period is crucial for the stain to cure and bond with the wood, ensuring a resilient and long-lasting finish.
By applying the wood stain with precision and care, you’re not only elevating the aesthetic allure of the picnic table but also fortifying it against the outdoor elements. The rich and enduring hue of the wood stain will infuse the table with warmth and character, setting the stage for the final crucial step of sealing the table to safeguard its newfound beauty. With the wood stain applied, it’s time to move on to the pivotal phase of sealing the picnic table to ensure its longevity and resilience.
Read more: How To Refinish A Teak Dining Table
Sealing the Table
After the wood stain has imbued your picnic table with a captivating hue and enhanced durability, the next vital step is to seal the surface to safeguard its beauty against the rigors of outdoor exposure. Sealing the table not only provides essential protection from moisture and UV rays but also prolongs the lifespan of the wood, ensuring your hard work endures for years to come. Follow these steps to effectively seal your newly stained picnic table:
- Choose a Quality Sealer: Select a high-quality wood sealer designed for exterior use. Look for a product that offers UV protection and is formulated to withstand the elements prevalent in your specific climate.
- Apply the Sealer Evenly: Using a clean paintbrush or applicator recommended by the sealer manufacturer, apply the sealer evenly in the direction of the wood grain. Ensure complete coverage, allowing the sealer to penetrate the wood for optimal protection.
- Work Methodically: Similar to the staining process, work on the picnic table in manageable sections to maintain control and achieve uniform coverage. This approach prevents the sealer from drying too quickly, ensuring a flawless finish without lap marks.
- Allow for Drying Time: Once the entire picnic table is sealed, allow it to dry thoroughly as per the manufacturer’s instructions. This crucial drying period enables the sealer to form a protective barrier, shielding the wood from moisture, sunlight, and other environmental factors.
- Apply Additional Coats (Optional): Depending on the sealer’s recommendations, you may opt to apply additional coats for enhanced protection. Follow the specified drying times between coats to ensure optimal adhesion and durability.
By sealing the picnic table with a high-quality wood sealer, you’re fortifying its natural beauty and ensuring its resilience in the face of outdoor elements. The protective barrier provided by the sealer will shield the wood from moisture, UV rays, and general wear and tear, preserving the table’s stunning appearance for years to come. With the table now expertly sealed, it’s time to add the final touches that will elevate its visual appeal and functionality, bringing your outdoor entertaining space to new heights.
Final Touches
With the picnic table now refinished, sealed, and primed to grace your outdoor space with renewed charm, it’s time to add the final touches that will elevate its visual allure and functionality. These finishing touches not only enhance the table’s aesthetics but also contribute to a welcoming and inviting outdoor entertaining area. Consider the following elements to put the perfect finishing stamp on your refinished picnic table:
- Add Decorative Hardware: Consider embellishing the picnic table with decorative hardware, such as stylish hinges, drawer pulls, or corner brackets. These accents can infuse the table with personality and serve as eye-catching details that elevate its overall appeal.
- Accessorize with Coordinated Decor: Complement the refinished picnic table with coordinated outdoor decor, such as vibrant seat cushions, weather-resistant tablecloths, or decorative centerpieces. These elements can tie the entire outdoor space together and create a cohesive and inviting ambiance.
- Customize with Built-In Features: If you’re feeling adventurous, consider customizing the picnic table with built-in features, such as ice bucket inserts, built-in coolers, or convenient storage compartments. These practical and innovative additions can elevate the table’s functionality while showcasing your creativity.
- Apply a Personalized Touch: Consider adding a personal touch to the picnic table, such as hand-painted designs, stenciled patterns, or a family monogram. These personalized accents can infuse the table with sentimental value and make it a cherished focal point in your outdoor space.
- Ensure Comfort and Functionality: Prioritize comfort and functionality by ensuring the seating is comfortable and the table’s dimensions accommodate the needs of your outdoor gatherings. Consider adding adjustable feet for stability on uneven surfaces or incorporating built-in seating for a streamlined and space-saving design.
By integrating these final touches, you’re not only enhancing the aesthetic appeal of the refinished picnic table but also crafting a welcoming and functional outdoor entertaining space. These thoughtful details contribute to a warm and inviting atmosphere, setting the stage for memorable gatherings and leisurely moments in the great outdoors. With the final touches in place, your refinished picnic table is ready to take center stage in your outdoor oasis.
Conclusion
Congratulations on successfully completing the journey of refinishing your picnic table! Through meticulous preparation, diligent sanding, expert staining, thorough sealing, and thoughtful final touches, you’ve transformed a weathered and worn table into a stunning focal point for your outdoor entertaining space. As you step back and admire the fruits of your labor, take pride in knowing that your refinished picnic table is not only a testament to your DIY prowess but also a catalyst for creating cherished memories in the great outdoors.
By embarking on this rewarding endeavor, you’ve not only revitalized the aesthetic allure of your outdoor space but also contributed to its functionality and comfort. Your refinished picnic table now stands as a symbol of warmth, hospitality, and the simple joys of outdoor gatherings. Whether it’s hosting al fresco meals with loved ones, enjoying leisurely moments with a good book and a refreshing beverage, or simply savoring the beauty of nature, your refinished picnic table is poised to enrich your outdoor lifestyle in countless ways.
As you bask in the satisfaction of a job well done, remember that the care and attention you’ve invested in refinishing your picnic table will yield enduring rewards. The table’s enhanced durability, captivating aesthetics, and personalized touches reflect your commitment to creating a welcoming and inviting outdoor retreat. With each passing season, your refinished picnic table will continue to be a steadfast companion, facilitating cherished moments and fostering a sense of connection with the natural world.
So, as you gather around your newly refinished picnic table, may it serve as a beacon of conviviality and a backdrop for countless shared experiences. Whether it’s the laughter of friends, the tranquility of solitary contemplation, or the joy of savoring a delicious meal, your refinished picnic table stands ready to enrich your outdoor lifestyle and create lasting memories. Embrace the simple pleasures it offers, and revel in the transformative power of DIY ingenuity and creative expression.
With your refinished picnic table taking pride of place in your outdoor sanctuary, the stage is set for a myriad of delightful moments and heartwarming gatherings. Cheers to the beauty, functionality, and enduring charm of your refinished picnic table – a testament to the transformative potential of a simple yet impactful DIY project.
Frequently Asked Questions about How To Refinish A Picnic Table
Was this page helpful?
At Storables.com, we guarantee accurate and reliable information. Our content, validated by Expert Board Contributors, is crafted following stringent Editorial Policies. We're committed to providing you with well-researched, expert-backed insights for all your informational needs.


0 thoughts on “How To Refinish A Picnic Table”