Articles
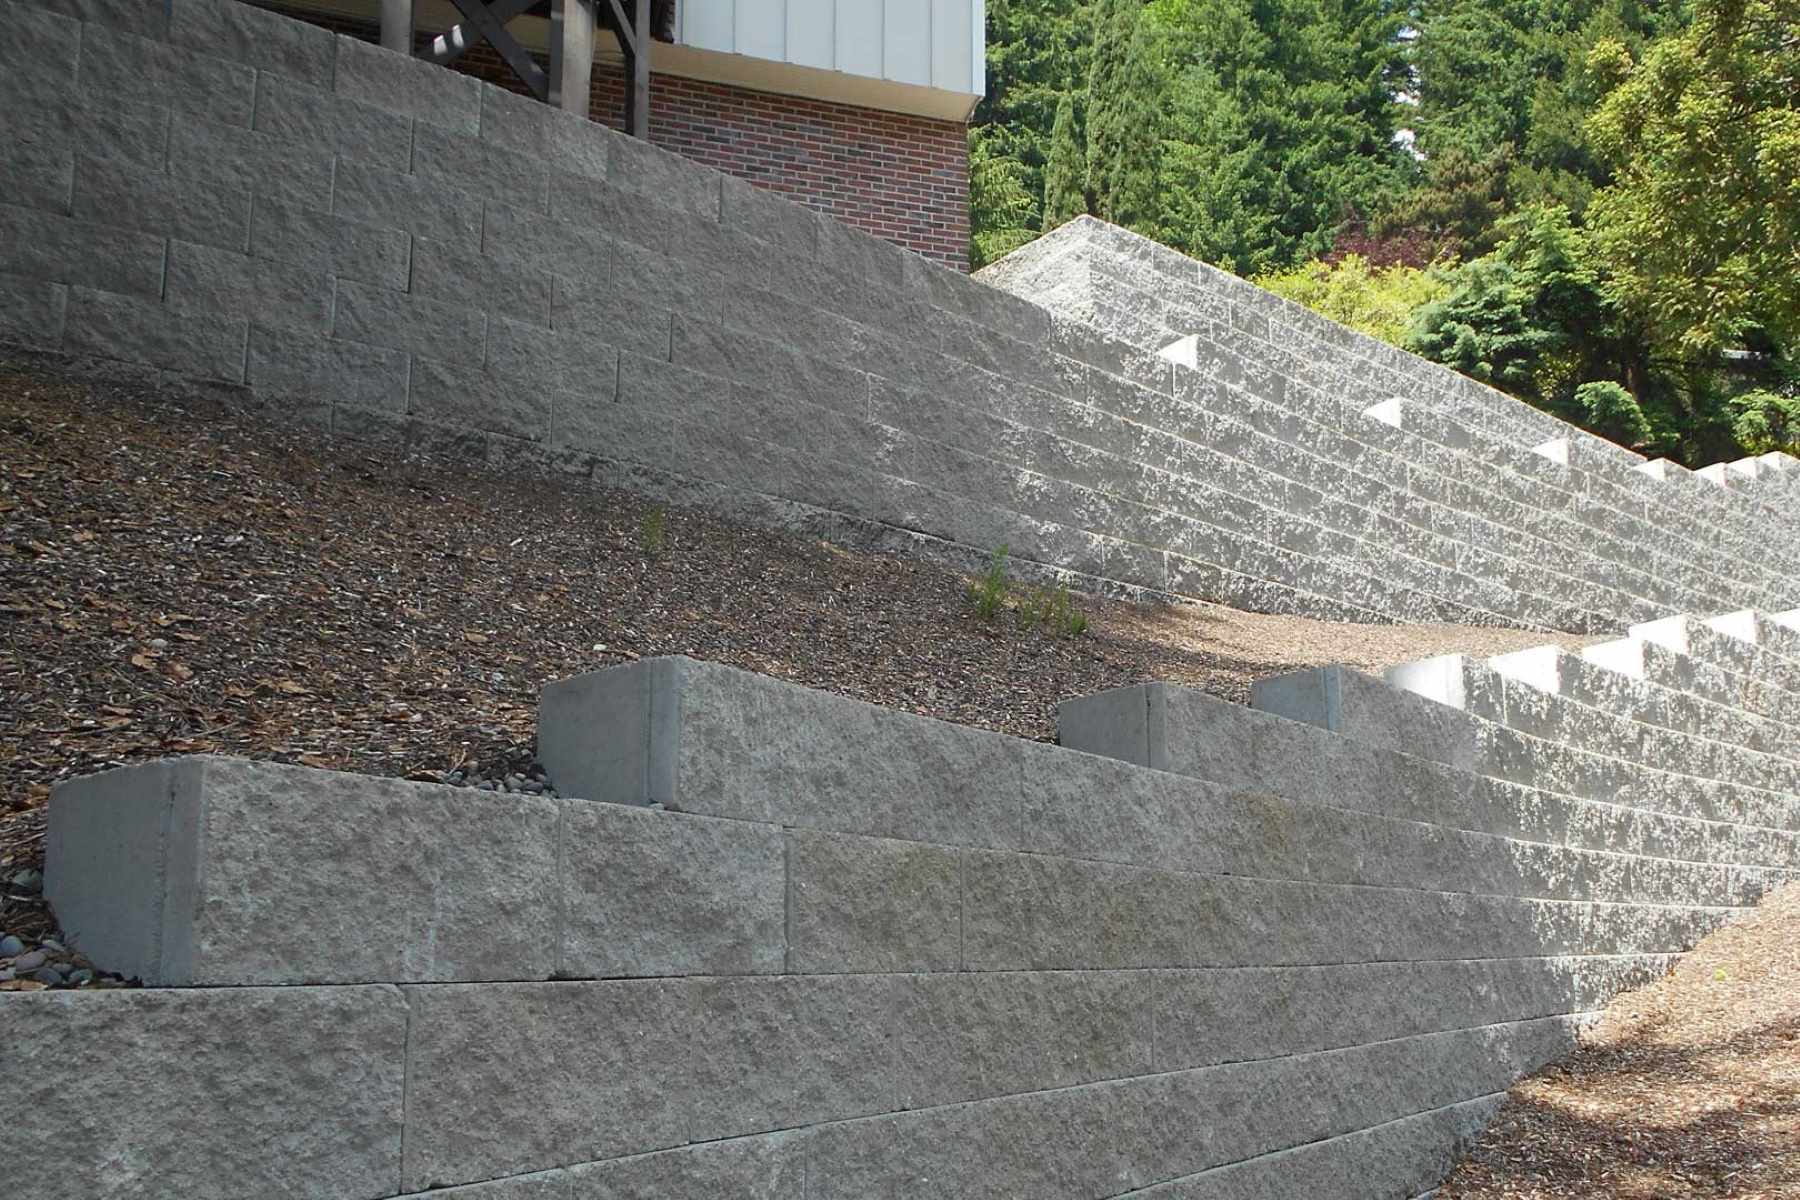
How To Build Stairs In A Retaining Wall
Modified: October 25, 2024
Learn how to build stairs in a retaining wall with our comprehensive articles. Discover step-by-step guides and expert tips to create a sturdy and functional staircase.
(Many of the links in this article redirect to a specific reviewed product. Your purchase of these products through affiliate links helps to generate commission for Storables.com, at no extra cost. Learn more)
Introduction
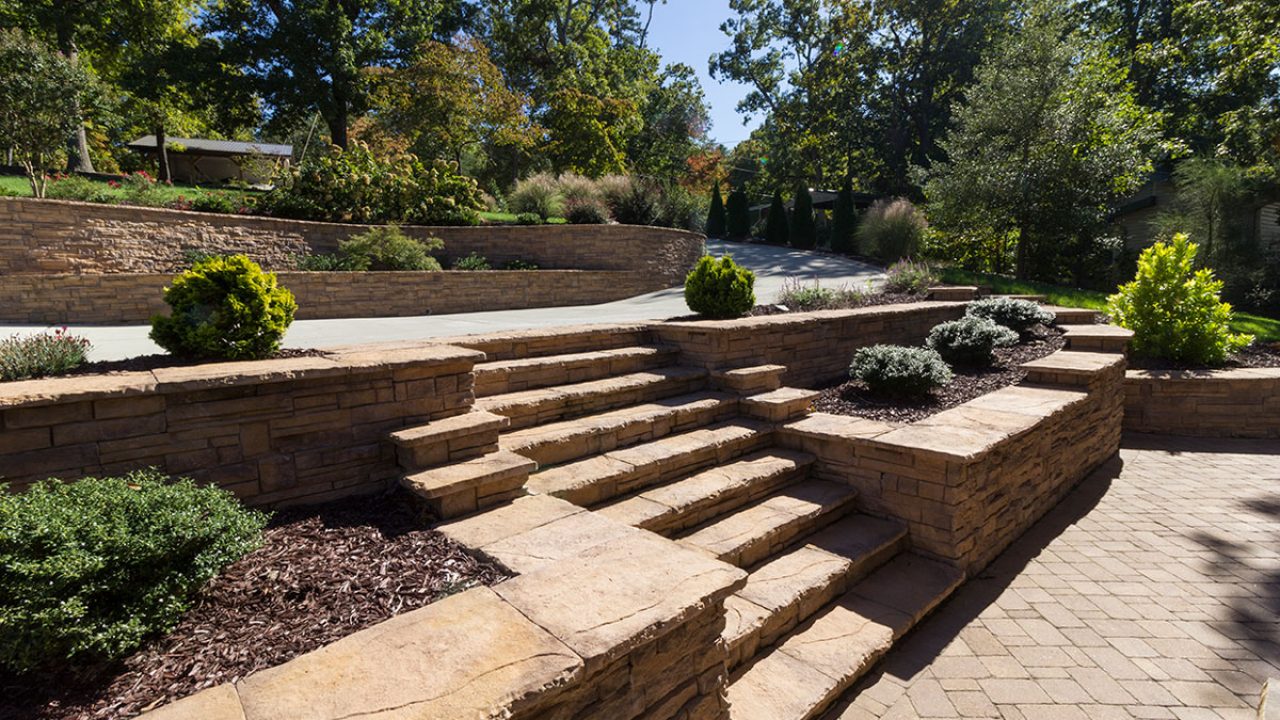
Building stairs in a retaining wall is a valuable skill to have for homeowners and DIY enthusiasts alike. Whether you’re looking to create easier access to different levels of your yard or want to enhance the aesthetic appeal of your outdoor space, incorporating stairs into a retaining wall can accomplish both goals. Not only do stairs provide functional benefits, but they also add a touch of elegance and sophistication to any landscape design. In this article, we will guide you through the step-by-step process of planning, designing, and building stairs in a retaining wall.
Before diving into the construction process, it’s important to note that building stairs in a retaining wall requires careful planning and adherence to local building codes. It’s essential to ensure both the safety and durability of the stairs to prevent accidents and structural issues down the line. By following the proper guidelines and techniques, you can successfully create a beautiful and functional stairway that will withstand the test of time.
In this comprehensive guide, we will walk you through each stage of building stairs in a retaining wall, including planning and designing the stairs, gathering the necessary materials and tools, preparing the retaining wall, marking the stair locations, cutting out the stair treads and risers, installing the treads and risers, securing the stairs, and applying the finishing touches. By the end of this article, you will have the knowledge and confidence to tackle this project and create an impressive set of stairs within your retaining wall.
So, let’s get started with the planning and designing stage, where we’ll explore the key considerations and steps to take before diving into the construction process.
Key Takeaways:
- Careful planning, precise installation, and proper securing are essential for building durable and visually appealing stairs in a retaining wall. Attention to detail and adherence to safety guidelines are crucial for a successful project.
- From gathering materials to applying finishing touches, building stairs in a retaining wall requires patience, creativity, and a commitment to quality. Embrace the process and take pride in the transformation of your outdoor space.
Read more: How To Build A Brick Retaining Wall
Step 1: Planning and Designing the Stairs
Before you can begin building stairs in a retaining wall, it’s important to carefully plan and design your project. This involves determining the location and size of the stairs, checking the local building codes, and drawing a detailed plan for the stairs.
The first step in planning and designing the stairs is to determine the location where you want them to be built. Consider the functionality and accessibility of your outdoor space and choose a spot that provides easy access to different levels or areas. Take into account the natural flow and layout of your yard to ensure that the stairs blend harmoniously with the surrounding landscape.
Once you have chosen the location, you need to determine the size of the stairs. Consider factors such as the height of the retaining wall, the number of steps needed, and the desired width of each step. It’s essential to strike a balance between the size of the stairs and the available space to ensure both safety and convenience.
After determining the location and size of the stairs, it’s crucial to check the local building codes and regulations. Building codes may vary depending on your location, and it’s important to familiarize yourself with the specific requirements for constructing stairs in a retaining wall. This step is essential to ensure compliance with safety standards and to prevent potential issues in the future.
With the location, size, and building codes in mind, the next step is to draw a detailed plan for the stairs. A well-thought-out plan will serve as a blueprint for construction, providing guidance on materials, dimensions, and the overall layout. Consider using graph paper or a digital design tool to accurately depict the dimensions of the retaining wall and the stairs. Include all necessary measurements, such as the height of the steps, the width of the treads, and the depth of the risers. Additionally, note any additional features or elements you wish to incorporate, such as railings or decorative elements.
By taking the time to carefully plan and design your stairs, you will set yourself up for a successful and smooth construction process. Planning ensures that you have a clear vision of the project, and it allows you to anticipate any challenges or obstacles that may arise along the way. So, grab a pen and paper and begin sketching out your design, keeping in mind the location, size, local building codes, and aesthetic preferences.
Step 2: Gathering Materials and Tools
Once you have a detailed plan for your stairs, it’s time to gather all the necessary materials and tools for the construction process. Having everything readily available will ensure a smooth and efficient workflow, minimizing interruptions and delays. Here is a list of the materials and tools you’ll need:
List of Necessary Materials:
- Retaining wall blocks or stones
- Concrete mix
- Pressure-treated lumber for stair treads and risers
- Construction adhesive
- Screws or anchors
- Gravel or crushed stone for the base
- Caulk or mortar
- Paint or stain (optional)
List of Required Tools:
- Tape measure
- Pencil
- Level
- Trowel
- Masonry saw or angle grinder
- Circular saw or miter saw
- Drill
- Screwdriver
- Paintbrush or roller (if painting or staining)
- Safety equipment, such as gloves and goggles
When gathering the materials, it’s important to ensure their quality and suitability for the job. Retaining wall blocks or stones should be sturdy and able to withstand the weight and pressure of the stairs. Pressure-treated lumber is necessary for the treads and risers, as it is durable and resistant to decay and rot. Concrete mix should be of high quality and suitable for outdoor applications.
As for the tools, they should be in good working condition and appropriate for the tasks at hand. The tape measure, pencil, and level are essential for accurate measurements and alignment. A trowel is needed for applying the adhesive and mortar, while a masonry saw or angle grinder is necessary for cutting the retaining wall blocks or stones. A circular saw or miter saw will come in handy for cutting the lumber, and a drill and screwdriver are needed for securing the stairs. If you plan to paint or stain the stairs, you’ll also need a paintbrush or roller.
Don’t forget to prioritize safety by wearing appropriate protective equipment, such as gloves and goggles, to protect yourself from potential hazards during construction.
By gathering all the necessary materials and tools beforehand, you’ll be well-prepared to start the construction process and avoid unnecessary delays. Take your time to gather high-quality materials and ensure that your tools are in good working condition. Doing so will contribute to the overall success and durability of your stairs.
Step 3: Preparing the Retaining Wall
Before you can begin the installation of the stairs, it’s crucial to prepare the retaining wall properly. This step involves ensuring the stability and integrity of the wall, cleaning the surface, and repairing any existing damages. By taking these precautions, you’ll ensure a solid foundation for the stairs and enhance their longevity.
The first task is to assess the stability and integrity of the retaining wall. Inspect the wall for any signs of structural damage, such as cracks, bulges, or leaning. If you notice any significant issues, it’s recommended to consult a professional before proceeding. Addressing any structural concerns beforehand will prevent further damage and ensure the safety of your stairs.
Next, clean the surface of the retaining wall to remove any dirt, debris, or vegetation that may affect the bond between the wall and the stairs. Use a stiff brush or pressure washer to thoroughly clean the surface. Pay special attention to any crevices or gaps where the stairs will be installed.
If you encounter any existing damages, such as loose or damaged blocks, it’s important to repair them before proceeding. Remove any loose or damaged blocks and replace them with new ones, following the manufacturer’s instructions. Ensure that the replacement blocks are properly secured and fit snugly into the wall to maintain its stability.
Additionally, it’s crucial to check the vertical alignment of the retaining wall to ensure that it is level. A slight slope or irregularity can affect the positioning and stability of the stairs. Use a level to determine if the wall is vertical, and make any necessary adjustments by adding or removing soil, or applying a leveling compound, if needed. A level wall will provide a solid base for the stairs and ensure their proper installation.
By thoroughly preparing the retaining wall, you’ll create a stable and secure foundation for your stairs. Ensuring the stability and integrity of the wall, cleaning the surface, and repairing any damages will contribute to the overall durability and safety of your staircase. Take the time to assess and address any issues before proceeding to the next steps.
Step 4: Marking the Stair Locations on the Wall
Once the retaining wall is prepared, it’s time to mark the locations of the stairs. This step involves determining the number and size of the stairs and using a level and pencil to mark the positions accurately.
The first task is to determine the number of stairs you will need. Consider the height of the retaining wall and the desired height for each step. Divide the overall height by the desired height of each step to determine the number of stairs. It’s important to ensure that the height of each step is consistent to provide a comfortable and safe climbing experience.
Next, determine the size of each step, including the width of the tread and the height of the riser. The tread is the horizontal surface of the step that you step on, and the riser is the vertical surface that connects each tread. Standard tread width is typically around 11 to 12 inches, while riser height is usually around 6 to 8 inches. However, you can adjust these measurements to fit your specific needs and preferences.
Once you have determined the number and size of the stairs, use a level and pencil to mark their positions on the retaining wall. Place the level horizontally on the wall where the first tread will be, and adjust it until it is perfectly level. Mark a straight line with the pencil along the top edge of the level. This line represents the back edge of the first tread.
Repeat this process for each tread, ensuring that each line is level and parallel to the ground. Use the pencil to mark the positions of the risers below each tread line. These markings will serve as your guide during the installation process.
It’s important to be precise and accurate when marking the stair locations to ensure that the stairs are straight, level, and visually appealing. Take your time to measure and mark each position carefully, double-checking the measurements and using a level to maintain accuracy.
By marking the stair locations on the retaining wall, you will have a clear visual guide for the installation process. This step helps ensure that the stairs are properly aligned and positioned, providing a safe and aesthetically pleasing final result.
When building stairs in a retaining wall, make sure to use proper materials and techniques to ensure stability and safety. It’s important to follow local building codes and regulations to ensure the stairs are built to the proper specifications.
Read more: How To Build A Retaining Wall For A Driveway
Step 5: Cutting Out the Stair Treads and Risers
After marking the stair locations on the retaining wall, the next step is to cut out the stair treads and risers. This step involves measuring and cutting the treads from the chosen material and measuring and cutting the risers for each step.
To begin, measure the length and width of each tread, ensuring they correspond with the dimensions marked on the wall. The tread material can be chosen based on personal preference, such as pressure-treated lumber, composite decking, or natural stone. Use a measuring tape and pencil to mark the dimensions on the chosen material, and double-check the accuracy of your measurements before making any cuts.
Once you have marked the measurements on the tread material, use a circular saw or miter saw to carefully cut along the marked lines. Follow appropriate safety precautions, such as wearing safety goggles and gloves, and ensure the material is securely clamped down before making any cuts. Take your time and make steady, controlled cuts to achieve clean and precise edges.
After cutting the treads, the next step is to measure and cut the risers for each step. Measure the height between each tread and mark the dimensions on the chosen material. Again, double-check the accuracy of your measurements before proceeding.
Similar to the treads, use a circular saw or miter saw to cut along the marked lines for the risers. Take care to make straight and accurate cuts, ensuring the risers fit snugly between each tread and align with the marked positions on the wall.
It’s important to note that if you prefer a floating stair design, where the risers are not visible, you can omit this step and focus solely on cutting the treads. This design option provides a more open and modern look.
By measuring and cutting the treads and risers accurately, you’ll ensure that each step fits seamlessly into the retaining wall and creates a sturdy and reliable staircase. Take your time during this step to achieve precise cuts and maintain the dimensions specified in your design.
Step 6: Installing the Stair Treads and Risers
With the stair treads and risers cut to the proper dimensions, it’s time to install them onto the retaining wall. This step involves applying construction adhesive on the back of each tread and riser and then positioning and attaching them to the wall.
Begin by applying construction adhesive to the back of each stair tread. Place a generous amount of adhesive to ensure a strong bond between the tread and the surface of the retaining wall. Make sure to spread the adhesive evenly across the entire back surface.
Once the adhesive is applied, carefully position the first stair tread onto the wall, aligning it with the markings you made earlier. Ensure that the front edge of the tread is flush with the front edge of the retaining wall. Press the tread firmly against the wall, applying even pressure to secure it in place.
Continue this process for each of the remaining treads, applying adhesive and positioning them one by one. Make sure to maintain consistent spacing between each tread to ensure a balanced and visually appealing staircase. Use a level to ensure that each tread is positioned horizontally and adjust as necessary.
After installing the treads, move on to the risers. Apply construction adhesive to the back of each riser, taking care to spread it evenly across the surface. Position the first riser beneath the first tread, ensuring that it aligns with the markings on the wall.
Press the riser firmly against the wall, using a level to ensure it is vertical and aligned with the treads. Adjust as necessary to achieve a straight and secure installation. Repeat this process for each riser, making sure to apply adhesive and position them accurately.
As you install each tread and riser, check for levelness and adjust as needed to maintain a uniform and stable staircase. It’s important to take your time during this step to ensure the treads and risers are properly secured to the retaining wall.
Keep in mind that the drying time for the construction adhesive may vary, so refer to the manufacturer’s instructions for specific guidelines. Allow sufficient time for the adhesive to fully cure before moving on to the next step.
By applying construction adhesive and securely positioning the stair treads and risers onto the retaining wall, you’ll create a sturdy and reliable staircase. Take care to position them accurately and ensure levelness for a visually pleasing and safe result.
Step 7: Securing the Stairs
After installing the stair treads and risers onto the retaining wall, the next step is to secure them in place. This step involves checking for proper alignment and levelness and using screws or anchors to secure the treads and risers.
Begin by thoroughly inspecting the installed stairs to ensure that they are aligned properly and level. Use a level to check the horizontal alignment of each individual tread and the overall levelness of the staircase. Make any necessary adjustments to ensure that the stairs are straight and uniform.
If any of the treads or risers are not level, insert shims beneath them to achieve the desired alignment. Shims are thin pieces of wood or plastic that can be wedged between the stairs and the wall to level them out. Make sure to use shims of the appropriate thickness to ensure stability.
Once the stairs are aligned and level, it’s time to secure them to the retaining wall. Depending on the material of the wall and the chosen method of installation, you can use screws or anchors to achieve a secure attachment.
If your retaining wall is made of wood, drive screws into the treads and risers at strategic locations to secure them to the wall. Choose screws that are appropriate for outdoor use and compatible with the material of the stairs and the retaining wall. Predrilling pilot holes before driving in the screws can help prevent splitting of the wood.
If your retaining wall is made of concrete or masonry, you may use anchors to secure the stairs. Drill holes into the wall at predetermined locations, and insert the anchors according to the manufacturer’s instructions. Once the anchors are in place, use screws to fasten the treads and risers securely to the wall.
It’s important to ensure that the screws or anchors are driven in securely and tightly to provide a strong and stable attachment. This will ensure the durability and safety of the installed stairs.
After securing the stairs, double-check their alignment and levelness to ensure that they haven’t shifted or become loose during the attachment process. Make any final adjustments if necessary.
By checking for proper alignment and levelness and securely attaching the stairs to the retaining wall, you’ll create a stable and reliable staircase. Taking the time and effort to secure the stairs properly will contribute to their long-lasting performance and safety.
Step 8: Finishing Touches
After securing the stairs to the retaining wall, it’s time to add the finishing touches to complete the project. This step involves filling any gaps or seams with caulk or mortar and sanding and painting or staining the stairs if desired.
Begin by inspecting the installed stairs for any gaps or seams between the treads, risers, and the retaining wall. Use a caulk gun to apply a bead of caulk along these gaps, filling them in to create a seamless and finished look. Choose a caulk color that matches the color of the stairs to ensure a cohesive appearance. Smooth out the caulk with a caulk smoothing tool or your finger for a neat and professional finish.
If you have used natural stone for your treads and risers, you may use mortar instead of caulk to fill in any gaps or seams. Mix the mortar according to the manufacturer’s instructions and apply it using a pointing trowel. Be sure to match the mortar color with the stone for a seamless and natural-looking finish.
Once the gaps and seams are filled, it’s time to give the stairs a final touch-up. If desired, sand the surfaces of the treads and risers to smooth out any rough edges or imperfections. Start with a coarse-grit sandpaper and gradually move to a finer grit for a smooth finish. Sand in the direction of the wood grain or the natural texture of the stone to avoid damaging the surface.
If you wish to enhance the appearance of the stairs, you can consider painting or staining them. Choose a high-quality outdoor paint or stain that is suitable for the material of your stairs. Apply the paint or stain evenly with a brush or roller, following the manufacturer’s instructions. Allow sufficient drying time between coats, and apply additional coats as necessary until you achieve the desired color and finish.
Alternatively, if you used pressure-treated lumber for your stairs, you can leave them unpainted or unstained and allow them to weather naturally over time.
After completing the finishing touches, take a step back and admire your work. Your stairs should now be visually appealing, with any gaps or seams filled and the surfaces smoothed and painted or stained if desired.
By giving attention to the finishing touches, you will elevate the overall appearance and quality of your stairs. Whether you decide to caulk or mortar the gaps, and whether you choose to paint, stain, or leave the stairs natural, the finishing touches will add the final touch of finesse to your project.
Read more: How To Build Retaining Wall On A Slope
Conclusion
Building stairs in a retaining wall is a project that can greatly enhance the functionality and aesthetics of your outdoor space. Throughout the step-by-step process, we have discussed the importance of careful planning, gathering the necessary materials and tools, preparing the retaining wall, marking the stair locations, cutting out the treads and risers, installing the stairs, securing them, and applying the finishing touches. By following these steps, you can successfully create a beautiful and functional set of stairs that will not only provide easy access but also add a touch of elegance to your landscape design.
Proper planning is crucial, from determining the location and size of the stairs to checking local building codes and drawing a detailed plan. Gathering the necessary materials and tools ensures a smooth workflow, while preparing the retaining wall establishes a stable and secure foundation for the stairs. Marking the stair locations on the wall helps with precise installation, and cutting out the treads and risers ensures a perfect fit. Installing the stairs involves applying construction adhesive, positioning them accurately, and securely attaching them to the wall. Checking for proper alignment and levelness and using screws or anchors to secure the stairs further guarantees their stability. Finally, the finishing touches, such as filling gaps and seams and sanding and painting or staining the stairs, add the final touches of completeness and visual appeal.
Undertaking a project like building stairs in a retaining wall requires patience, attention to detail, and adherence to safety guidelines. It’s important to follow local building codes and consult professionals when needed. By investing time and effort into this project, you can create a functional, durable, and visually pleasing set of stairs that will transform your outdoor space.
Remember, building stairs in a retaining wall is not just a functional addition—it’s an opportunity to showcase your creativity and enhance the overall landscape design. Enjoy the process, embrace your creativity, and take pride in the finished product. Happy building!
Frequently Asked Questions about How To Build Stairs In A Retaining Wall
Was this page helpful?
At Storables.com, we guarantee accurate and reliable information. Our content, validated by Expert Board Contributors, is crafted following stringent Editorial Policies. We're committed to providing you with well-researched, expert-backed insights for all your informational needs.


0 thoughts on “How To Build Stairs In A Retaining Wall”