Articles
How To Build Field Fence Corners
Modified: August 22, 2024
Learn the best techniques and tips for building sturdy field fence corners with our informative articles. Improve the durability and longevity of your fence with our expert advice.
(Many of the links in this article redirect to a specific reviewed product. Your purchase of these products through affiliate links helps to generate commission for Storables.com, at no extra cost. Learn more)
Introduction
Field fence corners play a crucial role in building a sturdy and reliable fence around your property. Whether you need to enclose a pasture, create a boundary for livestock, or establish a barrier to keep out predators, properly constructing field fence corners is essential for the overall stability and longevity of the fence.
In this comprehensive guide, we will walk you through the step-by-step process of building field fence corners. We’ll cover everything you need to know, from marking the corner posts to adding tension to the wire. By following these instructions and using the right tools and materials, you’ll have a solid foundation for your field fence corners.
Before we dive into the details, let’s take a look at the tools and materials you’ll need:
- Corner posts
- H-braces
- Fence wire
- Wire tensioners
- Post hole digger
- Trowel
- Level
- Measuring tape
- Hammer
- Fence staples
Having these tools and materials ready will ensure a smooth and efficient construction process.
Key Takeaways:
- Building sturdy field fence corners requires precise planning, accurate measurements, and proper installation of corner posts and H-braces. Attention to detail and using the right tools and materials are crucial for a reliable and long-lasting fence.
- Regular maintenance and testing of the field fence are essential to ensure its durability and effectiveness. By addressing any potential weaknesses early on and making necessary repairs, you can maintain a secure enclosure for your property or livestock.
Read more: How To Put Up Field Fence
Tools and Materials
Before you begin building field fence corners, it’s important to gather all the necessary tools and materials to complete the project. Here’s a list of what you’ll need:
Tools:
- Post hole digger: This tool is essential for digging the holes for the corner posts and H-braces.
- Trowel: You’ll need a trowel to remove any excess dirt or debris from the post holes.
- Level: A level is necessary to ensure that the corner posts and H-braces are plumb and level.
- Measuring tape: Accurate measurements are crucial for properly spacing the corner posts and H-braces.
- Hammer: You’ll need a hammer to drive the fence staples into the posts and secure the wire.
Materials:
- Corner posts: These are the main support posts for the fence corners. They should be sturdy and made of strong materials like wood or metal.
- H-braces: H-braces provide additional support to the fence corners and help prevent sagging or leaning. They are typically made of wood or metal.
- Fence wire: Choose a high-quality, durable fence wire that is suitable for the type of livestock or animals you’re trying to contain.
- Wire tensioners: These tensioners are used to tighten the fence wire and keep it taut.
- Fence staples: Use fence staples to secure the fence wire to the corner posts and H-braces.
Gathering these tools and materials beforehand will save you time and ensure that you have everything you need to complete the project.
Step 1: Marking the Corner Posts
The first step in building field fence corners is to mark the locations for your corner posts. The placement of these posts is crucial, as they serve as the foundation for the entire fence. Here’s how to mark the corner post locations:
- Start by determining the layout and boundaries of your fence. Use stakes and string to outline the perimeter of the fence, ensuring that the corners are squared.
- Measure and mark the desired distance for the first corner post. This measurement will depend on the size and layout of your fence. Ensure that the distance is consistent with the rest of the fence line.
- Double-check the accuracy of your measurements by using a measuring tape and level. This will help ensure that your fence corners are properly aligned.
- Drive a stake into the ground at the marked location for the first corner post. This stake will serve as a temporary reference point.
- Repeat the measurements and marking process for the remaining corner posts. Make sure each corner is properly aligned and squared with the string lines.
Once you have marked the locations for all the corner posts, you are ready to move on to the next step: preparing the H-braces.
Remember, accuracy is key when marking the corner post locations, as any errors can affect the overall stability and alignment of your fence. Take your time in this step to ensure that everything is properly measured and marked.
Read more: How To Build A Corner Fireplace
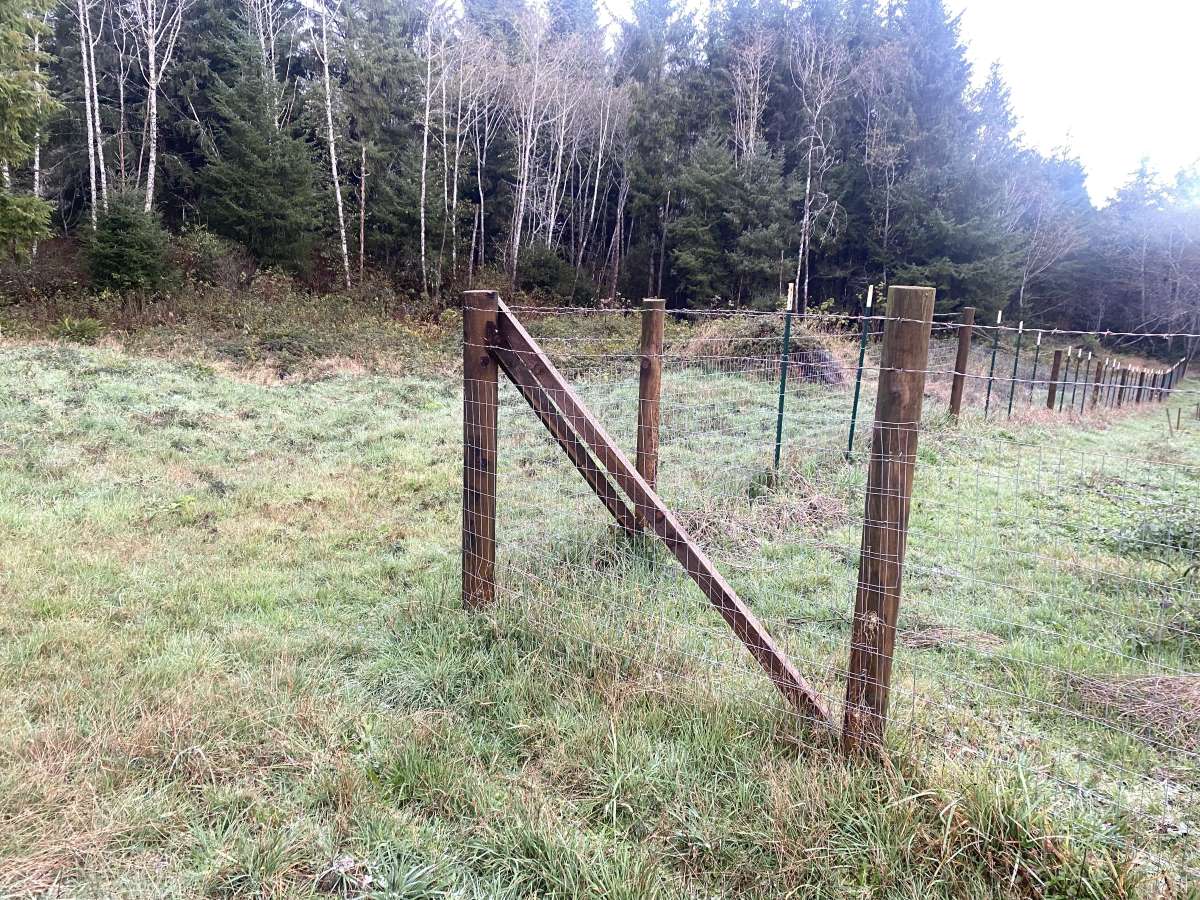
Step 2: Preparing the H-Braces
In order to provide additional support and stability to your field fence corners, you’ll need to install H-braces. H-braces consist of two diagonal braces that form an ‘H’ shape and help reinforce the corner posts. Here’s how to prepare the H-braces:
- Select the appropriate size and type of materials for your H-braces. Common options include treated lumber or metal pipes.
- Measure and cut the two diagonal braces to the desired length. The length will depend on the height of your fence and the distance between the corner posts.
- At one end of each brace, cut a 45-degree angle to create a point. This will allow the brace to penetrate the ground and provide additional support.
- Position the braces against the corner posts, forming an ‘X’ shape. Ensure that the angled ends of the braces are facing downwards.
- Mark the placement of the braces on the corner posts.
- Using a drill or a hammer and nails, secure the braces to the corner posts. Make sure they are tightly fastened to provide maximum support.
Once you have prepared the H-braces, you are ready to move on to the next step: digging the corner post holes.
Remember, the stability and strength of your field fence corners depend on the proper installation of the H-braces. Take your time to accurately measure and securely fasten the braces to the corner posts for optimal results.
Step 3: Digging the Corner Post Holes
Now that you have marked the locations for the corner posts and prepared the H-braces, it’s time to dig the holes for the corner posts. Properly dug holes will provide a stable foundation for the posts, ensuring the integrity of your field fence corners. Here’s how to dig the corner post holes:
- Using a post hole digger, start digging the first corner post hole at the marked location. The depth of the hole should be determined by the height of your fence, typically at least one-third of the post’s length.
- Remove the soil from the hole and set it aside for later use.
- Repeat the digging process for the remaining corner post holes, ensuring that each hole is evenly spaced and aligned with the fence layout.
- Check the depth and width of each hole using a measuring tape or a level. Adjust the holes as needed to ensure consistency and alignment.
- Once all the holes are dug and properly aligned, remove any excess dirt or debris from the holes using a trowel.
By taking the time to dig the corner post holes correctly, you are setting a strong foundation for your field fence corners. This step is crucial in ensuring the stability and longevity of the fence.
Next, we’ll move on to the next step: setting the corner posts in the holes.
Step 4: Setting the Corner Posts
With the corner post holes dug, it’s time to set the corner posts. These posts will serve as the main support for your field fence corners, so it’s important to ensure they are properly installed and secured. Here’s how to set the corner posts:
- Start by placing one corner post into the first post hole. Make sure it is aligned with the string lines and that it stands straight.
- Fill the hole around the corner post with the soil that you set aside earlier. Tamp down the soil firmly using a trowel or the end of a post hole digger to provide stability.
- Repeat the process for the remaining corner posts, ensuring they are evenly spaced and aligned with the fence layout.
- Use a level to check that each corner post is plumb and straight. Adjust the alignment and add or remove soil as necessary.
- Tamp down the soil around each post again to ensure it is firmly packed and provides adequate support.
Setting the corner posts properly is essential for the stability and longevity of your field fence corners. Taking the time to ensure they are aligned and securely installed will pay off in the long run.
Next, we’ll move on to the next step: installing the H-braces to reinforce the corners of the fence.
Step 5: Installing the H-Braces
After setting the corner posts, it’s time to install the H-braces to provide additional support and stability to your field fence corners. The H-braces will help prevent sagging and maintain the overall strength of the fence. Here’s how to install the H-braces:
- Position one end of the H-brace against the corner post, with the angled end of the brace facing downwards.
- Secure the H-brace to the corner post using screws, nails, or metal brackets. Make sure the brace is tightly fastened to the post for maximum support.
- Repeat the process for the second end of the H-brace, placing it against another corner post and securing it tightly.
- Check the alignment and stability of the H-braces by applying pressure and ensuring they are securely fastened to both corner posts.
- Repeat the installation process for the remaining H-braces at each corner of the fence.
Installing the H-braces will significantly enhance the strength and durability of your field fence corners. Properly secured H-braces will help distribute the tension evenly along the fence line, preventing any weak spots or leaning corners.
Next, we’ll move on to the next step: stretching the fence wire.
When building field fence corners, use sturdy corner posts and brace assemblies to provide support and prevent sagging or leaning over time. This will ensure the longevity and stability of your fence.
Read more: How To Build A Corner Pantry Cabinet
Step 6: Stretching the Fence Wire
Once the corner posts and H-braces are in place, it’s time to stretch the fence wire across the field fence corners. Stretching the fence wire is essential for creating a secure and stable barrier for your property or livestock. Follow these steps to stretch the fence wire:
- Start at one end of the fence line and attach the fence wire securely to the first corner post using fence staples. Make sure the wire is taut but not overly stretched.
- Move to the next corner post and continue attaching the fence wire, pulling it tightly as you go. Use fence staples to secure the wire to each corner post and H-brace.
- Continue this process, stretching the fence wire one section at a time until you reach the opposite end of the fence line.
- Make sure the fence wire is evenly spaced and properly aligned along the entire fence line.
Stretching the fence wire properly is crucial for achieving a sturdy and reliable field fence. It’s important to maintain consistent tension while installing the wire to ensure there are no sagging areas or loose sections.
Once the fence wire is in place, you’re ready to move on to the next step: securing the fence wire to the posts and braces.
Step 7: Securing the Fence Wire to the Posts
With the fence wire stretched across the field fence corners, it’s time to securely attach the wire to the posts and H-braces. Properly securing the fence wire will prevent it from coming loose or sagging over time. Follow these steps to secure the fence wire:
- Starting at one end of the fence line, use fence staples to attach the fence wire to the first corner post. Place the staples evenly along the wire, ensuring it is held securely in place.
- Continue attaching the fence wire to each corner post and H-brace using fence staples. Space the staples approximately 12-18 inches apart for optimal support.
- Be careful not to overdrive the staples, as this could damage the wire or weaken its hold. Use a hammer or staple gun to gently secure the wire without crushing it.
- Check the tension of the wire as you secure it to ensure it remains taut and evenly stretched along the entire fence line.
By securely fastening the fence wire to the posts and H-braces, you’ll create a strong and reliable field fence that can withstand the elements and the pressure of livestock. Take your time in this step to ensure that the wire is properly attached and tensioned.
Next, we’ll move on to the next step: adding tension to the wire.
Step 8: Adding Tension to the Wire
After securing the fence wire to the corner posts and H-braces, it’s important to add tension to the wire to ensure it remains taut and properly supported. Tightening the fence wire will help prevent sagging and maintain the integrity of your field fence. Follow these steps to add tension to the wire:
- Start at one end of the fence line and locate the wire tensioner, which is typically a device designed to tighten the wire.
- Attach the tensioner to the fence wire, near the first corner post.
- Using a tensioning tool or a pair of pliers, begin tightening the tensioner in a clockwise motion. This action will tighten the wire and remove any excess slack.
- Continue tightening the tensioner until the fence wire is taut, but be careful not to over-tension it, as this may cause the wire to break or put excessive strain on the corner posts.
- Repeat this process for each section of the fence wire, ensuring consistent tension throughout the entire fence line.
Adding tension to the wire is a critical step in building field fence corners, as it maintains the strength and stability of the fence. By properly tensioning the wire, you’ll minimize the risk of sagging and ensure a secure enclosure for your property or livestock.
With the tension added to the wire, you’re nearly done with the construction of your field fence corners. The next step is to test the fence for any potential issues or weaknesses.
Step 9: Testing the Fence
Before considering your field fence corners complete, it’s crucial to thoroughly test the fence to ensure its effectiveness and durability. Testing the fence will help identify any potential weaknesses or areas that require further reinforcement. Follow these steps to test your fence:
- Walk along the entire length of the fence line, carefully inspecting for any loose wire, sagging sections, or gaps.
- Gently push against the fence at various points to check for any noticeable give or weak spots. Take note of any areas that require additional support.
- If you have livestock, introduce them to the fenced area and observe their behavior. Pay attention to any attempts to breach the fence or signs of the fence being compromised.
- Make any necessary adjustments or repairs to reinforce the fence. This may involve tightening loose wire, adding additional staples, or installing extra braces or supports.
- Regularly monitor the condition of your fence and make any maintenance repairs as needed to ensure its ongoing functionality.
By testing your field fence corners, you’ll be able to address any potential issues early on and prevent future problems. Regular maintenance and inspections will help keep your fence in optimal condition and provide reliable protection for your property or livestock.
With the fence successfully tested and any necessary adjustments made, you can confidently consider your field fence corners complete. Congratulations on building a sturdy and reliable fence!
Remember, proper maintenance, including regular inspections and repairs, will help ensure the longevity and effectiveness of your field fence corners in the years to come.
Thank you for following this step-by-step guide. Happy fencing!
Read more: How To Build Corner Deck Stairs
Conclusion
Building field fence corners requires careful planning, precise execution, and attention to detail. By following the step-by-step process outlined in this guide, you can construct sturdy and reliable fence corners that will stand the test of time.
From marking the corner posts to testing the fence for durability, each step plays a crucial role in ensuring the strength and stability of your field fence. By using the right tools and materials, properly installing H-braces, and securing the fence wire, you can create a secure enclosure for your property or livestock.
Regular maintenance and inspections are also essential to keep your field fence corners in optimal condition. By periodically checking for loose wire, sagging sections, or any signs of weakness, you can address any issues promptly and prevent further damage.
Remember that building field fence corners is a task that requires patience, accuracy, and commitment to quality. Taking the time to do it right will save you from future headaches and potential costly repairs.
Now that you have the knowledge and understanding of how to build field fence corners, put it into action and create a reliable and durable fence for your needs. Whether it’s for enclosing pastures, establishing boundaries, or protecting your livestock, properly constructed field fence corners will provide you with peace of mind and security.
Thank you for following this comprehensive guide. Happy fencing!
Now that you've mastered building field fence corners, why not give your garden a stylish yet practical upgrade? Dive into our guide on creative garden fence ideas. Whether you seek privacy, beauty, or just a new project, you'll find plenty of inspiration to transform your outdoor space. Don't miss out on these innovative designs!
Frequently Asked Questions about How To Build Field Fence Corners
Was this page helpful?
At Storables.com, we guarantee accurate and reliable information. Our content, validated by Expert Board Contributors, is crafted following stringent Editorial Policies. We're committed to providing you with well-researched, expert-backed insights for all your informational needs.


0 thoughts on “How To Build Field Fence Corners”