Articles
How To Finish Garage Stairs
Modified: October 22, 2024
Learn the best techniques and tips for finishing your garage stairs from our expert articles. Transform your space in no time with our easy-to-follow tutorials.
(Many of the links in this article redirect to a specific reviewed product. Your purchase of these products through affiliate links helps to generate commission for Storables.com, at no extra cost. Learn more)
Introduction
Welcome to our comprehensive guide on how to finish garage stairs! If you have a garage with unfinished or worn-out stairs, this article will provide you with the step-by-step instructions to transform them into a safe and visually appealing feature of your home. Whether you use your garage as a workshop, storage space, or simply want to upgrade the overall look, finishing your garage stairs will not only enhance the functionality but also add value to your property.
Before diving into the process, it’s important to note that finishing garage stairs requires a basic understanding of carpentry and DIY skills. If you are not comfortable with these tasks or unsure about your abilities, it is strongly recommended to consult a professional. However, if you feel confident and eager to take on the project, let’s get started!
First and foremost, you need to assess the current state of your garage stairs. Are they already installed but in need of repairs or refinishing? Or do you need to build new stairs from scratch? Depending on the situation, the steps involved may vary slightly. In this article, we will cover both scenarios, starting with the measurements and planning phase.
Key Takeaways:
- Transforming your garage stairs into a safe and visually appealing feature of your home is achievable with the right knowledge and skills. From planning and installation to finishing touches and safety measures, this comprehensive guide equips you for success.
- By following the step-by-step process outlined in this article, you can confidently tackle the project of finishing your garage stairs. From measuring and planning to securing and adding final touches, you’ll create a durable, functional, and attractive staircase for your home.
Read more: How To Finish Side Of Stairs
Step 1: Measure and plan
Before any construction or installation takes place, it’s essential to measure the available space for your stairs. Take accurate measurements of the width, depth, and height of the area, ensuring that you comply with local building codes and safety regulations. These measurements will serve as the foundation for planning the layout of your stairs, including the number of steps and the dimensions of each tread and riser.
Once you have the measurements, you can create a plan or a sketch to visualize the final design. This step is crucial in determining the materials and tools required for the project. It’s also an excellent opportunity to consider any additional features you may want to incorporate, such as handrails or anti-slip measures. Once your plan is in place, you can move on to gathering the necessary materials and tools.
Keep up with newlines and spaces
Step 1: Measure and Plan
Before you start any construction or installation, it’s crucial to measure the available space for your garage stairs and create a detailed plan. Planning and accurate measurements will ensure that your stairs fit properly and meet building codes and safety regulations. Here’s how to get started:
1. Assess the space: Take a thorough look at the area where you plan to install or refinish your garage stairs. Measure the width, depth, and height, and make note of any obstacles or obstructions that may affect the design and layout.
2. Determine the number of steps: Based on the height of the stairs, determine the number of steps required. Remember to account for the thickness of tread and riser material when calculating the exact height of each step.
3. Calculate the tread and riser dimensions: The tread is the horizontal part of the stair, and the riser is the vertical part that connects each tread. While building codes may vary, a typical rule of thumb is a 7-inch rise and an 11-inch run. Adjust these measurements based on your specific needs and preferences.
4. Consider safety features: As you plan out your stairs, keep safety in mind. Consider adding handrails for extra stability, especially if your stairs are more than a few steps high. You can also incorporate anti-slip measures such as non-slip adhesive strips or textured tread materials to prevent accidents.
5. Create a detailed plan: Once you have gathered all the necessary measurements and considerations, create a detailed plan or sketch that outlines the layout and dimensions of your stairs. This plan will serve as a guide throughout the construction process and help you stay organized.
6. Check local building codes: Before proceeding, ensure that your planned staircase complies with local building codes and regulations. Check for any specific requirements regarding dimensions, handrail specifications, and safety measures.
Remember, measuring and planning are critical steps in the process. Accurate measurements and a well-thought-out plan will not only make the construction phase smoother but also ensure that your finished garage stairs are safe and functional. Take your time during this step to make any necessary adjustments and avoid costly mistakes later on.
Keep up with newlines and spaces
Step 2: Gather Materials and Tools
Once you have completed the planning and measurement phase, it’s time to gather the materials and tools necessary to finish your garage stairs. Having all the required items on hand before you begin the construction process will save you time and frustration. Here’s a list of materials and tools you may need:
Materials:
- Tread boards: Choose a durable and sturdy material such as hardwood, plywood, or composite boards. Consider the aesthetics and color coordination with your garage decor.
- Riser boards: Riser boards provide support and prevent debris from accumulating between the steps. You can use the same material as the tread boards or opt for a different material for contrast.
- Stringers: Stringers are the diagonal supports that hold the treads and risers together. They can be made of pressure-treated lumber or metal, depending on your preference and budget.
- Screws or nails: Select appropriate fasteners based on the material of your stairs. Make sure they are rust-resistant for long-lasting durability.
- Stain or paint: If you want to enhance the appearance of the stairs, choose a stain or paint that is suitable for the material you are using. Consider using a non-slip additive for added safety.
- Handrail: If desired, ensure you have the necessary materials for installing a handrail, including brackets and supports.
- Safety equipment: Don’t forget to prioritize safety. Have goggles, gloves, ear protection, and a dust mask on-hand to protect yourself during the construction process.
Tools:
- Tape measure: For accurate measurements during construction.
- Saw: A circular saw or miter saw will help you cut the boards to the desired length and angle.
- Drill: A power drill is necessary for making screw or nail holes.
- Sander: To smoothen the surfaces of the boards and prepare them for staining or painting.
- Level: Use a level to ensure that the stairs are installed correctly and are even.
- Carpenter’s square: To ensure that your cuts are square and the stairs are aligned properly.
- Clamps: Clamps will help hold the boards in place during installation.
- Pencil or marker: For marking measurements and cutting lines on the boards.
- Paintbrush or roller: To apply stain or paint to the stairs.
Remember, the specific materials and tools you need may vary depending on the design and scope of your project. It’s always a good idea to double-check your plan and consult with professionals at the hardware store to ensure that you have everything you need for a successful project.
Keep up with newlines and spaces
Step 3: Remove Existing Stairs (If Applicable)
If you already have existing stairs in your garage that need to be replaced or refinished, you will first need to remove them before proceeding with the installation of new stairs. Here’s a step-by-step guide on how to remove old stairs:
1. Prepare the area: Clear the surrounding area of any objects or obstacles to create a safe working space. Use drop cloths or tarps to protect the floor and other surfaces from dust and debris.
2. Remove the handrail (if applicable): Start by removing the handrail, if there is one. Use a screwdriver or drill to remove any screws or bolts securing the handrail to the wall or posts. Be careful when removing the handrail to avoid damaging the surrounding area.
3. Remove the balusters: Next, remove the balusters, which are the vertical posts supporting the handrail. Depending on the type of balusters, you may need to use a saw or pry them off with a crowbar. Take caution to avoid damaging the surrounding structure.
4. Remove the tread and riser boards: Use a circular saw or reciprocating saw to cut through the tread and riser boards. Start from the top step and work your way down. Carefully make the cuts along the edges of the stringers to detach the boards from the structure. Be mindful of any nails or screws that may be holding the boards in place.
5. Remove the stringers: Once the tread and riser boards are removed, you can focus on removing the stringers. Use a reciprocating saw or pry bar to detach the stringers from the walls or posts. Take your time and be cautious, as removing the stringers may require some force and precision.
6. Clean up and dispose of debris: Once all the old stairs are removed, clean up the area by sweeping or vacuuming any dust or debris. Dispose of the old materials in accordance with local regulations.
If you are replacing the existing stairs entirely or starting from scratch, you can skip this step and move on to the installation phase. However, if you have removed the old stairs, take a moment to inspect the area and make any necessary repairs before proceeding with the installation of the new stairs.
Remember, if you are unsure about any steps during the removal process or encounter any difficulties, it’s always best to consult with a professional to ensure a safe and successful removal.
Keep up with newlines and spaces
Read more: How To Finish Stairs To Basement
Step 4: Install Stringers
After removing the old stairs or preparing the space for new stairs, it’s time to install the stringers. Stringers are the structural supports that hold the treads and risers together and provide stability to the staircase. Follow these steps to install the stringers:
1. Prepare the stringers: Start by obtaining or building the stringers according to the dimensions and design of your staircase. Stringers can be made of pressure-treated lumber or metal. Ensure that the stringers are cut accurately and have the appropriate number of steps to match your plan.
2. Mark the locations: Place the stringers in their respective positions against the wall or posts. Use a level and carpenter’s square to ensure they are plumb and square. Mark the locations for attaching the stringers to the top and bottom landing areas.
3. Attach the top stringer: Position the top stringer against the wall or post, aligning it with the marked location. Secure it in place using screws or nails, making sure it is securely fastened and level.
4. Install the remaining stringers: Depending on the width of the staircase, you may need additional stringers for support. Install the remaining stringers by spacing them evenly along the length of the stairs. Use a level to ensure they are plumb and a carpenter’s square to check for squareness.
5. Secure the stringers: Once all the stringers are in position, secure them by attaching them to the top and bottom landing areas. This can be done by driving screws, bolts, or anchors through the stringers and into the support structure. Ensure that the stringers are securely fastened, providing a solid foundation for the steps.
6. Check for stability: After the stringers are installed, check the stability of the staircase by applying pressure to different areas. If any movement or wobbling occurs, reinforce the connections or make adjustments as needed to ensure a sturdy and safe staircase.
Installing the stringers is a crucial step in the construction of your garage staircase. It’s important to measure accurately, align them properly, and secure them tightly to ensure the structural integrity of the stairs. Taking the time to install the stringers correctly will lay the foundation for the rest of the staircase installation process.
Keep up with newlines and spaces
When finishing garage stairs, make sure to use materials that can withstand heavy foot traffic and potential exposure to moisture. Consider using durable materials such as pressure-treated wood or composite decking for the treads and risers.
Step 5: Install Tread Boards
With the stringers securely in place, it’s time to move on to installing the tread boards. Tread boards are the horizontal surfaces of the stairs that you step on. Here’s a step-by-step guide on how to install them:
1. Measure and cut the tread boards: Measure the width of each step on your staircase. Using these measurements, mark and cut the tread boards to the desired length. Double-check your measurements and make precise cuts to ensure a proper fit.
2. Start from the bottom: It’s generally recommended to start installing the tread boards from the bottom of the staircase and work your way up. This ensures that the weight of the steps is evenly distributed as you progress.
3. Apply construction adhesive: Apply a thin layer of construction adhesive or wood glue to the top of the stringers, where the tread boards will be installed. This will help provide extra stability and prevent squeaking.
4. Position the tread boards: Place the first tread board on top of the stringers, aligning it with the front and sides of the stairs. Ensure that the board is level and flush against the stringers.
5. Secure the tread boards: Use screws or nails to secure the tread board into place. Drive the fasteners through the tread board and into the stringers, making sure they are evenly spaced and properly secured. Repeat this process for each tread board along the staircase.
6. Check for stability: After each tread board is installed, check for stability and ensure that there is no movement or flexing. If necessary, reinforce any loose or wobbly tread boards by adding additional fasteners or adjusting the securement.
7. Repeat the process: Continue the installation process for each tread board until you reach the top of the staircase. Take your time and use a level to ensure that each tread board is installed evenly and provides a flat surface for safe and comfortable stepping.
Remember to follow safety precautions while installing the tread boards, including wearing protective gloves and safety glasses. Take care to avoid splitting or damaging the tread boards during installation.
Installing the tread boards is an essential step in finishing your garage stairs. It not only enhances the functionality and aesthetics but also provides a solid surface for safe and convenient use. Once all the tread boards are installed, you can move on to the next step of installing the riser boards.
Keep up with newlines and spaces
Step 6: Install Riser Boards
Once you have installed the tread boards, the next step in finishing your garage stairs is to install the riser boards. Riser boards are the vertical components that connect each tread board, enclosing the staircase. Follow these steps to install the riser boards:
1. Measure and cut the riser boards: Measure the height between each tread board to determine the length of the riser boards. Mark and cut the riser boards to the appropriate height, ensuring they are the same length for a uniform look.
2. Start from the bottom: As with the tread boards, it’s best to start installing the riser boards from the bottom of the staircase and work your way up.
3. Apply construction adhesive: Apply a thin layer of construction adhesive or wood glue along the back of the riser board. This will help secure the riser boards in place and provide additional stability.
4. Position the riser boards: Place the first riser board against the back of the first tread board, aligning it with the sides. Ensure that the riser board is level and flush with the tread board and stringers.
5. Secure the riser boards: Use screws or nails to secure the riser board into place. Drive the fasteners through the riser board and into the tread board and stringers. Make sure the fasteners are evenly spaced and properly secured. Repeat this process for each riser board along the staircase.
6. Check for stability: After each riser board is installed, check for stability and ensure that there is no movement or flexing. If necessary, reinforce any loose or wobbly riser boards by adding additional fasteners or adjusting the securement.
7. Repeat the process: Continue the installation process for each riser board until you reach the top of the staircase. Take your time and use a level to ensure that each riser board is installed evenly and provides a visually pleasing and finished look.
Installing the riser boards completes the construction of your garage stairs, enclosing the space between each tread board for a polished and cohesive appearance. Ensure that the riser boards are securely fastened and aligned properly to ensure stability and safety.
Take care to follow safety precautions, such as wearing protective gloves and safety glasses during the installation process. Remember to measure accurately and make precise cuts to ensure a professional and seamless fit for your riser boards.
With the tread boards and riser boards installed, you’re one step closer to completing your garage stairs. The next step is to secure the stairs to the structure and finish them off with a few final touches.
Keep up with newlines and spaces
Step 7: Secure the Stairs
After installing the tread and riser boards, it’s crucial to secure the stairs to ensure stability and safety. Securing the stairs involves anchoring them to the structure and reinforcing the connections. Follow these steps to properly secure your garage stairs:
1. Locate the anchor points: Carefully examine the stringers and identify the anchor points where the stairs will be attached to the structure. These points are typically located on the top and bottom landing areas.
2. Use appropriate fasteners: Choose the appropriate fasteners based on the material of your stringers and the structure you are attaching them to. For example, if your stringers are made of wood and you are attaching them to a wooden structure, exterior-grade screws are typically the best choice.
3. Pre-drill holes: Before inserting the fasteners, pre-drill pilot holes to prevent splitting and ensure a secure connection. The size of the pilot holes should match the outer diameter of the fasteners you are using.
4. Attach the stairs: Align the stairs with the anchor points on the structure and insert the fasteners through the pre-drilled holes in the stringers. Drive the fasteners securely but be careful not to overtighten, as this may cause damage or shifting of the stairs.
5. Check for stability: After attaching the stairs, carefully test their stability by applying pressure and walking up and down. If you notice any wobbling or movement, reinforce the connections by adding additional fasteners or making adjustments as needed.
6. Consider additional support: Depending on the height and length of your stairs, you may need to install additional support such as brackets or posts to enhance stability. Consult local building codes to ensure compliance and follow manufacturer guidelines for installation.
Securing the stairs is an essential step in the finishing process to ensure safety and longevity. Properly anchoring the stairs to the structure provides stability and prevents shifting or movement, especially with regular use over time.
Always prioritize safety when securing your garage stairs. Take your time to ensure that all connections are secure and that the stairs feel sturdy and reliable. If you have any doubts or concerns about the process, consult a professional for guidance.
With the stairs now securely attached, you’re ready to move on to the final step of finishing your garage stairs—adding the finishing touches and implementing safety measures.
Keep up with newlines and spaces
Read more: How To Finish A Garage Floor
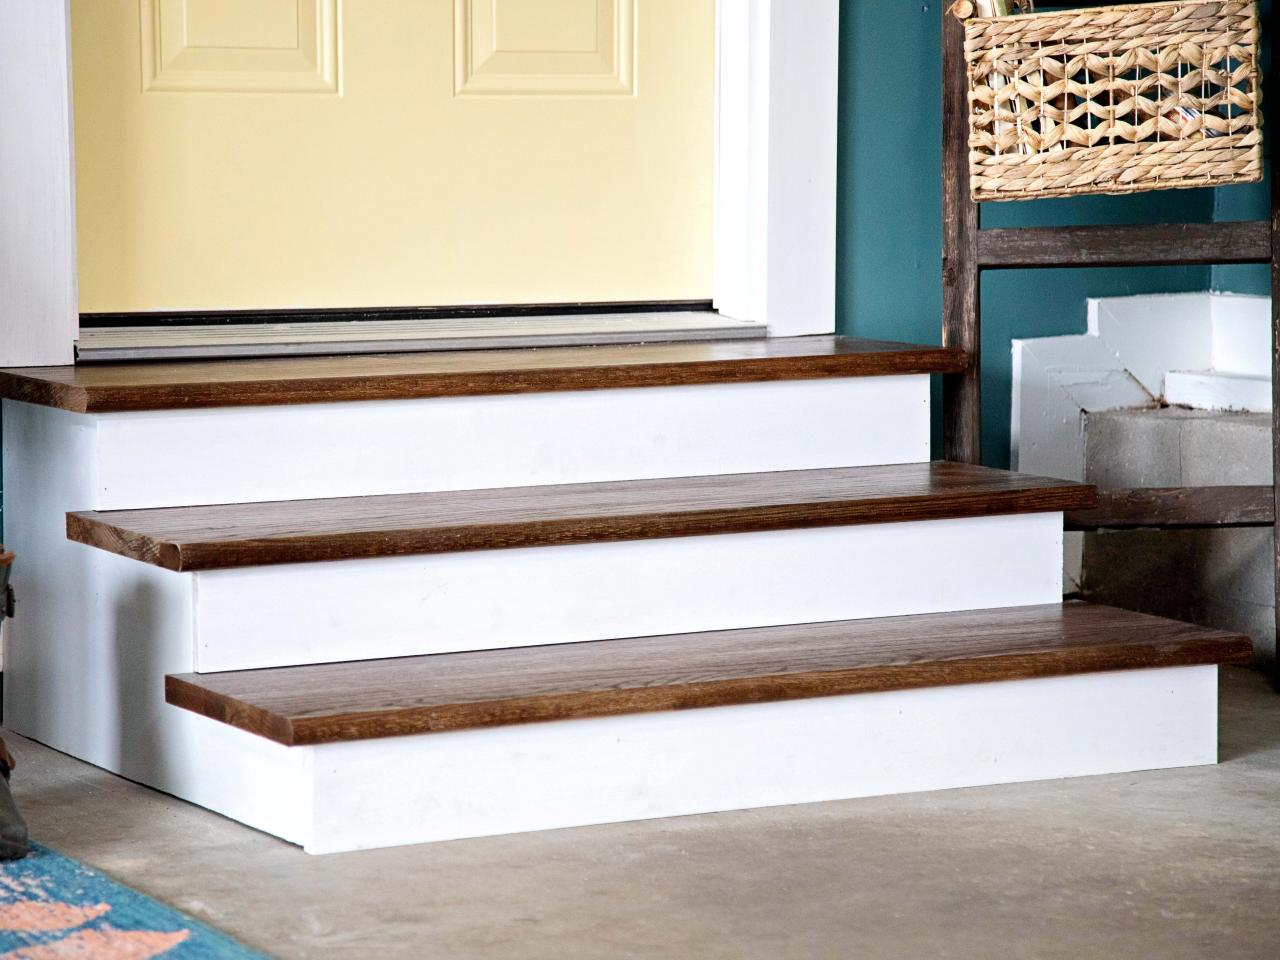
Step 8: Finish the Stairs
With the stairs securely installed and in place, it’s time to give them a finished look. This step involves adding final touches to enhance their appearance and protect them from wear and tear. Follow these steps to finish your garage stairs:
1. Sand the surfaces: Use sandpaper or a hand sander to smooth out any rough edges or imperfections on the tread and riser boards. Sanding will create a clean and even surface for the next steps of finishing.
2. Apply stain or paint: Determine whether you want to stain or paint the stairs based on your desired look. Staining preserves the natural beauty of the wood, while painting offers more customization options. Choose a stain or paint that is suitable for the material you used for the stairs.
3. Apply multiple coats: Apply multiple coats of stain or paint as needed, following the manufacturer’s instructions for drying time between coats. This will help achieve a more durable and long-lasting finish. Consider adding a clear protective finish, such as polyurethane or varnish, to further enhance the durability and appearance of the stairs.
4. Install handrails or balustrades (if desired): If you haven’t already installed handrails or balustrades, now is the time to do so. Handrails provide additional safety and can be made of wood, metal, or other materials. Balustrades, also known as spindles or pickets, are the vertical supports that run between the handrail and the tread boards. Install these components according to the manufacturer’s instructions and local building codes.
5. Add non-slip measures (optional): To improve safety, consider adding non-slip measures to the stairs. This can include applying non-slip adhesive strips to the tread boards or using non-slip paint additives. These measures provide traction and reduce the risk of slipping, especially if your garage stairs may be exposed to moisture or become slippery when wet.
6. Install kick plates: Kick plates, also known as riser protectors, are thin strips of material installed on the front edge of the tread boards. They help protect the riser and add a decorative touch. Choose kick plates that coordinate with the design and material of your stairs, and attach them securely using adhesive or nails.
7. Apply touch-up paint or stain: After completing the installation of handrails, balustrades, non-slip measures, and kick plates, do a final inspection of the stairs. Touch up any areas that may have been scuffed or damaged during the installation process. This will give your stairs a polished and finished look.
Finishing your garage stairs adds the final aesthetic touches and protective measures, ensuring they not only look appealing but also withstand daily use. Taking the time to properly finish the stairs will enhance their durability and make them a long-lasting and functional part of your garage space.
Remember to follow the manufacturer’s instructions and safety guidelines when applying finishes and installing handrails or other components. With the finishing touches complete, you’re now at the final step—implementing safety measures.
Keep up with newlines and spaces
Step 9: Final Touches and Safety Measures
As you near the completion of your garage stairs project, it’s important to attend to the final touches and implement safety measures to ensure the overall functionality and safety of the stairs. Follow these steps to add the finishing touches and enhance the safety of your garage stairs:
1. Clean up: Before you begin adding the final touches, take a moment to clean up any dust, debris, or residue from the construction process. Sweep or vacuum the stairs and surrounding areas to create a clean and safe environment.
2. Add decorative elements: Consider adding decorative elements to enhance the visual appeal of your garage stairs. This can include adding trim or molding along the sides of the stringers or painting the riser boards in a contrasting color to create a stylish and personalized look.
3. Install lighting: Adding lighting to your garage stairs not only enhances the aesthetics but also improves safety, especially in dimly lit areas. Install wall-mounted or stair-specific lighting fixtures to ensure proper visibility and prevent accidents.
4. Implement anti-slip measures: To enhance safety, consider incorporating anti-slip measures on the tread boards. This can involve applying non-slip adhesive strips or using specialized non-slip paint or coatings. These measures significantly reduce the risk of slipping, especially in wet or high-moisture conditions.
5. Install handrails or grab bars: Handrails or grab bars provide crucial support and stability while ascending or descending the stairs. Install them securely, ensuring they are at an appropriate height and comply with local building codes. Handrails can be made of various materials such as wood, metal, or sturdy plastic, and should be firmly anchored to the wall or secured to the stringers.
6. Place warning signs or markings: Depending on the location and usage of your garage stairs, it may be necessary to place warning signs or markings to alert individuals to potential hazards, such as low headroom or uneven surfaces. These signs are particularly important if the stairs are located in a commercial or public area.
7. Regular maintenance: Keep your garage stairs in optimal condition by implementing regular maintenance practices. This includes inspecting for any signs of wear and tear, tightening loose parts, and addressing any issues promptly. Regular cleaning and checking for potential hazards will help ensure the long-term safety and durability of your stairs.
Completing the final touches and implementing safety measures is vital to the overall success of your garage stairs project. By paying attention to these details, you not only enhance the appearance but also prioritize the safety and functionality of the stairs for everyone using them.
Remember to adhere to safety guidelines and local building codes when installing lighting, handrails, or other elements. Regularly inspect and maintain your stairs to address any potential issues and ensure their long-term use and safety.
Congratulations on completing your garage stairs project! By following these steps and incorporating these final touches and safety measures, you have transformed your garage stairs into a safe, functional, and visually appealing feature of your home.
Keep up with newlines and spaces
Conclusion
Finishing your garage stairs is a rewarding and transformative project that not only adds value to your property but also enhances the functionality and visual appeal of your space. By following the step-by-step guide outlined in this article, you have gained the knowledge and skills to successfully complete the process.
Throughout the journey, you learned the importance of measuring and planning to ensure accurate dimensions and compliance with building codes. Gathering the necessary materials and tools allowed you to seamlessly progress through each step of the construction process.
You tackled the removal of existing stairs (if applicable) and skillfully installed the stringers, providing a sturdy foundation for the stairs. By installing the tread boards and riser boards, you created a leveled and cohesive surface that is both safe and aesthetically pleasing.
Securing the stairs ensured their stability and addressed any potential movement or wobbling. The finishing touches, such as sanding, staining, or painting, added the final eye-catching and protective elements to your stairs.
As a responsible homeowner, you also implemented safety measures, such as handrails, non-slip measures, and adequate lighting, ensuring that your stairs are safe for yourself, your family, and any visitors who use them.
Maintaining your garage stairs through regular inspection and upkeep will help preserve their functionality and appearance over time. Remember to address any issues promptly and follow recommended maintenance practices.
By completing these steps with care and attention to detail, you have transformed your garage stairs into a practical and visually appealing feature of your home. They now offer safe and convenient access to your garage space, making it a more enjoyable and functional area for your daily activities.
Whether you tackled this project on your own or sought the assistance of professionals, the knowledge and skills you have gained throughout the process will serve you well in future DIY endeavors. Your beautifully finished garage stairs are a testament to your dedication and the pride you take in your home.
Congratulations on a job well done!
Keep up with the newlines and spaces
Frequently Asked Questions about How To Finish Garage Stairs
Was this page helpful?
At Storables.com, we guarantee accurate and reliable information. Our content, validated by Expert Board Contributors, is crafted following stringent Editorial Policies. We're committed to providing you with well-researched, expert-backed insights for all your informational needs.


0 thoughts on “How To Finish Garage Stairs”