Articles
How To Make A Log Cabin Quilt Block
Modified: August 22, 2024
Learn how to create a beautiful log cabin quilt block with our informative articles. Get step-by-step instructions and expert tips for perfect results.
(Many of the links in this article redirect to a specific reviewed product. Your purchase of these products through affiliate links helps to generate commission for Storables.com, at no extra cost. Learn more)
Introduction
Welcome to the world of quilting! If you’re a beginner looking to start your quilting journey or an experienced quilter looking for a new project, the log cabin quilt block is a classic design that you’ll love. With its simple yet timeless pattern, the log cabin block is a great choice for creating beautiful quilts with minimal effort.
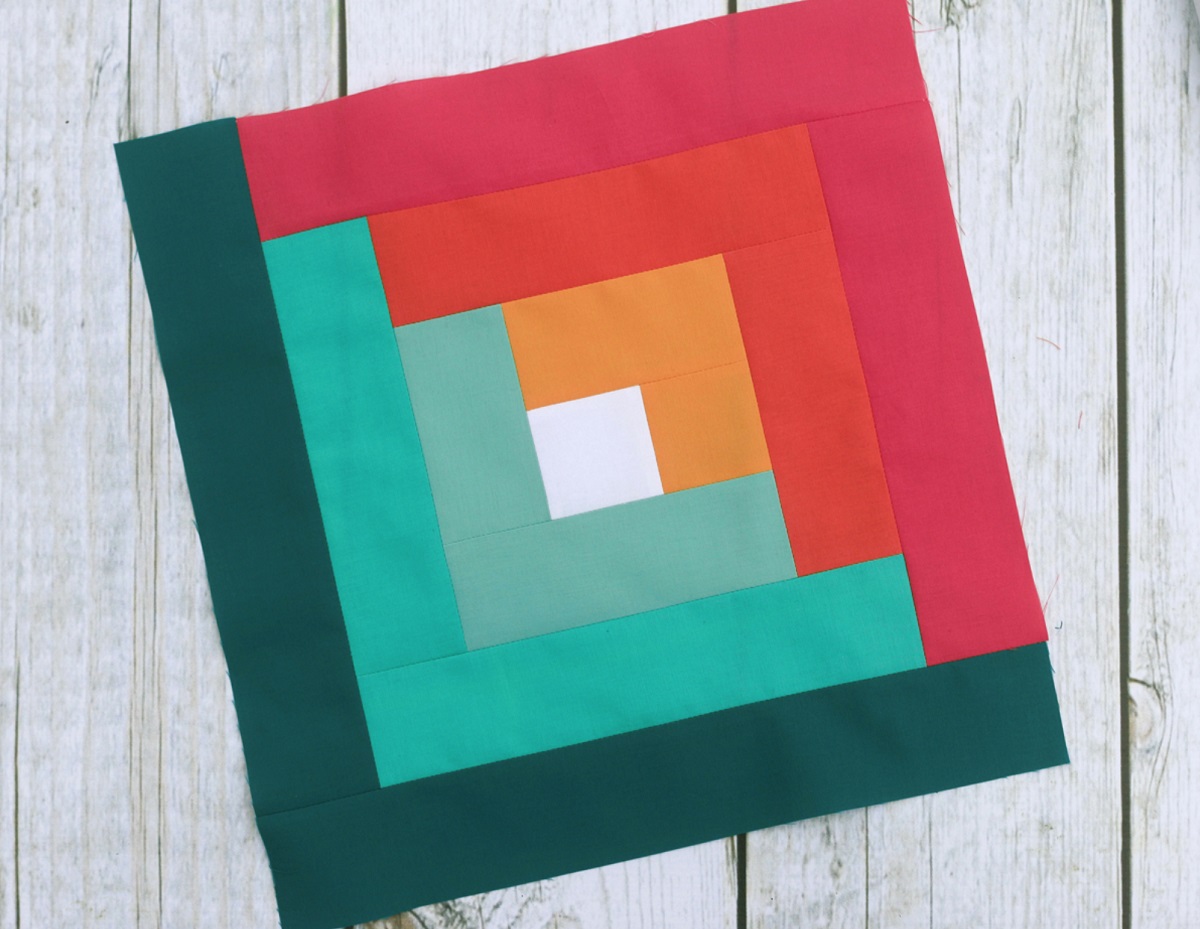
The log cabin block gets its name from its resemblance to a traditional log cabin structure. The block is constructed by adding strips of fabric around a center square, mimicking the logs used in building a cabin. This versatile design can be made using various colors and fabric combinations to achieve different effects.
In this article, we’ll guide you through the process of making a log cabin quilt block, step by step. By the end, you’ll have the skills to create your very own log cabin quilt top, ready to be layered, quilted, and bound.
Before we dive into the instructions, let’s gather the materials you’ll need for this project.
Key Takeaways:
- The log cabin quilt block is a timeless and versatile design that can be customized with various colors and fabric combinations. It’s a beginner-friendly project that results in stunning quilts with minimal effort.
- Quilting is a fulfilling creative outlet that offers relaxation, stress relief, and a sense of accomplishment. Embrace your creativity, share your projects, and enjoy the journey of turning fabric into beautiful quilts.
Read more: How To Make A Block Quilt
Materials Needed
Before getting started, it’s important to gather all the necessary materials to ensure a smooth and enjoyable quilting experience. Here’s a list of the materials you’ll need to make a log cabin quilt block:
- Fabric: Choose a variety of fabrics in different colors and patterns to achieve the desired look for your quilt block. You’ll need fabric for the center square and the surrounding strips. Consider using both light and dark shades to create contrast and visual interest.
- Cutting Mat and Rotary Cutter: These tools will make the cutting process much easier and more precise. A self-healing cutting mat and a sharp rotary cutter will allow you to make clean and accurate cuts.
- Quilting Ruler: A clear, acrylic quilting ruler with measurements marked in inches will help you cut the fabric with precision and accuracy.
- Sewing Machine: A sewing machine will make the piecing process faster and more efficient. Choose a machine that you are comfortable using and make sure it has a straight stitch setting.
- Thread: Select a high-quality thread that matches or complements the colors of your fabric.
- Pins: Use pins to hold the fabric pieces in place while sewing.
- Iron and Ironing Board: An iron and ironing board are essential for pressing the fabric to create crisp seams.
- Quilting Batting: Batting is the middle layer of the quilt that provides warmth and structure. Choose a batting that suits your desired level of warmth and loft.
- Backing Fabric: The backing fabric is the fabric that will be on the back of the quilt. Choose a fabric that coordinates with your quilt top.
- Binding Fabric: Binding is the fabric strip that covers the raw edges of the quilt. Choose a fabric that complements your quilt top.
- Quilting Pins or Spray Adhesive: These will be used to secure the layers of the quilt together while quilting.
- Quilting Needles: These needles have a slightly larger eye and a sharp point, making it easier to sew through the layers of fabric and batting.
Once you have gathered all the materials, you’re ready to start making your log cabin quilt block. Let’s move on to the first step: cutting the fabric.
Step 1: Cutting the Fabric
Before you can start piecing your log cabin quilt block, you’ll need to cut the fabric into the appropriate sizes and shapes. The size of the cuts will depend on the desired finished size of your quilt block and the width of the strips you want to use.
Here’s a guide on how to cut the fabric for a traditional log cabin block:
- Start by determining the size of your center square. This square will be the focal point of your log cabin block. Cut a square piece of fabric in the desired size. The most common size for a log cabin block is 2.5 inches by 2.5 inches.
- Next, decide on the width of the strips that you want to use for the surrounding logs. The width of these strips will determine the final size of your block. For example, if you choose 2.5-inch wide strips, each round of logs will add 2.5 inches to the block size.
- Once you’ve decided on the strip width, cut the fabric into strips of the desired width. You’ll need enough strips to go around all four sides of the center square.
- For a traditional log cabin block, start by cutting two strips that are the same length as the sides of the center square. These strips will be added to opposite sides of the square.
- Next, cut two strips that are the same length as the remaining sides of the center square, plus the width of the previous strips. These strips will be added to the remaining sides of the square.
- Continue this process, alternating the light and dark fabric strips, until you achieve the desired size for your log cabin block. Each round of logs should be added to the previous round, creating a spiral pattern.
- Once all the strips are cut, double-check the measurements to ensure accuracy. It’s always a good idea to label each strip with a sticky note or marker to keep track of their order and placement.
With your fabric properly cut, you’re now ready to move on to the next step: piecing the blocks together. Stay tuned!
Step 2: Piecing the Blocks
Now that you have your fabric strips cut to the appropriate sizes, it’s time to start piecing them together to create the log cabin quilt block. This step is where the magic happens as you bring your block to life.
Follow these steps to piece your log cabin block together:
- Begin by placing the center square fabric right-side up on your work surface.
- Take one of the fabric strips and align one of its long edges with one side of the center square. Make sure the right sides of the fabrics are facing each other.
- Pin the strip in place, ensuring that it is centered along the side of the square.
- Using a quarter-inch seam allowance, sew the strip to the center square. Backstitch at the beginning and end of the seam to secure it.
- Press the seam toward the newly added strip with an iron. This will help create a crisp and flat seam.
- Repeat the process with the remaining fabric strips, adding them one by one in a clockwise fashion around the center square. Remember to align the long edges of the strips with the sides of the existing fabric and sew them with a quarter-inch seam allowance.
- After adding each strip and pressing the seam, trim any excess fabric that extends beyond the edges of the block.
- Continue adding strips until your log cabin block reaches the desired size. This may require several rounds of adding strips.
- Once you’ve completed adding all the strips and pressing the seams, give your block a final press to ensure it lies flat without any wrinkles or folds.
With your log cabin block pieced together, take a moment to admire your work. The spiral pattern created by the strips adds depth and visual interest to the block. You can now move on to the next step: assembling the quilt top.
When making a log cabin quilt block, press your seams open to reduce bulk and create a flatter block for easier quilting.
Step 3: Assembling the Quilt Top
Now that you have completed piecing your log cabin blocks, it’s time to assemble them into a quilt top. This step involves arranging the blocks in a pleasing layout and sewing them together to create a cohesive quilt design.
Follow these steps to assemble your log cabin quilt top:
- Lay out your log cabin blocks on a design wall or a large flat surface. Experiment with different arrangements to find the layout that you like best. Consider the placement of colors and patterns to achieve visual balance.
- Once you are happy with the layout, take a photo or make notes to help you remember the arrangement. This will be useful when you start sewing the blocks together.
- Begin sewing the blocks together row by row. Take the first two blocks and place them with right sides facing each other.
- Using a quarter-inch seam allowance, sew the blocks together. Press the seam open or to one side, according to your preference.
- Continue sewing the blocks together in each row until you have completed the entire row.
- Repeat the process to sew the remaining rows together.
- Once all the rows are sewn together, press the seam allowances open or to one side, again according to your preference.
- Finally, sew the rows together, matching the seams and aligning the blocks carefully.
- Press the final seams and give your quilt top a final once-over to ensure everything is aligned and neat.
With your log cabin blocks sewn together, you now have a completed quilt top. Take a moment to admire your creation before moving on to the next step: layering and quilting.
Read more: How Much Is Log Cabin Siding
Step 4: Layering and Quilting
Now that you have your log cabin quilt top assembled, it’s time to move on to the next step: layering and quilting. This process involves sandwiching the quilt top, batting, and backing fabric together and sewing them in place to create a beautiful and functional quilt.
Follow these steps to layer and quilt your log cabin quilt:
- Start by laying out your backing fabric on a large, flat surface, right side down. Secure it in place using masking tape or quilt clips to keep it taut.
- Place the batting on top of the backing fabric, smoothing out any wrinkles or folds. Trim the batting to the same size as your quilt top if necessary.
- Next, carefully lay your quilt top on top of the batting, right side up. Align the edges and corners, ensuring everything is centered and straight.
- Using quilt pins or spray adhesive, secure the layers together, starting from the center and working your way outward. Make sure all three layers are smooth and wrinkle-free.
- Once the layers are securely pinned or sprayed together, it’s time to choose a quilting design. You can opt for simple straight-line quilting, free-motion quilting, or any other design that complements your log cabin blocks.
- Select the appropriate quilting thread and load it onto your sewing machine.
- Start quilting from the center of the quilt and work your way to the edges. Use a quilting foot or a walking foot to ensure smooth and even stitches.
- Continue quilting until you have covered the entire quilt top with your chosen pattern. Take your time and enjoy the process of bringing your quilt to life.
- Once you’re finished quilting, carefully remove any basting pins or adhesive residue from the quilt.
With the quilting complete, your log cabin quilt is almost finished. The final step is to bind the quilt to give it a polished and professional look. Let’s move on to the last step: binding.
Step 5: Binding the Quilt
Congratulations on reaching the final step of your log cabin quilt project! Binding is the process of finishing the raw edges of the quilt, providing a clean and professional look while also securing the quilt layers together.
Follow these steps to bind your log cabin quilt:
- Prepare the binding fabric by cutting continuous strips that are 2.5 inches wide. If necessary, piece the strips together to create one long binding strip that is long enough to go around the entire perimeter of your quilt.
- Fold the binding strip in half lengthwise with wrong sides together and press it flat with an iron.
- Starting on one side of the quilt, align the raw edges of the binding strip with the raw edges of the quilt top, leaving a few inches of binding loose at the beginning.
- Using a quarter-inch seam allowance, stitch along the edge of the quilt, sewing through all layers and securing the binding in place. Stop stitching about a quarter-inch away from the corner.
- At the corner, fold the binding strip up, making a 45-degree angle, and then fold it back down, aligning it with the next edge of the quilt. This will create a mitered corner. Continue stitching along the next side.
- Repeat the previous step for each corner, mitering them as you go.
- When you reach the starting point, leave a few inches of binding loose and trim any excess. Overlap the loose end with the starting end, unfold the binding, and cut it at the overlap.
- Join the loose end and starting end of the binding by opening them and placing them right sides together at a 90-degree angle. Sew across the diagonal and trim the excess. Fold the binding back and finish sewing it to the quilt.
- Once the binding is sewn in place, fold it over to the back of the quilt and secure it using pins or clips.
- Hand stitch the folded edge of the binding to the back of the quilt using a ladder stitch or any other invisible stitch. Take care to ensure that your stitches are even and secure.
With the binding complete, take a step back and admire your finished log cabin quilt. Give it a final press to smooth out any wrinkles, and voila! You now have a beautiful, handmade log cabin quilt to enjoy or gift to someone special.
Quilting is a journey of creativity and craftsmanship, and making a log cabin quilt block is just the beginning. Continue exploring different patterns, fabrics, and techniques to further expand your quilting skills. Happy quilting!
Conclusion
Congratulations on completing your log cabin quilt block! Throughout this article, we’ve guided you through the step-by-step process of cutting the fabric, piecing the blocks, assembling the quilt top, layering and quilting, and binding. Now, you have a stunning log cabin quilt that showcases your creativity and quilting skills.
The log cabin quilt block is a classic design that offers endless possibilities for customization. Whether you choose to use traditional colors or experiment with bold and modern combinations, the log cabin pattern is sure to result in a striking quilt. This versatile design can be adapted to create quilts of various sizes, from small wall hangings to large bed covers.
As you continue on your quilting journey, remember to embrace your creativity and have fun with the process. Don’t be afraid to try new color palettes, experiment with different fabrics, and explore unique quilting techniques. Each quilt you create will be a reflection of your personal style and artistic expression.
Additionally, don’t forget to share your quilting projects with others. Show off your log cabin quilt on social media, participate in quilting communities, or even consider entering your quilt into quilt shows or competitions. Sharing your work not only allows you to inspire and connect with fellow quilters but also provides valuable feedback and encouragement.
Quilting is not only a fulfilling creative outlet, but it also offers relaxation, stress relief, and a sense of accomplishment. The process of turning fabric into a beautiful quilt is a labor of love, and the finished result will undoubtedly bring warmth and joy to your home or the lucky recipient of your quilt.
So, gather your materials, follow the steps outlined in this article, and dive into the world of log cabin quilting. With practice and dedication, you’ll perfect your skills and create unique quilts that will be cherished for years to come.
Happy quilting!
Frequently Asked Questions about How To Make A Log Cabin Quilt Block
Was this page helpful?
At Storables.com, we guarantee accurate and reliable information. Our content, validated by Expert Board Contributors, is crafted following stringent Editorial Policies. We're committed to providing you with well-researched, expert-backed insights for all your informational needs.


0 thoughts on “How To Make A Log Cabin Quilt Block”