Articles
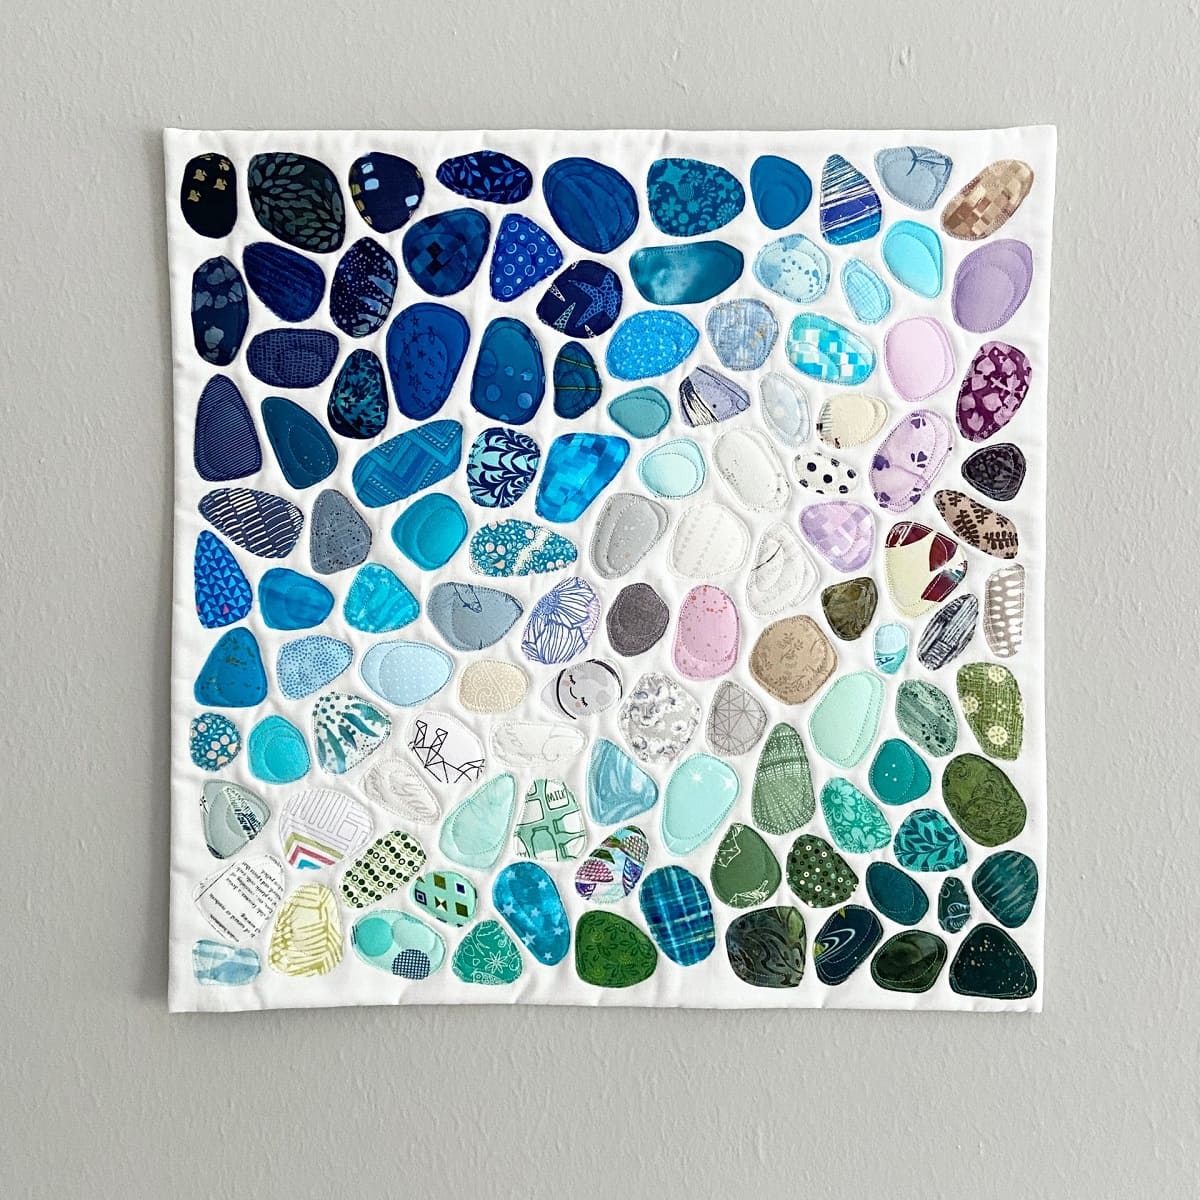
How To Make A Mini Mosaic Quilt
Modified: August 22, 2024
Learn how to create a stunning mini mosaic quilt with step-by-step instructions and helpful articles. Enhance your quilting skills and create a masterpiece today!
(Many of the links in this article redirect to a specific reviewed product. Your purchase of these products through affiliate links helps to generate commission for Storables.com, at no extra cost. Learn more)
Introduction
Welcome to the exciting world of mini mosaic quilting! If you’re looking for a unique and eye-catching quilting project, then you’re in the right place. Mini mosaic quilts are a delightful way to showcase your creativity and add a touch of charm to any room.
In this article, we will guide you through the step-by-step process of making a mini mosaic quilt. From choosing fabrics to adding the finishing touches, we’ll cover everything you need to know to create your own stunning masterpiece.
Mini mosaic quilting is a technique that involves arranging small fabric tiles to create intricate and visually appealing designs. It’s like putting together a puzzle, but with fabric instead of pieces.
One of the great things about mini mosaic quilting is that it allows you to experiment with different colors, patterns, and textures. Whether you prefer bold and vibrant designs or subtle and understated combinations, the possibilities are endless.
Not only is mini mosaic quilting a fun and rewarding craft, but it also offers an opportunity to repurpose fabric scraps. Instead of letting those small pieces go to waste, you can transform them into stunning works of art.
So, if you’re ready to embark on a creative journey and dive into the world of mini mosaic quilting, let’s gather our materials and get started!
Key Takeaways:
- Mini mosaic quilting is a delightful and rewarding craft that allows you to express your creativity and repurpose fabric scraps to create stunning and unique works of art. From choosing fabrics to adding finishing touches, each step offers an opportunity for personal expression and skill refinement.
- The process of making a mini mosaic quilt involves a series of creative and fulfilling steps, including choosing fabrics, cutting and organizing fabric tiles, designing the layout, and adding borders and quilting. Each step contributes to the creation of a beautiful and personalized quilt that reflects the quilter’s imagination and dedication.
Read more: How To Make Outdoor Mosaic
Materials Needed
Before diving into the mini mosaic quilting project, it’s important to gather all the necessary materials. Here’s a list of what you’ll need:
- Fabric: Choose a variety of fabrics in different colors and patterns. Consider using scraps or fat quarters for a diverse selection.
- Fabric marking pen or pencil: This will be used for drawing your design on the fabric tiles.
- Rotary cutter and cutting mat: These tools will make it easier to cut your fabric tiles accurately.
- Fabric glue: Opt for a fabric-safe adhesive that will securely bond the fabric tiles together.
- Sewing machine: You’ll need a sewing machine to stitch the fabric tiles together and add the borders.
- Thread: Choose thread that matches the color of your fabric tiles or goes well with your overall design.
- Needles: Make sure you have both hand-sewing needles and machine needles for the various steps of the project.
- Quilting ruler: A quilting ruler will help you measure and cut your fabric tiles accurately.
- Iron and ironing board: These are essential for pressing your fabric tiles and creating crisp seams.
- Quilt batting: Choose a thin batting specifically designed for mini quilts.
- Fabric for backing: Select a fabric that complements your design and provides a sturdy backing for your quilt.
- Binding fabric: This will be used to finish the edges of your mini mosaic quilt.
- Pins or clips: Use these to hold the fabric tiles together while gluing or sewing.
While this is a general list of materials, feel free to customize it based on your preferences and the design you have in mind. Don’t hesitate to get creative and experiment with different materials to make your mini mosaic quilt truly unique.
Now that we have everything we need, let’s move on to the first step: choosing fabrics for your mini mosaic quilt.
Step 1: Choosing Fabrics
Choosing the right fabrics is a crucial step in creating a stunning mini mosaic quilt. The fabrics you select will determine the overall look and feel of your finished quilt. Here are a few tips to help you make the best choices:
- Color coordination: Consider the color scheme you want for your mini mosaic quilt. Do you prefer a harmonious blend of colors or a bold and contrasting palette? Take some time to play with different fabric combinations to see what appeals to you.
- Pattern and texture: Explore fabrics with various patterns and textures to add visual interest to your quilt. Mix and match solids, florals, plaids, and geometrics to create a dynamic and engaging design.
- Contrast and balance: Pay attention to the contrast and balance between your fabric choices. A good mix of light and dark fabrics, busy prints and solids, and different scales of patterns can bring depth and dimension to your mini mosaic quilt.
- Theme or inspiration: Consider if you want your mini mosaic quilt to have a theme or be inspired by something specific. It could be nature, a favorite hobby, or a particular color palette. Let your imagination run wild!
Remember, mini mosaic quilts are all about creativity and self-expression. Don’t be afraid to experiment and trust your instincts when it comes to choosing fabrics. There are no right or wrong choices – it’s all about what resonates with you.
Once you have a selection of fabrics that you love, it’s time to move on to the next step: cutting the fabrics into tiles.
Step 2: Cutting Fabrics into Tiles
Now that you have chosen your fabrics, it’s time to start cutting them into tiles. These fabric tiles will be the building blocks of your mini mosaic quilt. Follow these steps for precise and accurate cutting:
- Prepare your cutting area: Set up your rotary cutter, cutting mat, and quilting ruler on a flat and stable surface. Make sure you have enough space to comfortably work with your fabric.
- Measure and mark: Use your quilting ruler to measure the desired size of your fabric tiles. Common sizes for mini mosaic quilts are 1 inch square or 2 inch square, but feel free to adjust the dimensions based on your design preferences.
- Hold the fabric securely: Place one hand on the fabric to keep it stable while cutting. This will help prevent any shifting or distortion during the cutting process.
- Cut with the rotary cutter: Align the edge of the quilting ruler with the marked lines on the fabric. Hold the ruler firmly in place and use the rotary cutter to cut along the edge of the ruler. Make sure to apply even pressure and use smooth, continuous motions.
- Repeat the process: Continue measuring, marking, and cutting your fabric tiles until you have enough to complete your design. It’s always a good idea to cut a few extra tiles in case of mistakes or to add more variety to your quilt.
As you cut your fabric tiles, keep them organized and separated by color, pattern, or any other criteria that will make it easier to assemble your design later on. You can use small containers or plastic bags to store and sort the tiles.
Once you have all the fabric tiles ready, take a moment to appreciate the beautiful array of colors and patterns you have at your disposal. Now, it’s time to move on to the next step: creating a design for your mini mosaic quilt.
Step 3: Creating a Design
With your fabric tiles prepared, it’s time to unleash your creativity and start designing your mini mosaic quilt. Here are some steps to help you create a visually appealing and balanced design:
- Plan your layout: Begin by visualizing how you want your quilt design to look. You can sketch a rough layout on paper or use a design tool like a quilt design software to experiment with different arrangements. Determine the size and shape of your quilt, as well as any specific patterns or motifs you want to incorporate.
- Start with a focal point: Choose a fabric tile or a group of tiles to serve as the focal point of your design. This could be a larger tile, a differently patterned tile, or a contrasting color that will draw attention.
- Create balance and harmony: As you add more fabric tiles, aim for balance and harmony in your design. Consider the placement of different colors, patterns, and textures to achieve a cohesive and visually pleasing arrangement. Experiment with different tile combinations to find the right balance.
- Play with symmetry and asymmetry: Depending on your design preference, you can create a symmetrical layout with mirrored patterns or go for an asymmetrical arrangement for a more dynamic look. Both approaches can yield beautiful results, so embrace whichever appeals to your artistic sensibilities.
- Take a step back: Periodically step back and examine your design from a distance. This will help you see the overall composition and identify any areas that need adjustment or refinement. Don’t be afraid to make changes and rearrange tiles until you’re satisfied with the design.
Remember, designing a mini mosaic quilt is a highly personal process. There are no strict rules, so feel free to experiment, trust your instincts, and let your creativity guide you. This is your opportunity to create a unique and one-of-a-kind piece of art.
Once you have finalized your design, it’s time to bring it to life by organizing the fabric tiles in preparation for the next step: gluing them together.
Read more: How To Make Mosaic Backsplash
Step 4: Organizing Fabric Tiles
Now that you have a design in mind, it’s important to organize your fabric tiles before gluing them together. This step will ensure that the tiles are arranged correctly and make the assembly process much smoother. Here’s how to organize your fabric tiles:
- Clear workspace: Find a clean and flat surface where you can lay out your fabric tiles. This could be a large table or even the floor, as long as it’s free from dirt or debris.
- Refer to your design: Use your sketch or reference image to guide you in placing the fabric tiles in the correct positions. Take your time and double-check that each tile is in the right spot.
- Group tiles by color or pattern: If your design features different color blocks or specific patterns, consider grouping the corresponding fabric tiles together. This will make it easier to glue the tiles in the correct order.
- Play with placement: As you arrange the fabric tiles, you may find that some adjustments are needed to achieve the desired look. Feel free to play around with the placement of the tiles until you’re satisfied with the overall arrangement.
- Take a photo: Before moving on to the next step, it’s a good idea to take a photo of your organized fabric tiles. This will serve as a reference later on and help you recreate the design accurately when gluing.
By organizing your fabric tiles, you’ll have a clear visual representation of how your mini mosaic quilt will look once assembled. This step eliminates any confusion or errors that may arise during the gluing process, ensuring a seamless and hassle-free experience.
Now that your fabric tiles are organized, it’s time to move on to the exciting step of gluing the tiles together and bringing your design to life. Get ready to see your mini mosaic quilt take shape before your eyes!
Step 5: Gluing Fabric Tiles
Now that you have your fabric tiles organized, it’s time to start gluing them together to create your mini mosaic quilt. This step will securely bond the tiles and bring your design to life. Here’s how to glue the fabric tiles:
- Prepare your workspace: Find a clean and flat surface where you can comfortably work on the gluing process. Lay down a protective layer, such as wax paper or a plastic sheet, to prevent any excess glue from seeping onto your work surface.
- Start with a small area: Begin by applying a small amount of fabric glue to one fabric tile using a brush or a cotton swab. Be mindful not to use too much glue, as it can result in excess seepage and messiness.
- Attach the tiles: Take the glued tile and carefully place it onto the corresponding spot in your design. Gently press down to ensure proper adhesion. Repeat this process for each fabric tile, following the layout and guidance you established during the organization step.
- Allow the glue to dry: Once all the fabric tiles are glued in place, allow the quilt top to dry completely. Follow the instructions on the fabric glue for recommended drying times.
- Check for secure attachment: After the glue has dried, check each fabric tile to ensure it is securely attached. If any tiles feel loose, reapply a small amount of fabric glue underneath and press them down again.
While gluing the fabric tiles, it’s crucial to work with precision and attention to detail. Take your time and make sure each tile is placed correctly to achieve the desired design. If you’re unsure about a particular tile, you can reference the photo you took during the organization step to confirm its placement.
Once all the fabric tiles are securely glued together, you’re one step closer to completing your mini mosaic quilt. Next, we’ll move on to the exciting process of sewing the fabric tiles together to create a cohesive quilt top.
When making a mini mosaic quilt, be sure to use small, sharp scissors for precision cutting of your fabric pieces to ensure clean and accurate edges.
Step 6: Sewing Fabric Tiles Together
With your fabric tiles securely glued together, it’s time to take your mini mosaic quilt to the next level by sewing the tiles together. This step will not only reinforce the bond between the fabric tiles but also create a sturdy and durable quilt top. Follow these steps to sew the fabric tiles together:
- Prepare your sewing machine: Thread your sewing machine with a matching thread color and set it up for straight stitching. Use a machine needle suitable for the weight of your fabric tiles.
- Start with a few anchor stitches: Choose a starting point on your mini mosaic quilt and anchor your stitches by sewing a few backstitches or forward-reverse stitches. This will prevent the fabric tiles from unraveling during the sewing process.
- Align the fabric tiles: Take the first two fabric tiles that need to be sewn together and align their edges with right sides facing each other. Pin or use fabric clips to hold them in place.
- Sew the fabric tiles together: Using a 1/4 inch seam allowance, start sewing from the pinned edge, ensuring you catch both fabric tiles. Sew straight and steadily, removing any pins or clips as you go along.
- Continue sewing: Repeat the process of aligning and sewing the fabric tiles together until you have sewn all the tiles in each row. Then, proceed to sew the rows together, matching the seams and edges accurately.
- Press the seams: After sewing, press the seams on the wrong side of the fabric using an iron set to the appropriate temperature for your fabric.
Throughout the sewing process, pay attention to maintaining an accurate seam allowance and keeping the fabric tiles aligned. This will result in a neat and professional-looking quilt top.
As you sew the fabric tiles together, you’ll start to see your design take shape and the mini mosaic quilt come to life. Take your time, enjoy the process, and celebrate each step towards completing your masterpiece.
Now that the fabric tiles are sewn together, it’s time to add borders to enhance the overall aesthetics and finish of your mini mosaic quilt.
Step 7: Adding Borders
Adding borders to your mini mosaic quilt is an exciting step that will give your quilt a polished and finished look. Borders not only frame your design but also contribute to the overall visual appeal. Follow these steps to add borders to your quilt:
- Measure your quilt top: Begin by measuring the length and width of your quilt top. Write down these measurements as they will help you determine the size and length of the borders.
- Select border fabric: Choose a fabric that complements your mini mosaic quilt design. Consider using a solid or a fabric with a subtle pattern that enhances the colors and arrangement of your fabric tiles.
- Cut border fabric: Cut strips of fabric for your borders. The width of the strips will depend on the desired finished border width. Generally, a border width of 2-4 inches works well for mini mosaic quilts.
- Attach the borders: Beginning with the sides, align one border strip with the quilt top edge, right sides together. Sew a straight seam using a 1/4 inch seam allowance. Repeat this process for the top and bottom borders.
- Press the borders: After attaching each border strip, press the seams towards the border fabric, away from the quilt top. This will create a smooth and professional finish.
- Measure and trim excess fabric: Once all the borders are attached, measure your quilt top again to ensure it is squared up. Trim any excess border fabric if needed.
Adding borders to your mini mosaic quilt not only adds visual interest but also provides a frame for your design, creating a cohesive and finished look. Don’t be afraid to experiment with different border widths or even multiple borders to enhance the overall aesthetics of your quilt.
Congratulations! With the borders in place, your mini mosaic quilt is nearly complete. The next step is to quilt the layers together to add stability and texture to your creation.
Read more: How To Make A Mosaic Walkway
Step 8: Quilting the Mini Mosaic Quilt
Quilting is the process of stitching through the layers of your mini mosaic quilt to secure them together and add texture and dimension. It also helps to prevent the fabric layers from shifting over time. Here are the steps to quilt your mini mosaic quilt:
- Prepare the layers: Lay your mini mosaic quilt top, batting, and backing fabric on a flat surface. Ensure that the backing fabric is slightly larger than the quilt top.
- Baste the layers: Starting from the center, secure the layers together using safety pins or temporary basting spray. Work outward in a grid pattern, spacing the pins or spray a few inches apart.
- Select a quilting design: Decide on a quilting design that complements your mini mosaic quilt. You can choose to follow the seam lines, quilt free-motion designs, or use a quilting stencil for more intricate patterns.
- Quilt the layers: Using your sewing machine or a quilting needle, stitch along the lines of your chosen quilting design. Take your time and work gradually, ensuring smooth and even stitches.
- Secure loose threads: As you quilt, periodically check for any loose threads and secure them with a knot or by backstitching. This will keep your quilt looking neat and well-finished.
Quilting is an opportunity to add your personal touch to your mini mosaic quilt. Whether you choose simple straight-line quilting or intricate free-motion designs, let your creativity flow and enjoy the process.
Once you have completed the quilting, take a moment to admire how the stitching brings your mini mosaic quilt to life. The final step is to add binding to the edges to give your quilt a clean and professional finish.
Step 9: Binding the Edges
Binding is the final step in completing your mini mosaic quilt. It not only provides a clean and finished edge but also adds durability and strength to your quilt. Follow these steps to bind the edges of your quilt:
- Prepare binding fabric: Cut strips of fabric for binding. The width of the strips should be around 2.5 to 3 inches, and the length should be enough to cover the entire perimeter of your quilt.
- Join the binding strips: If needed, sew the binding strips together at a 45-degree angle, creating a diagonal seam. Trim the excess fabric and press the seams open for a flat finish.
- Attach the binding: Starting from the middle of one side, place the raw edges of the binding strip against the raw edges of the quilt top. Pin or clip in place, leaving a few inches of binding unstitched at the beginning.
- Sew the binding: Using a 1/4 inch seam allowance, sew along the edge, securing the binding to the quilt top. Mitre the corners by folding the binding at a 45-degree angle to create a neat and mitered corner.
- Join the ends: When you reach the starting point, trim the binding strip, leaving a few inches of excess. Fold the end of the binding strip back on itself and overlap it with the starting point. Trim the excess fabric and sew the ends together.
- Secure the binding: Fold the binding over the raw edge of the quilt and press it in place. Hand stitch the folded edge of the binding to the back of the quilt using a slip stitch or a blind stitch, ensuring that your stitches are invisible from the front.
Binding gives your mini mosaic quilt a polished look and prevents the edges from fraying or unraveling. Take your time with this step to ensure clean and precise stitching.
Congratulations! With the edges beautifully bound, your mini mosaic quilt is complete and ready to be enjoyed or gifted to someone special.
Now that you have finished binding, it’s time for the final step: adding the finishing touches to your mini mosaic quilt.
Step 10: Finishing Touches
As you reach the final step of completing your mini mosaic quilt, it’s time to add the finishing touches that will make your quilt truly special. Here are some suggestions to consider:
- Trim excess threads: Take a moment to carefully trim any loose threads that may still be visible on your quilt top or binding. This will give your quilt a clean and polished appearance.
- Label your quilt: Create a personalized label for your mini mosaic quilt. Include your name, the date, and any other details you would like to document. Attach the label to the back of your quilt using hand-stitching or fabric glue.
- Add a hanging sleeve: If you plan to display your mini mosaic quilt on a wall, consider adding a hanging sleeve to the back. This narrow fabric tube allows you to slide a rod through it for easy hanging.
- Embroider or appliqué details: If you want to add extra embellishments to your quilt, consider embroidering or appliquéing small motifs or designs onto the fabric tiles. This can add a personal touch and enhance the overall aesthetic appeal.
- Document your process: Take photos or write down your experience and the inspiration behind your mini mosaic quilt. This documentation will serve as a wonderful memory of your creative journey.
Remember, the finishing touches are an opportunity to showcase your creativity and add those personal touches that make the quilt uniquely yours. Take your time, enjoy the process, and admire the beautiful result of your hard work and artistic flair.
With the finishing touches complete, you can now revel in the joy of your completed mini mosaic quilt. Display it proudly in your home, give it as a heartfelt gift, or enter it into a quilt show to share your talent with others.
Congratulations on completing your mini mosaic quilt! Your dedication, creativity, and craftsmanship have led to the creation of a stunning work of art.
Enjoy your quilt and the warm and cozy feeling it brings to your space. Happy quilting!
Conclusion
Congratulations on embarking on the journey of creating a mini mosaic quilt! From choosing fabrics to adding the finishing touches, you have learned the step-by-step process of bringing your vision to life. Mini mosaic quilting is a fun and rewarding craft that allows you to express your creativity and create unique and captivating works of art.
Throughout this article, we explored the various steps involved in making a mini mosaic quilt. You learned how to choose the right fabrics, cut them into tiles, create a visually appealing design, and organize and glue the fabric tiles together. We covered the importance of sewing the tiles together, adding borders, quilting the layers, and binding the edges to give your quilt a polished and professional finish.
The beauty of mini mosaic quilting lies in the endless possibilities for creativity and personal expression. Each quilt is a unique reflection of the quilter’s imagination and skill. As you progressed through each step, you had the opportunity to make design choices, experiment with colors and patterns, and truly make the quilt your own.
Remember, practice makes perfect, and every quilt you make is an opportunity to refine your skills and explore new techniques. Don’t be afraid to push the boundaries of your creativity and try new ideas. Embrace the imperfections and enjoy the journey of learning and creating.
Whether you hang your mini mosaic quilt on a wall, display it on a bed, or gift it to a loved one, it will undoubtedly be a cherished piece of art and a testament to your dedication and craftsmanship. Take pride in what you have accomplished and share your beautiful creation with others.
Thank you for joining us in the world of mini mosaic quilting. We hope this article has provided you with the knowledge, inspiration, and encouragement to bring your ideas to life. Now, grab your fabrics, sewing machine, and creative spirit, and start crafting your next mini mosaic quilt masterpiece!
Frequently Asked Questions about How To Make A Mini Mosaic Quilt
Was this page helpful?
At Storables.com, we guarantee accurate and reliable information. Our content, validated by Expert Board Contributors, is crafted following stringent Editorial Policies. We're committed to providing you with well-researched, expert-backed insights for all your informational needs.


0 thoughts on “How To Make A Mini Mosaic Quilt”