
Furniture
How To Take Apart A Dresser
Modified: May 6, 2024
Learn how to take apart a dresser safely and easily. Our step-by-step guide provides tips and tricks for dismantling furniture without damaging it.
(Many of the links in this article redirect to a specific reviewed product. Your purchase of these products through affiliate links helps to generate commission for Storables.com, at no extra cost. Learn more)
Introduction
Have you ever found yourself needing to take apart a dresser? Whether you’re moving, renovating, or just looking to repurpose an old piece of furniture, knowing how to properly disassemble a dresser can come in handy. Taking apart a dresser may seem like a daunting task, but with the right tools and a little know-how, it can be a relatively simple process.
In this article, we will guide you through the step-by-step process of disassembling a dresser. We will cover everything from clearing out the dresser to removing drawers, hardware, and additional components. So, let’s get started!
Key Takeaways:
- Disassembling a dresser requires the right tools, careful organization, and a systematic approach. Clearing out the dresser, removing drawers, hardware, and additional components are essential steps to successfully take apart a dresser.
- Handling the disassembled dresser components with care and labeling the hardware will make reassembly easier in the future. Whether for moving, renovating, or repurposing, knowing how to take apart a dresser can be invaluable.
Read more: How To Take Apart A Lamp
Tools and Materials Needed
Before you begin taking apart a dresser, it’s important to gather the necessary tools and materials. Here’s a list of what you’ll need:
- Screwdriver (both Phillips and flathead)
- Allen wrench set
- Hammer
- Pliers
- Tape measure
- Protective gloves
- Masking tape or labels
Additionally, it’s a good idea to have a designated space to work in, preferably a large, open area where you can spread out the dresser components.
Once you have gathered all the necessary tools and materials, you’re ready to start disassembling the dresser.
Step 1: Clearing the Dresser
Before you begin the disassembly process, it’s important to clear out the dresser and remove any items that may be stored inside. This includes clothing, accessories, or any other personal belongings.
Start by emptying out the drawers one by one. Remove any folded clothes, jewelry, or small items that may be tucked away. It’s a good idea to have some storage containers or boxes nearby to temporarily store these items.
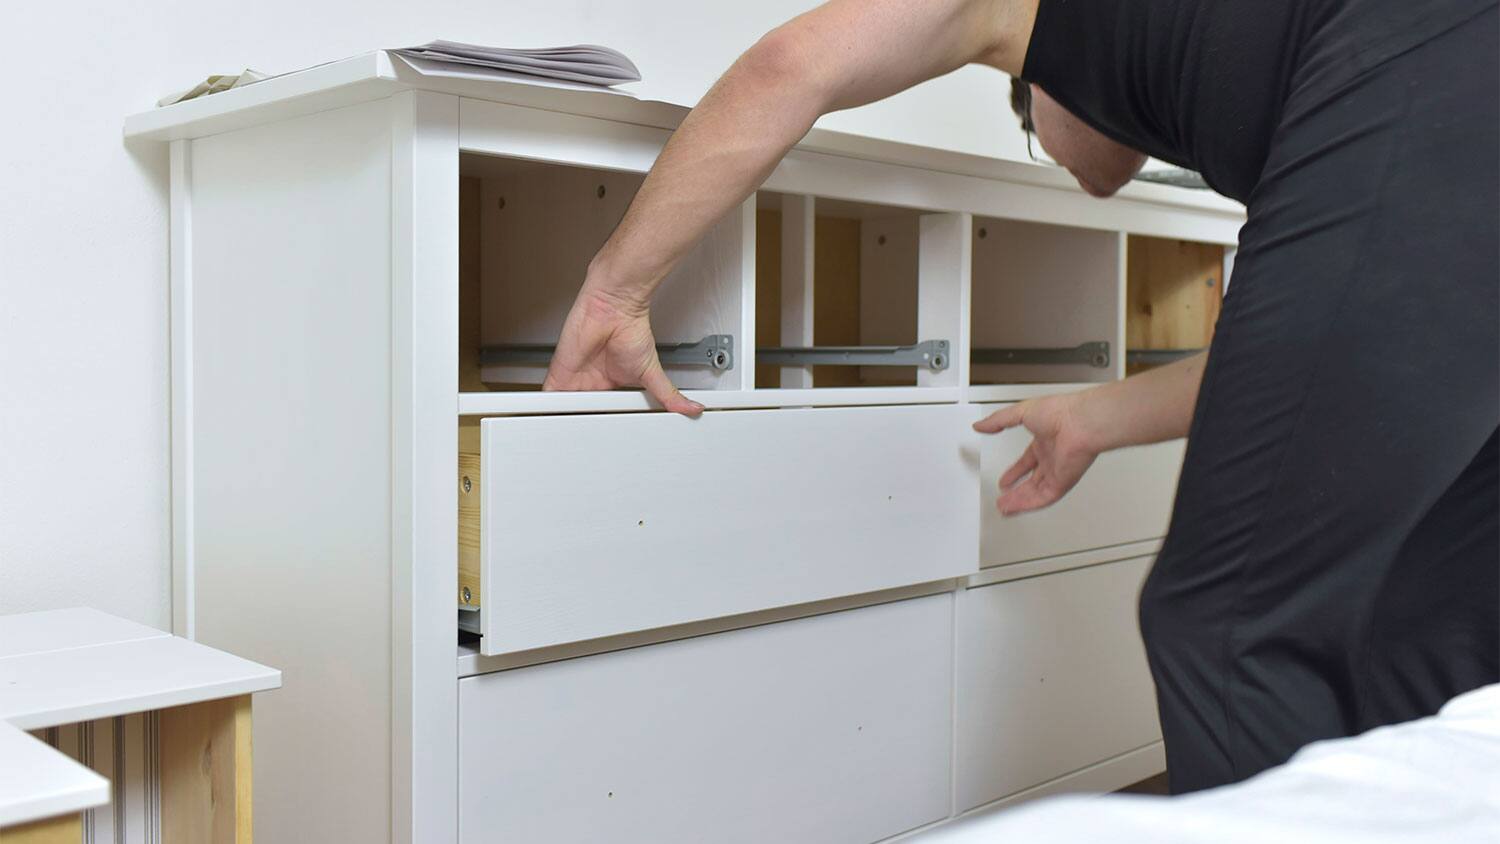
Once the drawers are empty, remove them from the dresser. Carefully lift each drawer and pull it out from the tracks or slides. Set the drawers aside in a safe location.
Next, remove any loose items from the dresser top and shelves. This includes decorative objects, books, or any other items that may be displayed on the surface.
Take a moment to inspect the dresser for any hidden compartments or secret storage areas. Some dressers may have hidden compartments underneath or behind certain sections. If you discover any hidden areas, make sure to remove any items stored inside.
By clearing the dresser of all its contents, you can now focus on the disassembly process without any obstacles or potential damage to personal belongings. This step also allows you to assess the condition and stability of the dresser components more effectively.
With the dresser cleared out, you’re ready to move on to the next step: removing the drawers.
Step 2: Removing the Drawers
Now that the dresser is cleared of its contents, it’s time to remove the drawers. This step will make it easier to access the structure of the dresser and disassemble it further.
Start by opening each drawer fully. Look for any screws, clips, or brackets that are holding the drawer in place. In some cases, you may need to remove these fasteners using a screwdriver or pliers.
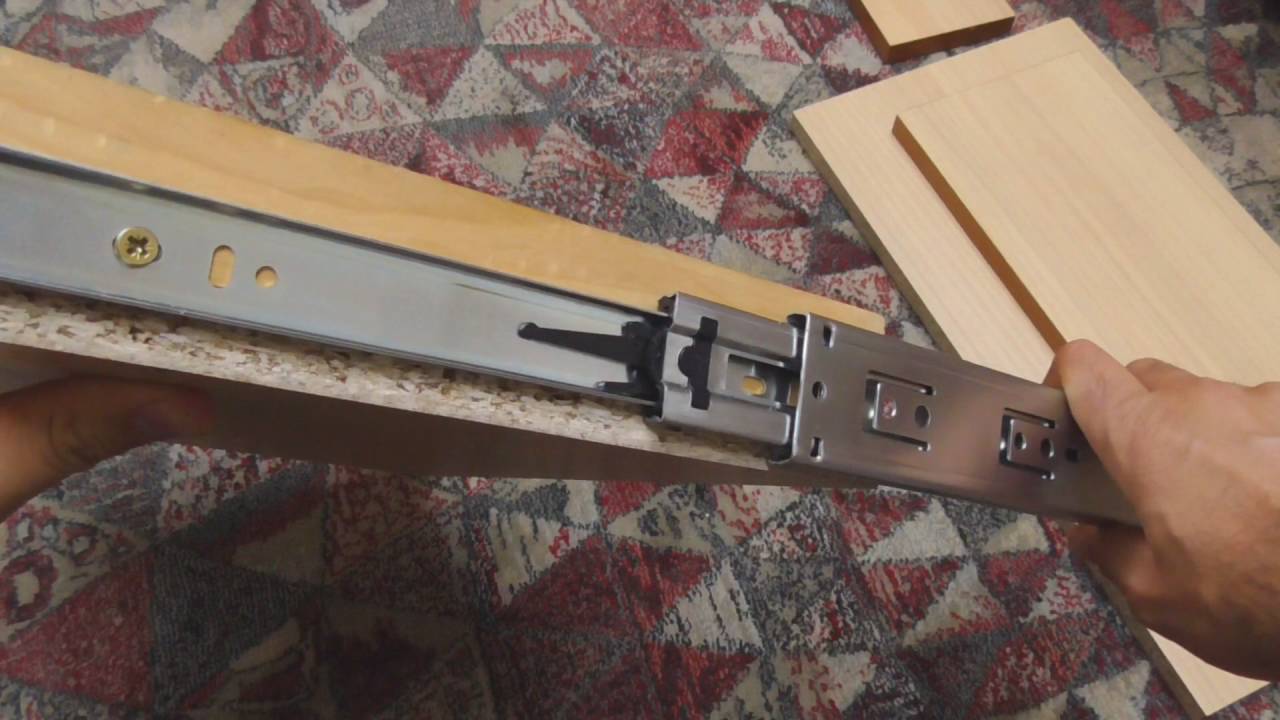
If your dresser has drawer slides, these are metal tracks that allow the drawers to slide in and out smoothly. To remove the drawers, locate the release mechanisms usually located on the slides. Depending on the type of slides, you may need to push a small lever or depress a tab to release the drawer from the slide.
Once you’ve released the drawer from the slides or removed any screws or clips holding it in place, carefully lift the drawer up and pull it out from the dresser. Set the drawer aside in a safe area.
Repeat this process for each drawer in the dresser, removing them one by one until all the drawers have been taken out.
As you remove each drawer, it’s a good idea to label or mark them. This will help you remember the order in which they were removed and make it easier to reassemble the dresser later. You can use masking tape or small labels to mark each drawer.
By removing the drawers, you’re now one step closer to disassembling the entire dresser. The next step will focus on removing the hardware from the dresser structure.
Step 3: Removing the Hardware
With the drawers removed, it’s time to remove the hardware from the dresser. Hardware refers to any handles, knobs, hinges, or other fittings that are attached to the dresser.
Start by inspecting the drawers and dresser doors to identify the type of hardware used. In most cases, you’ll find screws or bolts securing the hardware to the dresser.
Grab your screwdriver or Allen wrench set, depending on the type of fasteners used, and begin removing the screws or bolts that hold the hardware in place. Start with the handles or knobs on the drawers, unscrewing them one by one.
Once the hardware on the drawers is removed, move on to the hardware on the doors, if applicable. Follow the same process of removing the screws or bolts that secure the hinges or other fittings in place.
As you remove the hardware, be sure to keep the screws or bolts safely stored in a container or bag. It’s also helpful to keep track of which hardware belongs to which drawer or door. You can use small bags or envelopes and label them accordingly.
If you encounter stubborn or stuck screws, you can try applying some lubricant or using pliers to provide extra grip and leverage. Be careful not to damage the wood or scratch the surface of the dresser.
Once all the hardware has been removed, set it aside in a safe location. This will prevent any loss or damage during the disassembly and reassembly process.
Now that the hardware is removed, you’re ready to move on to dismantling the dresser frame in the next step.
Read more: How To Take A Dryer Apart
Step 4: Taking Apart the Frame
With the drawers and hardware removed, it’s time to take apart the frame of the dresser. This step involves disassembling the main structure of the dresser to make it easier to transport or repurpose.
Start by examining the joints and connections of the dresser. Look for any visible screws, bolts, or fasteners that hold the frame together. Using a screwdriver or Allen wrench set, begin loosening and removing these fasteners.
As you remove the screws or bolts, be sure to keep them organized and labeled. Consider using small bags or compartments to store the fasteners for each specific section or joint of the dresser.
If the dresser has any glued joints, you may need to gently pry apart the pieces using a pry bar or rubber mallet. Take caution not to damage the wood or cause splintering.
Once the fasteners are loosened or removed and any glued joints have been separated, start disassembling the dresser frame section by section. Carefully lift and separate the different components, such as the sides, back panel, and bottom.
For larger dressers that have multiple sections or panels, you may need assistance to ensure stability and avoid any accidents or injuries. Enlist the help of a friend or family member to assist you in safely dismantling the frame.
Throughout this process, remember to handle the pieces with care to avoid any damage. If there are any delicate or fragile sections, consider using protective padding or blankets to prevent scratching or chipping.
As you disassemble the frame, take note of the order in which the pieces were originally assembled. This will make it easier when you want to reassemble the dresser later.
By now, the main frame of the dresser should be disassembled, leaving you with individual sections and components. In the next step, we will focus on disassembling the drawer slides.
When taking apart a dresser, start by removing the drawers and any hardware. Use a screwdriver to take out the screws and disassemble the frame carefully to avoid damaging the pieces. Keep track of the hardware and store it in a safe place for reassembly.
Step 5: Disassembling the Drawer Slides
With the frame of the dresser disassembled, it’s time to tackle the drawer slides. Drawer slides are the mechanisms that allow the drawers to slide smoothly in and out of the dresser. Disassembling them will make it easier to transport or repurpose the drawers.
Start by examining the drawer slides and identifying how they are attached. In most cases, you’ll find screws or bolts securing the slides to both the dresser frame and the drawers.
Using a screwdriver or Allen wrench set, begin removing the screws or bolts that hold the drawer slides in place. Start with the screws or bolts on the dresser frame first. This will allow you to separate the slides from the frame without any resistance from the drawers.
After removing the screws or bolts from the dresser frame, carefully lift and separate the drawer slides from the frame. Set them aside in a safe place.
Next, focus on the screws or bolts securing the slides to the drawers. Remove these fasteners one by one, and gently pull the slides away from the drawers.
As you disassemble the drawer slides, be sure to keep the screws or bolts organized and labeled. You can use small bags or compartments to store the fasteners for each specific slide.
Pay attention to the condition of the drawer slides as you disassemble them. If you plan to reuse the slides or repurpose them for another project, it’s important to assess their functionality and determine if any repairs or replacements are needed.
Once the drawer slides are disassembled, you now have separate drawers and detached slides. This makes it easier to handle and transport the drawers individually.
In the next step, we will focus on separating the dresser top from the rest of the structure.
Step 6: Separating the Dresser Top
In this step, we will guide you through the process of separating the dresser top from the rest of the structure. Separating the top is necessary if you want to transport or repurpose it separately from the rest of the dresser.
Start by examining how the dresser top is attached to the frame. Look for any screws, bolts, or fasteners that connect the top to the sides or back panel.
Using a screwdriver or Allen wrench set, begin removing the fasteners. Start with the ones located at the back of the dresser, as they are often easier to access.
Once the back fasteners are removed, move on to the ones located at the sides or front of the dresser top. Take your time and ensure that all the fasteners are properly loosened or removed.
After the fasteners are taken out, carefully lift and separate the dresser top from the rest of the structure. It may be helpful to have someone assist you to ensure stability and prevent any damage.
As you separate the dresser top, be mindful of any additional support or bracing that may be connected to the frame or top. Take note of how these components are attached and remove them as necessary.
Once the dresser top is successfully separated, set it aside in a safe and secure location. Pay attention to its size and weight, as it may require additional assistance or special handling during transportation.
By separating the dresser top from the rest of the structure, you now have individual components that can be easily handled and transported. In the next step, we will focus on removing the back panel of the dresser.
Step 7: Removing the Back Panel
In this step, we will guide you through the process of removing the back panel of the dresser. The back panel is typically made of thin plywood or fiberboard and is attached to the frame to provide structural support.
Start by inspecting the back panel and identifying how it is attached to the dresser frame. Look for any nails, screws, or staples that secure the panel in place.
Using a hammer, carefully tap and remove any nails or staples that you see holding the back panel to the frame. If there are screws, use a screwdriver to loosen and remove them.
Work your way along the edges of the back panel, gradually removing each fastener as you go. Take care not to damage the panel or the surrounding wood.
Once the fasteners are removed, gently pull or pry the back panel away from the frame. It may be secured with adhesive, so apply moderate pressure if necessary.
As you remove the back panel, be cautious of any splintering or splitting that may occur. If you encounter resistance, use a pry bar or putty knife to carefully separate the panel from the frame.
Set the removed back panel aside in a safe location. Depending on its condition, you may choose to keep it for future use or discard it if it’s no longer needed.
With the back panel successfully removed, you now have a fully disassembled dresser frame. In the final step, we will cover any additional components that may need to be disassembled.
Read more: How To Take Apart A Rubbermaid Shed
Step 8: Disassembling Any Additional Components
In this final step of disassembling a dresser, we will address any additional components that may need to be disassembled. These components can vary depending on the style and design of the dresser, but common examples include attached mirrors, decorative trim, or specialized features.
Start by assessing the dresser for any additional components that are still connected to the frame or individual sections.
If your dresser has an attached mirror, carefully examine how it is secured. Look for any brackets, screws, or clips that hold the mirror in place.
Using the appropriate tools like a screwdriver or Allen wrench, begin removing the fasteners and gently detach the mirror from the dresser. If the mirror is heavy or large, it may require help from another person to prevent accidents or damage.
For dressers with decorative trim or molding, inspect how these elements are attached. Depending on the design, you may need to remove nails, screws, or adhesive to detach the trim from the dresser.
Take your time during this step to ensure that all additional components are properly disassembled. Pay attention to any specific instructions or guidelines provided by the manufacturer, as certain dressers may have unique disassembly requirements.
Keep all the removed components organized and labeled to make reassembly or future use easier. Store the fasteners in separate bags or compartments, making sure they are securely closed to avoid any loss.
Once all additional components are disassembled and stored, you have successfully taken apart the dresser.
Remember to keep the disassembled pieces in a safe place and handle them with care during transportation or storage.
Whether you’re planning to reuse the components for a new project, repurpose them individually, or simply need to disassemble the dresser for practical reasons, following these steps will make the process more manageable and efficient.
Good job on successfully disassembling the dresser! Remember that reassembling it in the future will require careful attention and the reverse sequence of these steps.
If you have any questions or need further assistance, don’t hesitate to consult the dresser’s manufacturer or seek the help of a professional.
Happy disassembling!
Conclusion
Taking apart a dresser may seem like a daunting task at first, but with the right tools, a systematic approach, and a little patience, it can be a manageable and rewarding process.
In this article, we have provided you with a step-by-step guide to disassembling a dresser. Starting with clearing out the dresser and removing the drawers, then moving on to removing the hardware and dismantling the frame, we covered all the essential steps to successfully take apart a dresser.
We also discussed the importance of gathering the necessary tools and materials, labeling and organizing components during disassembly, and providing tips for handling delicate parts.
Remember, as you disassemble a dresser, it’s crucial to handle the pieces with care to avoid any damage. Taking the necessary precautions, such as wearing protective gloves and using padding or blankets, will help ensure the integrity of the dresser components.
Once the disassembly is complete, you now have the freedom to transport, repurpose, or reuse the individual components of the dresser. Whether you’re moving to a new home, renovating your space, or looking to breathe new life into an old piece of furniture, knowing how to take apart a dresser can be invaluable.
Before embarking on the reassembly process, remember to carefully store all the disassembled components and keep track of the labeled hardware. This will make it much easier to put the dresser back together when needed.
We hope that this comprehensive guide has provided you with the knowledge and confidence to tackle the task of disassembling a dresser. Remember, if you ever need additional assistance or have specific concerns about your dresser, it’s always wise to consult the manufacturer or seek the advice of a professional.
Happy disassembling and enjoy the process of transforming your dresser to suit your needs!
Now that you've mastered disassembling a dresser, why not delve into more DIY projects? Our latest guide on woodworking offers fresh insights and innovative techniques for anyone eager to create stunning woodcrafts. Whether you're looking to enhance your skills or start a new hobby, this article lays out the essential tools, tips, and trends for 2024. Don't miss out on learning how to elevate your woodworking projects with style and precision.
Frequently Asked Questions about How To Take Apart A Dresser
Was this page helpful?
At Storables.com, we guarantee accurate and reliable information. Our content, validated by Expert Board Contributors, is crafted following stringent Editorial Policies. We're committed to providing you with well-researched, expert-backed insights for all your informational needs.


0 thoughts on “How To Take Apart A Dresser”