Home>Furniture>Outdoor Furniture>How To Fix Concrete Cracks On The Patio
Outdoor Furniture
How To Fix Concrete Cracks On The Patio
Modified: March 7, 2024
Learn how to fix concrete cracks on your patio and protect your outdoor furniture. Our step-by-step guide will help you achieve long-lasting results.
(Many of the links in this article redirect to a specific reviewed product. Your purchase of these products through affiliate links helps to generate commission for Storables.com, at no extra cost. Learn more)
Introduction
Welcome to the ultimate guide on how to fix concrete cracks on your patio. Having cracks in your outdoor concrete can be unsightly and even hazardous if left unattended. However, with a little DIY know-how and the right materials, you can easily repair these cracks and restore the beauty and functionality of your outdoor space.
Concrete cracks can occur due to various factors such as weather changes, age, improper installation, and heavy use. It is essential to understand the causes of these cracks to effectively repair and prevent them in the future. This comprehensive guide will take you through the process step-by-step, ensuring that you have all the necessary information to successfully fix concrete cracks on your patio.
Before we dive into the repair process, it’s crucial to assess the severity of the cracks and take necessary safety precautions. While minor cracks can often be repaired using basic tools and materials, larger or structural cracks may require professional assistance.
The preparation phase is essential to ensure a successful repair. You’ll need to gather the necessary tools and materials, including a concrete patching compound or epoxy injection system, safety gear, a wire brush, and a trowel. It’s also important to clean the area thoroughly before beginning the repair process to remove any debris, loose materials, or dirt that could compromise the repair.
In this guide, we’ll cover two common methods for repairing concrete cracks on patios: filling small cracks with a concrete patching compound and repairing larger cracks with an epoxy injection system. We’ll provide easy-to-follow instructions and tips to help you achieve professional-looking results.
Once the cracks are repaired, we’ll also discuss the importance of sealing the cracks and finishing the surface to protect it from future damage. Sealing the cracks not only improves the appearance of your patio but also helps prevent water penetration and further cracking.
Lastly, we’ll explore preventive measures to avoid future cracks on your patio. Simple maintenance practices and proactive steps can greatly extend the lifespan of your concrete, keeping it in excellent condition for years to come.
By following this comprehensive guide, you’ll be equipped with the knowledge and skills to tackle concrete crack repairs on your patio. Whether you’re an experienced DIY enthusiast looking to enhance your outdoor space or a beginner with little repair experience, this guide will empower you to take on this project with confidence.
So roll up your sleeves, gather your tools, and let’s get started on fixing those concrete cracks and reclaiming the beauty and functionality of your patio!
Key Takeaways:
- Understanding the causes of concrete cracks and assessing their severity is crucial for effective repair and prevention. Proper preparation, the right tools, and materials are essential for successful DIY repairs.
- Prevent future cracks on your patio by implementing proactive measures like proper sub-base preparation, reinforcement, control joint installation, and regular maintenance. These strategies will help maintain a durable and crack-free outdoor space.
Read more: How To Fix A Cracked Concrete Patio
Understanding Concrete Cracks
Before you dive into the process of fixing concrete cracks on your patio, it’s important to understand why they occur in the first place. Concrete cracks can develop for a variety of reasons, and knowing the causes will help you address the underlying issues and prevent future cracks from appearing.
One of the primary reasons concrete cracks is due to shrinkage. When concrete is initially poured, it contains a significant amount of water. As the concrete cures and dries, this water evaporates, causing the material to shrink. This shrinkage can result in small cracks, commonly known as shrinkage cracks.
Another common cause of concrete cracks is settlement. Over time, the ground beneath your patio can shift and settle due to various factors, including erosion, changes in moisture content, and the weight placed on the concrete. This settlement can cause the concrete to crack as it adjusts to the new conditions.
Freeze-thaw cycles can also contribute to concrete cracking. In areas with colder climates, water can seep into the concrete, freeze, and expand. This expansion can place significant pressure on the concrete, leading to cracks. The repetitive cycle of freezing and thawing can worsen existing cracks and create new ones.
Additionally, heavy loads or sudden impacts can cause concrete to crack. For example, if heavy furniture or equipment is placed on your patio without proper support or if a heavy object is dropped on the surface, it can result in cracks.
It’s essential to assess the severity of the cracks on your patio to determine the appropriate repair method. Hairline cracks, which are typically very thin and superficial, are generally cosmetic and do not pose a significant structural concern. However, wider and deeper cracks may require more extensive repair to ensure the stability and longevity of the patio.
By understanding the underlying causes of concrete cracks, you can take proactive measures to prevent them in the future. Some preventive steps include ensuring proper compaction of the sub-base before pouring concrete, using reinforcement materials like steel rebar or wire mesh, and applying sealants or waterproof coatings to protect the concrete from moisture infiltration.
Remember, timely repair and preventive maintenance are key to preserving the integrity and appearance of your patio. With the knowledge of why concrete cracks occur, you can effectively address the issue and enjoy a crack-free and durable outdoor space.
Causes of Concrete Cracks
Concrete cracks can be a common occurrence in outdoor spaces like patios. Understanding the causes of these cracks is essential for effective repair and prevention. Here are some of the primary causes of concrete cracks:
- Shrinkage: When concrete cures and dries, it undergoes shrinkage due to water evaporation. This shrinkage can result in small cracks, known as shrinkage cracks. It is a natural process and is more prevalent in larger concrete slabs.
- Settlement: The ground beneath your patio can experience settlement or uneven settling. This can occur due to factors like soil erosion, moisture changes, or poor compaction during the construction process. As the ground settles, it causes the concrete to crack in response to the shifting surface.
- Freeze-Thaw Cycles: In regions with freezing temperatures, water can penetrate the concrete surface and then freeze and expand during colder months. The expansion of freezing water exerts pressure on the concrete, leading to cracks. This process, known as freeze-thaw cycling, can worsen existing cracks or create new ones over time.
- Heavy Loads: Excessive weight or sudden impact can cause concrete to crack. For example, placing heavy furniture or equipment on the patio without proper support can stress the concrete surface and result in cracks. Similarly, dropping heavy objects on the concrete can cause immediate cracks.
- Improper Installation: Poor construction techniques or inadequate preparation can contribute to concrete cracks. Insufficient compaction of the base, incorrect curing methods, or improper mixing ratios can lead to weakened areas and eventually cracks in the concrete.
- Environmental Factors: Exposure to extreme weather conditions, such as excessive heat or prolonged periods of rain, can cause concrete to expand or contract, leading to cracks. Additionally, overexposure to UV rays from the sun can weaken the concrete’s surface, making it more susceptible to cracking.
Identifying the specific cause or causes of the cracks on your patio will help determine the appropriate repair method and preventive measures to implement. For minor cracks, simple patching and sealing may be sufficient. However, for larger or structural cracks, it may be necessary to consult a professional contractor to assess and address the underlying issues.
By understanding the causes of concrete cracks, you can take proactive steps to prevent future cracks from appearing. Proper construction techniques, including compacting the sub-base, using reinforcing materials, and applying protective sealants, can help minimize the risk of cracks in your patio.
Remember, regular inspection and maintenance can help detect and address any early signs of cracking, ensuring the longevity and integrity of your outdoor concrete surfaces.
Assessing the Severity of Cracks
Before trying to repair the cracks on your patio, it’s crucial to assess their severity. This assessment will help determine the appropriate repair method and whether professional assistance may be needed. Here’s how you can evaluate the severity of concrete cracks:
- Size of the Crack: Measure the width and depth of the crack. Hairline cracks, which are thin and superficial, are typically cosmetic and don’t pose significant structural concerns. Cracks less than ¼ inch wide are generally considered small. However, cracks wider than ¼ inch may indicate underlying structural issues and require further attention.
- Direction of the Crack: Note the direction of the crack. Vertical and diagonal cracks that are narrow and relatively straight are often less concerning than horizontal cracks. Horizontal cracks can indicate a more severe problem, such as excessive pressure or movement, and may require a professional evaluation.
- Continuity of the Crack: Determine if the crack is continuous or penetrates through the entire depth of the concrete. Surface-level cracks that don’t extend through the full thickness of the concrete are generally easier to repair. Deep or continuous cracks can be signs of more significant structural issues that should be addressed by a professional.
- Crack Movement: Observe whether the crack is static or exhibits any movement. Static cracks are not actively widening or shifting, which may indicate a stable condition. However, if the crack is actively growing or widening, it could indicate ongoing structural movement and should be inspected by a professional.
- Surrounding Damage: Assess the condition of the surrounding concrete and areas adjacent to the crack. Look for signs of spalling (chipping or flaking of the surface), crumbling edges, or displacement, which can be indicators of more extensive damage. If there is significant damage around the crack, seeking professional assistance is recommended.
- Location: Consider the location of the crack on your patio. Cracks near the edges or joints are often more challenging to repair and may require additional measures to ensure stability and prevent future cracking.
Keep in mind that while small, cosmetic cracks may not require immediate attention, it’s essential to monitor them for any changes over time. If you notice significant widening or additional cracks occurring nearby, it’s best to consult a professional to assess the situation.
By accurately assessing the severity of the cracks, you can determine whether you can proceed with DIY repairs or if it’s necessary to engage the services of a professional contractor. Addressing structural concerns promptly is crucial to maintaining the safety and integrity of your patio.
Now that you know how to assess the severity of concrete cracks, you can confidently proceed with the appropriate repair method for your patio, ensuring a successful and long-lasting solution.
Safety Precautions
When working on repairing concrete cracks on your patio, it’s essential to prioritize safety. Taking appropriate precautions will not only protect you from potential injuries but also ensure the success of your repair project. Here are some safety measures to keep in mind:
- Protective Gear: Wear appropriate protective gear, including safety goggles, a dust mask, and work gloves, to shield yourself from any flying debris, dust, or chemicals used in the repair process. This is especially important when using power tools or working with concrete patching compounds and epoxy.
- Ventilation: If you are working in an enclosed area or using chemicals with strong odors, ensure proper ventilation by opening windows and doors or using fans to circulate fresh air. This will help prevent the inhalation of harmful fumes or dust particles.
- Stability: Ensure that your patio is structurally stable and free from any loose or unstable sections before beginning the repair process. If there are any concerns about the stability of the concrete, consult a professional contractor for a thorough assessment.
- Slip Resistance: Always wear slip-resistant footwear to minimize the risk of falls or accidents, especially when working on damp or wet surfaces.
- Tool Safety: Handle your tools with care and follow the manufacturer’s instructions. Use tools that are appropriate for the task at hand, and ensure they are in good working condition to avoid any accidents or mishaps.
- Chemical Handling: When working with concrete patching compounds or epoxy, carefully read and follow the instructions provided. Some chemicals may be caustic or require specific handling procedures. Avoid direct contact with your skin, and immediately rinse with water if any contact occurs.
- Working at Heights: If your patio is elevated or you need to work on a ladder, ensure the ladder is stable and positioned on a level surface. Take caution when moving or reaching while on the ladder to avoid falls or injuries.
- Electricity: If you need to use power tools, ensure that all electrical cords and outlets are in good condition. Avoid using power tools in wet conditions or near water sources to prevent electrical hazards.
- First Aid Kit: Keep a well-stocked first aid kit nearby in case of any minor injuries. It’s essential to have access to bandages, antiseptic solutions, and other necessary supplies.
- Know Your Limitations: If the cracks on your patio are extensive or require specialized knowledge and equipment, it may be best to seek professional assistance. Don’t hesitate to call in a professional contractor if you’re unsure about handling certain aspects of the repair process.
Remember, safety should always be your top priority. By taking the necessary precautions and following these safety guidelines, you can ensure a safe and successful concrete crack repair project on your patio. Take your time, work carefully, and enjoy the satisfaction of restoring and improving your outdoor space!
Read more: How To Fix Cracks In A Concrete Patio
Preparation
Before you begin repairing the concrete cracks on your patio, proper preparation is crucial for a successful and long-lasting repair. Taking the time to prepare the surface and gather the necessary tools and materials will ensure that the repair process goes smoothly. Here are the key steps in the preparation phase:
Clean the Area
Start by thoroughly cleaning the area around the cracks. Remove any loose debris, dirt, or vegetation that may be present. Use a wire brush or a stiff broom to sweep away any loose particles. Cleaning the surface will create a clean base for the repair materials to adhere to and ensure a better bond.
Inspect for Structural Issues
Inspect the entire patio surface for any signs of significant damage or underlying structural issues. Look for areas of spalling, crumbling edges, or displacement that may require more extensive repairs. If you notice any major concerns, it’s advisable to consult with a professional contractor who can evaluate the structural integrity of your patio.
Measure and Assess the Cracks
Measure the width, length, and depth of the cracks using a ruler or tape measure. Assess the severity of the cracks based on their size, direction, continuity, and movement. This evaluation will help you determine the appropriate repair method and the materials needed for the job.
Read more: How To Fix A Crack In Concrete Floor
Gather the Tools and Materials
Make sure you have all the necessary tools and materials on hand before starting the repair process. The exact tools and materials required will depend on the size and type of cracks you are dealing with. In general, here are the essential items you will need:
- Concrete patching compound or epoxy injection system: Choose the appropriate repair material based on the size and severity of the cracks.
- Caulking gun: If using a concrete patching compound, you will need a caulking gun to apply it smoothly and evenly.
- Trowel: A trowel will be needed to spread and level the patching compound or epoxy.
- Wire brush: Use a wire brush to clean the cracks and remove any loose debris or old filler material.
- Protective gear: Wear safety goggles, a dust mask, and work gloves to protect yourself from debris and chemicals.
- Clean water: Have access to clean water for rinsing tools, cleaning the surface, and mixing the repair materials if required.
Protect Surrounding Areas
Cover any adjacent surfaces or items that you want to protect from accidental spills or splatters. Use plastic drop cloths or masking tape and plastic sheets to shield nearby plants, furniture, or other delicate items.
By following these preparation steps, you’ll be well-equipped and ready to tackle the repair process. Taking the time to clean the area, assess the cracks, and gather the necessary tools and materials will ensure a smooth and successful concrete crack repair on your patio.
Tools and Materials Needed
Repairing concrete cracks on your patio requires the use of specific tools and materials to ensure a successful repair. By gathering all the necessary items before starting the repair process, you can work efficiently and achieve long-lasting results. Here are the essential tools and materials you will need:
Tools:
- Wire brush: Use a stiff wire brush to clean the cracks and remove any loose debris or old filler material. The wire bristles will help ensure a clean and well-prepared surface for the repair.
- Trowel: A trowel is essential for applying and smoothing the concrete patching compound or epoxy. Choose a trowel with a comfortable grip and a flat or slightly curved blade, depending on your preference.
- Chisel or scraper: For larger cracks, a chisel or scraper may be necessary to widen the crack slightly and create a V-shaped groove. This helps create a better surface for the patching material to adhere to.
- Caulking gun: If you’re using a concrete patching compound in a cartridge form, a caulking gun is needed for easy and controlled application. Make sure to choose a caulking gun compatible with the cartridge size.
- Protective gear: Wear safety goggles to protect your eyes from any flying debris or chemicals. A dust mask will help prevent inhalation of dust particles, and work gloves will protect your hands from any potentially harsh chemicals or rough surfaces.
- Measuring tools: Having a ruler or tape measure on hand will help you accurately measure the width, length, and depth of the cracks, which is essential for selecting the appropriate repair method.
- Clean water source: Having access to clean water is necessary for rinsing tools, cleaning the surface, and mixing certain types of repair materials, if required.
Read more: How To Fix Uneven Concrete Patio
Materials:
- Concrete patching compound: Choose a high-quality concrete patching compound that is specifically formulated for crack repair. The compound should be suitable for the size and severity of the cracks on your patio. Select a product that provides durability and strong adhesion.
- Epoxy injection system: For larger cracks or those requiring a more structural repair, an epoxy injection system may be necessary. This system typically includes epoxy resin and a hardener, which are mixed together to create a strong and durable filler material.
- Sealant: Depending on the type of repair and the desired finish, you may need a concrete sealant to protect the repaired cracks and the surrounding surface. Choose a high-quality sealant designed for outdoor use and compatible with the materials you’ve used for the repair.
- Concrete bonding agent (optional): If working with older or more deteriorated concrete, a concrete bonding agent may be needed to enhance the bond between the existing concrete and the repair material. Follow the manufacturer’s instructions for proper application.
- Plastic drop cloths or masking tape (for protection): Use plastic drop cloths or masking tape and plastic sheets to protect adjacent surfaces or items that you want to shield from accidental spills or splatters during the repair process.
- Appropriate fasteners or anchors: If you discover any loose concrete or need to secure certain areas during the repair, you may require fasteners or anchors designed for concrete applications. Consult a professional or the manufacturer for the correct fasteners or anchors to use.
By having these essential tools and materials ready, you’ll be well-prepared to tackle the concrete crack repair project on your patio. Remember to carefully follow the manufacturer’s instructions for the tools and materials you use to ensure the best results.
Step-by-Step Guide to Fix Concrete Cracks
Repairing concrete cracks on your patio can be a straightforward process when following a step-by-step approach. Here’s a comprehensive guide to help you fix concrete cracks effectively:
Step 1: Prepare the Crack
- Clean the crack using a wire brush to remove any debris, loose particles, or old filler material. Ensure that the crack is clean and free of dust by using a vacuum or compressed air if necessary. This will provide a clean surface for optimal adhesion.
- If the crack is larger or has jagged edges, use a chisel or scraper to widen the crack and create a V-shaped groove. This will help provide a better surface for the patching compound or epoxy to adhere to.
Step 2: Mix and Apply the Repair Material
- If using a concrete patching compound: Follow the manufacturer’s instructions on mixing the patching compound. Typically, you’ll need to add water to the compound and mix it until it reaches a smooth consistency.
- Using a caulking gun, apply the patching compound into the crack, filling it completely. Smooth the surface using a trowel, ensuring that the compound is level with the surrounding concrete. Feather the edges to blend it seamlessly.
- If using an epoxy injection system: Follow the manufacturer’s instructions for mixing the epoxy resin and hardener. Thoroughly combine the two components until you achieve a uniform consistency.
- Using a trowel, apply the mixed epoxy into the crack, ensuring that it completely fills the void. Work the epoxy into the crack, pressing down firmly to eliminate any air pockets.
- Smooth the surface of the epoxy to level it with the surrounding concrete. Use a trowel or putty knife to achieve a seamless finish.
Read more: How To Repair Cracked Concrete Porch
Step 3: Allow the Repair Material to Cure
- Once the crack is filled with the repair material, allow it to cure according to the manufacturer’s instructions. The curing time can vary depending on the type of material used.
- During the curing process, protect the repaired area from foot traffic or any unnecessary stress to ensure the strength and durability of the repair.
Step 4: Seal the Cracks (Optional)
- If desired or necessary, apply a concrete sealant over the repaired cracks once the repair material has fully cured. Use a sealant suitable for outdoor use and follow the manufacturer’s instructions for application.
- Ensure that the sealant covers the entire repaired area as well as the surrounding concrete surface. This will help protect the repair and prevent future water penetration or cracking.
By following these step-by-step instructions, you can effectively fix concrete cracks on your patio. Remember to wear appropriate protective gear, work carefully, and allow sufficient curing time for the repair material. With a little patience and attention to detail, you can restore the integrity and visual appeal of your outdoor space.
Filling Small Cracks with Concrete Patching Compound
For small cracks on your patio, using a concrete patching compound is an effective and straightforward method to repair them. Follow these step-by-step instructions to fill small cracks with a concrete patching compound:
Step 1: Prepare the Crack
- Clean the crack using a wire brush to remove any debris, loose particles, or old filler material. Make sure the crack is clean and free of dust by using a vacuum or compressed air if necessary. This will provide a clean surface for optimal adhesion of the patching compound.
Read more: How To Repair Cracks In A Concrete Driveway
Step 2: Mix the Patching Compound
- Follow the manufacturer’s instructions on mixing the concrete patching compound. Typically, you’ll need to add water to the compound and mix it until it reaches a smooth consistency.
- Use a mixing container and a drill with a mixing paddle attachment to ensure thorough mixing. Start by adding water to the container, then gradually add the patching compound while continuously mixing until it forms a smooth paste. Aim for a consistency similar to pancake batter.
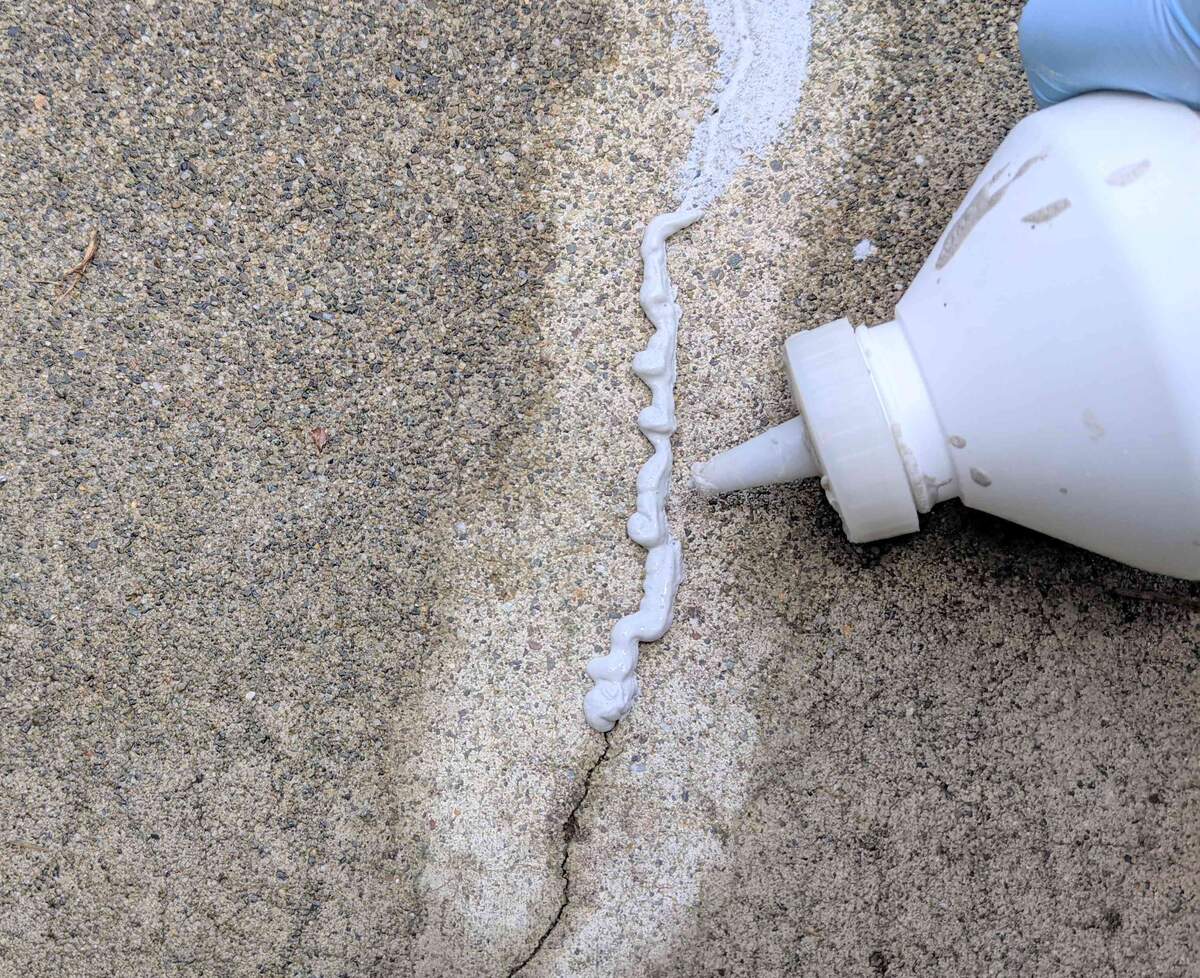
Step 3: Apply the Patching Compound
- Using a caulking gun, apply the mixed patching compound into the crack, starting from one end and working your way to the other. Ensure that the compound completely fills the crack without leaving any gaps.
- Smooth the surface of the patching compound using a trowel, making sure it is level with the surrounding concrete. Feather the edges of the compound to blend it seamlessly with the rest of the patio surface.
- Continue applying the patching compound to any additional cracks, following the same process of filling and smoothing.
Step 4: Allow the Patching Compound to Cure
- Once the cracks are filled with the patching compound, allow it to cure according to the manufacturer’s instructions. The curing time can vary depending on the specific product used.
- During the curing process, protect the repaired area from foot traffic or any unnecessary stress to ensure the strength and durability of the repair.
Step 5: Seal the Cracks (Optional)
- If desired or necessary, apply a concrete sealant over the repaired cracks once the patching compound has fully cured. Use a sealant suitable for outdoor use and follow the manufacturer’s instructions for application.
- Ensure that the sealant covers the entire repaired area as well as the surrounding concrete surface. This will help protect the repair and prevent future water penetration or cracking.
By following these simple steps, you can effectively fill small cracks on your patio using a concrete patching compound. Remember to wear appropriate protective gear, work carefully, and allow sufficient curing time for the patching compound. With proper repair and maintenance, you can extend the life and beauty of your patio for years to come.
Read more: How To Repair Cracks In Concrete Driveway
Repairing Large Cracks with Epoxy Injection
For larger cracks on your patio or those requiring a more structural repair, using an epoxy injection system is an effective method. Follow these step-by-step instructions to repair large cracks with epoxy injection:
Step 1: Prepare the Crack
- Clean the crack using a wire brush to remove any debris, loose particles, or old filler material. Ensure that the crack is clean and free of dust by using a vacuum or compressed air if necessary. This will provide a clean surface for optimal adhesion of the epoxy injection material.
- If the crack is larger or has jagged edges, use a chisel or scraper to widen the crack and create a V-shaped groove. This will help provide a better surface for the epoxy to adhere to and improve the overall strength of the repair.
Step 2: Prepare the Epoxy Injection System
- Follow the manufacturer’s instructions on mixing the epoxy resin and hardener. Thoroughly combine the two components until you achieve a uniform consistency.
- Applying the epoxy typically involves using a specialized injection gun or a dual cartridge system with a static mixing nozzle. Attach the appropriate nozzle or mixing tube to the cartridge, ensuring a secure fit.
- Prime the cartridge gun or injection system by dispensing a small amount of epoxy onto a scrap material until the resin and hardener are properly combined.
Step 3: Inject the Epoxy into the Crack
- Start injecting the epoxy into the crack at the lowest point and work your way up, moving slowly to allow the epoxy to fill the crack fully.
- Continue injecting the epoxy until it flows out from the adjacent injection holes or until the crack is completely filled.
- As you inject the epoxy, move the nozzle or mixing tube along the length of the crack to ensure even distribution and coverage.
- Pay attention to any bubbles or voids that may form during the injection process. If necessary, use a small tool or a toothpick to remove any trapped air and ensure that all areas within the crack are effectively filled.
Read more: How To Fix Cracked Sink
Step 4: Allow the Epoxy to Cure
- Once the crack is filled with the epoxy, allow it to cure according to the manufacturer’s instructions. The curing time can vary based on the specific epoxy formulation used.
- Avoid placing any stress on the repaired area during the curing process to ensure the strength and durability of the repair.
Step 5: Seal the Cracks (Optional)
- If desired or necessary, apply a concrete sealant over the repaired cracks once the epoxy has fully cured. Choose a sealant suitable for outdoor use and follow the manufacturer’s instructions for application.
- Ensure that the sealant covers the entire repaired area as well as the surrounding concrete surface. This will help protect the repair and prevent future water penetration or cracking.
By following these steps, you can effectively repair large cracks on your patio using an epoxy injection system. It’s important to wear appropriate protective gear, work carefully, and allow sufficient curing time for the epoxy. With the right repair approach, you can restore the structural integrity and appearance of your patio.
Sealing and Finishing the Cracks
Once you have successfully repaired the cracks on your patio, it’s important to seal and finish them to ensure long-lasting protection and a seamless appearance. Sealing the cracks will help prevent water penetration, protect the repair, and extend the lifespan of your patio. Follow these steps to seal and finish the cracks:
Step 1: Ensure the Repair Material is Fully Cured
Before sealing the cracks, make sure that the repair material you’ve used, whether it’s a concrete patching compound or epoxy, is fully cured. Refer to the manufacturer’s instructions for the recommended curing time.
Read more: How To Fix Fireplace Cracks
Step 2: Clean the Surface
- Thoroughly clean the repaired cracks and the surrounding concrete surface to remove any dust, debris, or loose particles. Use a broom, brush, or compressed air to ensure a clean surface.
- For stubborn stains or residue, consider using a mild detergent or concrete cleaner. Follow the product instructions and rinse the area with clean water. Allow the surface to dry completely before proceeding.
Step 3: Select a Suitable Sealant
Choose a high-quality concrete sealant that is specifically designed for outdoor use. There are various types of sealants available, such as clear sealers, penetrating sealers, or acrylic sealers. Consider the specific needs of your patio and the manufacturer’s recommendations.
Step 4: Apply the Sealant
- Read and follow the manufacturer’s instructions for the specific sealant you are using.
- Use a paintbrush or roller to apply the sealant over the repaired cracks. Work in small sections, ensuring even coverage and a smooth application.
- Apply the sealant in thin layers, using multiple coats if necessary. This will enhance the effectiveness of the sealant and provide a more durable finish.
- Avoid over-applying the sealant, as this can lead to a thick, uneven coat and potential issues with drying and adherence.
- Ensure that the sealant extends beyond the repaired cracks to create a protective barrier over the surrounding concrete surface.
Step 5: Allow the Sealant to Cure
Refer to the manufacturer’s instructions for the recommended curing time of the sealant. Make sure to allow sufficient time for the sealant to dry and fully cure before allowing foot traffic or placing any furniture or objects on the patio.
Read more: How To Fix A Crack In Stucco
Step 6: Inspect and Maintain
Regularly inspect the sealed cracks to ensure that the sealant is intact and providing adequate protection. If any cracks or signs of deterioration appear, take timely action to address them.
To maintain the sealed cracks and the overall condition of your patio, practice regular cleaning and maintenance. Sweep away debris, clean up spills promptly, and avoid using harsh chemicals or abrasive materials that may damage the sealant.
By following these steps to seal and finish the repaired cracks on your patio, you can significantly extend the lifespan and enhance the appearance of your outdoor space. Proper sealing and maintenance will help protect your patio from water damage, staining, and further cracking, allowing you to enjoy its beauty and durability for years to come.
Preventing Future Cracks on the Patio
Prevention is key when it comes to maintaining a crack-free patio. Taking proactive measures to minimize the risk of future cracks will help preserve the structural integrity and aesthetics of your outdoor space. Here are some essential tips to prevent future cracks on your patio:
1. Proper Sub-base Preparation
Ensure that the sub-base, which serves as the foundation for your patio, is properly prepared. Adequate compaction and leveling of the sub-base help prevent uneven settling and minimize the risk of future cracks.
2. Reinforcement
Consider reinforcing your patio with materials like steel rebar or wire mesh during the construction process. These reinforcements can help distribute the load more evenly and reduce the likelihood of cracks caused by heavy loads or shifting soil.
Read more: How To Fix A Crack In Glass
3. Control Joint Installation
Install control joints in your patio at regular intervals. Control joints create weakened areas that allow for controlled cracking, reducing the chances of random, unsightly cracks. Plan the placement of control joints based on the size and layout of your patio, following industry guidelines and consulting professionals if needed.
4. Proper Drainage
Ensure that your patio has proper drainage to prevent water accumulation. Poor drainage can subject the concrete to excessive moisture, which can lead to cracking, especially during freeze-thaw cycles. Grade the patio surface away from the house and install drains or gutters to divert water away from the area.
5. Avoiding Heavy Impact
Avoid dropping heavy objects directly onto the patio surface. Place furniture, pots, and other heavy items with care, using furniture pads or coasters to distribute the weight evenly and prevent concentrated pressure on specific areas.
6. Regular Maintenance
Incorporate regular maintenance into your patio care routine. This includes inspecting the surface for early signs of cracking, addressing minor cracks promptly, and performing necessary repairs to prevent them from worsening.
Read more: How Clean Concrete Patio
7. Protective Sealants
Apply a protective sealant to the patio surface every few years, following the manufacturer’s instructions. The sealant creates a barrier that helps prevent water penetration, UV damage, and surface deterioration, reducing the risk of cracks.
8. Avoid Harsh Chemicals
Avoid using harsh chemicals, such as de-icing salts or strong cleaning agents, on your patio. These chemicals can corrode the concrete surface and weaken it over time, making it more prone to cracking. Use mild detergents and gentle cleaning methods instead.
9. Avoiding Extreme Temperature Changes
Avoid subjecting your patio to extreme temperature changes whenever possible. Rapid or drastic temperature fluctuations, especially during freeze-thaw cycles, can stress the concrete and lead to cracks. Take precautions to protect the patio during extreme weather conditions.
By following these preventive measures and implementing regular maintenance practices, you can significantly reduce the risk of future cracks on your patio. Remember that attention to detail, proper construction techniques, and proactive care are essential in maintaining a strong, durable, and crack-free outdoor space.
Conclusion
Your patio is an essential part of your outdoor living space, providing a place for relaxation, entertainment, and enjoyment. Keeping it in excellent condition is crucial for both functionality and aesthetics. Concrete cracks may be unsightly and pose potential hazards if left unaddressed, but with the right knowledge and tools, you can easily repair and prevent them.
In this comprehensive guide, we have explored the process of fixing concrete cracks on your patio. We started by understanding the causes of concrete cracks and assessing their severity, allowing you to determine the appropriate repair method for your specific situation.
We covered two common repair methods: filling small cracks with a concrete patching compound and repairing large cracks with an epoxy injection system. We provided step-by-step instructions for each method, empowering you to confidently tackle the repair process. Proper preparation, using the right tools and materials, and allowing sufficient curing time are essential for successful repairs.
Once the cracks are repaired, we discussed the importance of sealing and finishing the cracks. Applying a high-quality sealant protects the repair and the surrounding concrete, preventing water penetration and future cracking. Regular maintenance and inspections will help ensure the longevity and beauty of your patio.
Furthermore, we emphasized the significance of preventive measures to avoid future cracks on your patio. Proper sub-base preparation, reinforcement techniques, control joint installation, and maintaining proper drainage are all effective ways to minimize the risk of cracks. Taking care to avoid heavy impact, using protective sealants, and regular maintenance are additional strategies to keep your patio in excellent condition.
By following the tips and guidance provided in this guide, you have the knowledge and tools to take on concrete crack repairs and prevent future issues on your patio. Remember to prioritize safety, stay diligent with maintenance, and seek professional assistance when needed.
Your patio is a valuable asset that deserves attention and care. With effective repair techniques and proactive measures, you can enjoy a crack-free, beautiful, and long-lasting outdoor space for years to come.
Frequently Asked Questions about How To Fix Concrete Cracks On The Patio
Was this page helpful?
At Storables.com, we guarantee accurate and reliable information. Our content, validated by Expert Board Contributors, is crafted following stringent Editorial Policies. We're committed to providing you with well-researched, expert-backed insights for all your informational needs.


0 thoughts on “How To Fix Concrete Cracks On The Patio”