Home>Furniture>Outdoor Furniture>How To Install Tile Over Concrete Patio
Outdoor Furniture
How To Install Tile Over Concrete Patio
Modified: March 7, 2024
Learn how to transform your outdoor space by installing tile over your concrete patio. Enhance your patio with beautiful outdoor furniture and create the perfect spot for relaxation and entertainment.
(Many of the links in this article redirect to a specific reviewed product. Your purchase of these products through affiliate links helps to generate commission for Storables.com, at no extra cost. Learn more)
Introduction
Welcome to the ultimate guide on how to install tile over a concrete patio. If you’re looking to transform your outdoor space and create a durable and beautiful surface for entertaining or relaxing, tiling over your existing concrete patio is an excellent option. This process will not only enhance the aesthetic appeal of your outdoor area but also provide added durability and long-lasting functionality.
Before we dive into the step-by-step process, let’s take a moment to understand why tiling over concrete is a popular choice for outdoor patio projects. Concrete provides a solid and stable foundation for the tiles, ensuring that they will remain in place for years to come. It is also easy to clean and maintain, making it ideal for outdoor applications where exposure to the elements, such as rain, wind, and sunlight, is common.
By choosing the right type of tile and following the proper installation techniques, you can create a beautiful, functional, and long-lasting patio that will withstand the test of time. So, let’s get started on transforming your concrete patio into a stunning outdoor oasis!
Key Takeaways:
- Transform your outdoor space by tiling over a concrete patio for a durable and beautiful surface. Follow the step-by-step guide to create a stunning oasis that withstands the test of time.
- Ensure a successful tile installation by properly preparing, cleaning, and leveling the concrete patio. Apply bonding agent, mix and apply mortar, and follow grouting and sealing steps for a professional and long-lasting finish.
Read more: How To Tile Over A Concrete Patio
Preparing the Concrete Patio
Before you begin the process of tiling over your concrete patio, it is crucial to prepare the surface properly. This step is essential to ensure a successful and long-lasting installation. Here are the key steps to follow:
- Cleaning the Surface: Start by thoroughly cleaning the concrete surface to remove any dirt, debris, or loose particles. Use a broom, leaf blower, or pressure washer to remove any stubborn stains or grime. Ensure that the surface is free of any oils or grease that could interfere with the adhesive bond.
- Checking for Cracks or Damage: Inspect the concrete patio for cracks, chips, or any other signs of damage. If you notice any minor cracks, they can be filled and repaired before installing the tiles. However, if there are significant structural issues, you may need to consult a professional to assess and address the problem.
- Repairing any Cracks or Damage: If you come across any cracks or damage, it is important to repair them before proceeding. Use a concrete patch or filler to fill in cracks and level out any uneven areas. Follow the instructions on the product, and allow it to fully cure before moving on to the next step.
- Leveling the Surface: Ensure that the concrete patio is level and even. Use a long, straight board or a level to check for any high or low spots. If there are uneven areas, consider using a self-leveling compound to create a smooth surface. Again, follow the manufacturer’s instructions for proper application and drying times.
- Applying a Bonding Agent: To improve the adhesion between the concrete and the tile adhesive, it is recommended to apply a bonding agent. This will create a stronger bond and enhance the overall durability of the installation. Follow the instructions on the bonding agent product for proper application techniques.
By following these steps to prepare your concrete patio, you will ensure a solid foundation for your tile installation. Taking the time to clean, repair, and level the surface will greatly contribute to the success and longevity of your project.
Cleaning the Surface
One of the essential steps in preparing your concrete patio for tiling is thoroughly cleaning the surface. This will ensure the best adhesion between the concrete and the tile adhesive and result in a successful and long-lasting installation. Here are the key steps to follow when cleaning the surface of your concrete patio:
- Sweep or Use a Leaf Blower: Start by sweeping or using a leaf blower to remove any loose dirt, debris, or leaves from the surface of the patio. This will help prevent these particles from interfering with the tile installation process.
- Pressure Washing: If your concrete patio is particularly dirty or has stubborn stains, consider using a pressure washer. This powerful tool will help remove dirt, grime, and even some deep-seated stains. Be sure to use the appropriate nozzle and follow the manufacturer’s instructions to prevent any damage to the concrete surface.
- Remove Grease or Oil Stains: If you notice any grease or oil stains on your concrete patio, it is essential to remove them before proceeding with the installation. There are specialized concrete cleaners and degreasers available that can effectively remove these stains. Follow the instructions on the product label and use a scrub brush or broom to scrub away the stains.
- Remove Mold or Mildew: If your concrete patio is prone to mold or mildew growth, it is crucial to address this issue before tiling. Use a solution of water and bleach or a commercial mold and mildew cleaner to clean the affected areas. Scrub the surface with a brush to remove any traces of mold or mildew. Rinse thoroughly with clean water.
- Allow the Surface to Dry: Once you have thoroughly cleaned the surface of your concrete patio, allow it to dry completely. This may take a few hours or even a full day depending on the weather conditions. Ensure that the surface is completely dry before moving on to the next steps of the tiling process.
By investing time and effort in cleaning your concrete patio before tiling, you will ensure optimal adhesion and a clean surface for the tile installation. Removing dirt, stains, grease, oil, mold, and mildew will contribute to the overall success and visual appeal of your outdoor space. Once the surface is clean and dry, you can proceed with confidence to the next steps of the tiling process.
Checking for Cracks or Damage
Before proceeding with the tile installation on your concrete patio, it is crucial to thoroughly inspect the surface for any cracks or damage. Identifying and addressing these issues beforehand will ensure a smooth and successful installation. Here are the key steps to follow when checking for cracks or damage on your concrete patio:
- Perform a Visual Inspection: Take a close look at the surface of the concrete patio and examine it for any visible cracks, chips, or other signs of damage. Pay attention to the edges, corners, and high-traffic areas as these are often prone to wear and tear.
- Use a Flashlight: In addition to a visual inspection, use a flashlight to closely examine the surface of the concrete. This will help you identify any hairline cracks or smaller imperfections that may not be visible in regular lighting conditions.
- Check for Structural Issues: While minor cracks or surface damage can often be repaired, it is essential to identify any significant structural issues. These may include large cracks, sinking or uneven sections, or signs of water damage. If you notice any major structural issues, it is recommended to consult a professional to assess the situation and recommend the appropriate solution.
- Consider Climate Factors: Depending on your climate, your concrete patio may be more susceptible to certain types of damage. For example, freeze-thaw cycles can cause concrete to crack or deteriorate over time. Take into account the climate conditions in your area and consider any specific measures needed to address or prevent damage.
- Take Note of Crack Sizes: If you do find cracks on your concrete patio, it is important to measure and note their sizes. This information will help determine the necessary steps for repair or preparation before tiling. Smaller cracks can often be filled or repaired, while larger cracks may require more extensive measures.
By thoroughly checking for cracks or damage on your concrete patio, you can address any issues before proceeding with the tile installation. Minor cracks or surface damage can be repaired, ensuring a smooth and level surface for the tiles. If you encounter any major structural concerns, it is recommended to seek professional advice to prevent further damage. By taking the time to inspect and address these issues, you will set a solid foundation for a successful tile installation on your concrete patio.
Repairing any Cracks or Damage
Once you have identified any cracks or damage on your concrete patio, it is crucial to repair them before proceeding with the tile installation. Repairing these issues will ensure a solid and level surface for the tiles, preventing any further damage or problems down the line. Here are the key steps to follow when repairing cracks or damage on your concrete patio:
- Clean the Cracks: Start by thoroughly cleaning the cracks or damaged areas on your concrete patio. Use a wire brush or a stiff bristle brush to remove any loose debris, dirt, or vegetation that may have accumulated in the cracks. This will ensure proper adhesion of the repair material.
- Choose the Repair Material: Select the appropriate repair material based on the size and depth of the cracks. For small cracks, you can use a crack filler or concrete patching compound. For larger cracks or deeper damage, consider using a concrete resurfacer or a concrete repair mortar mix.
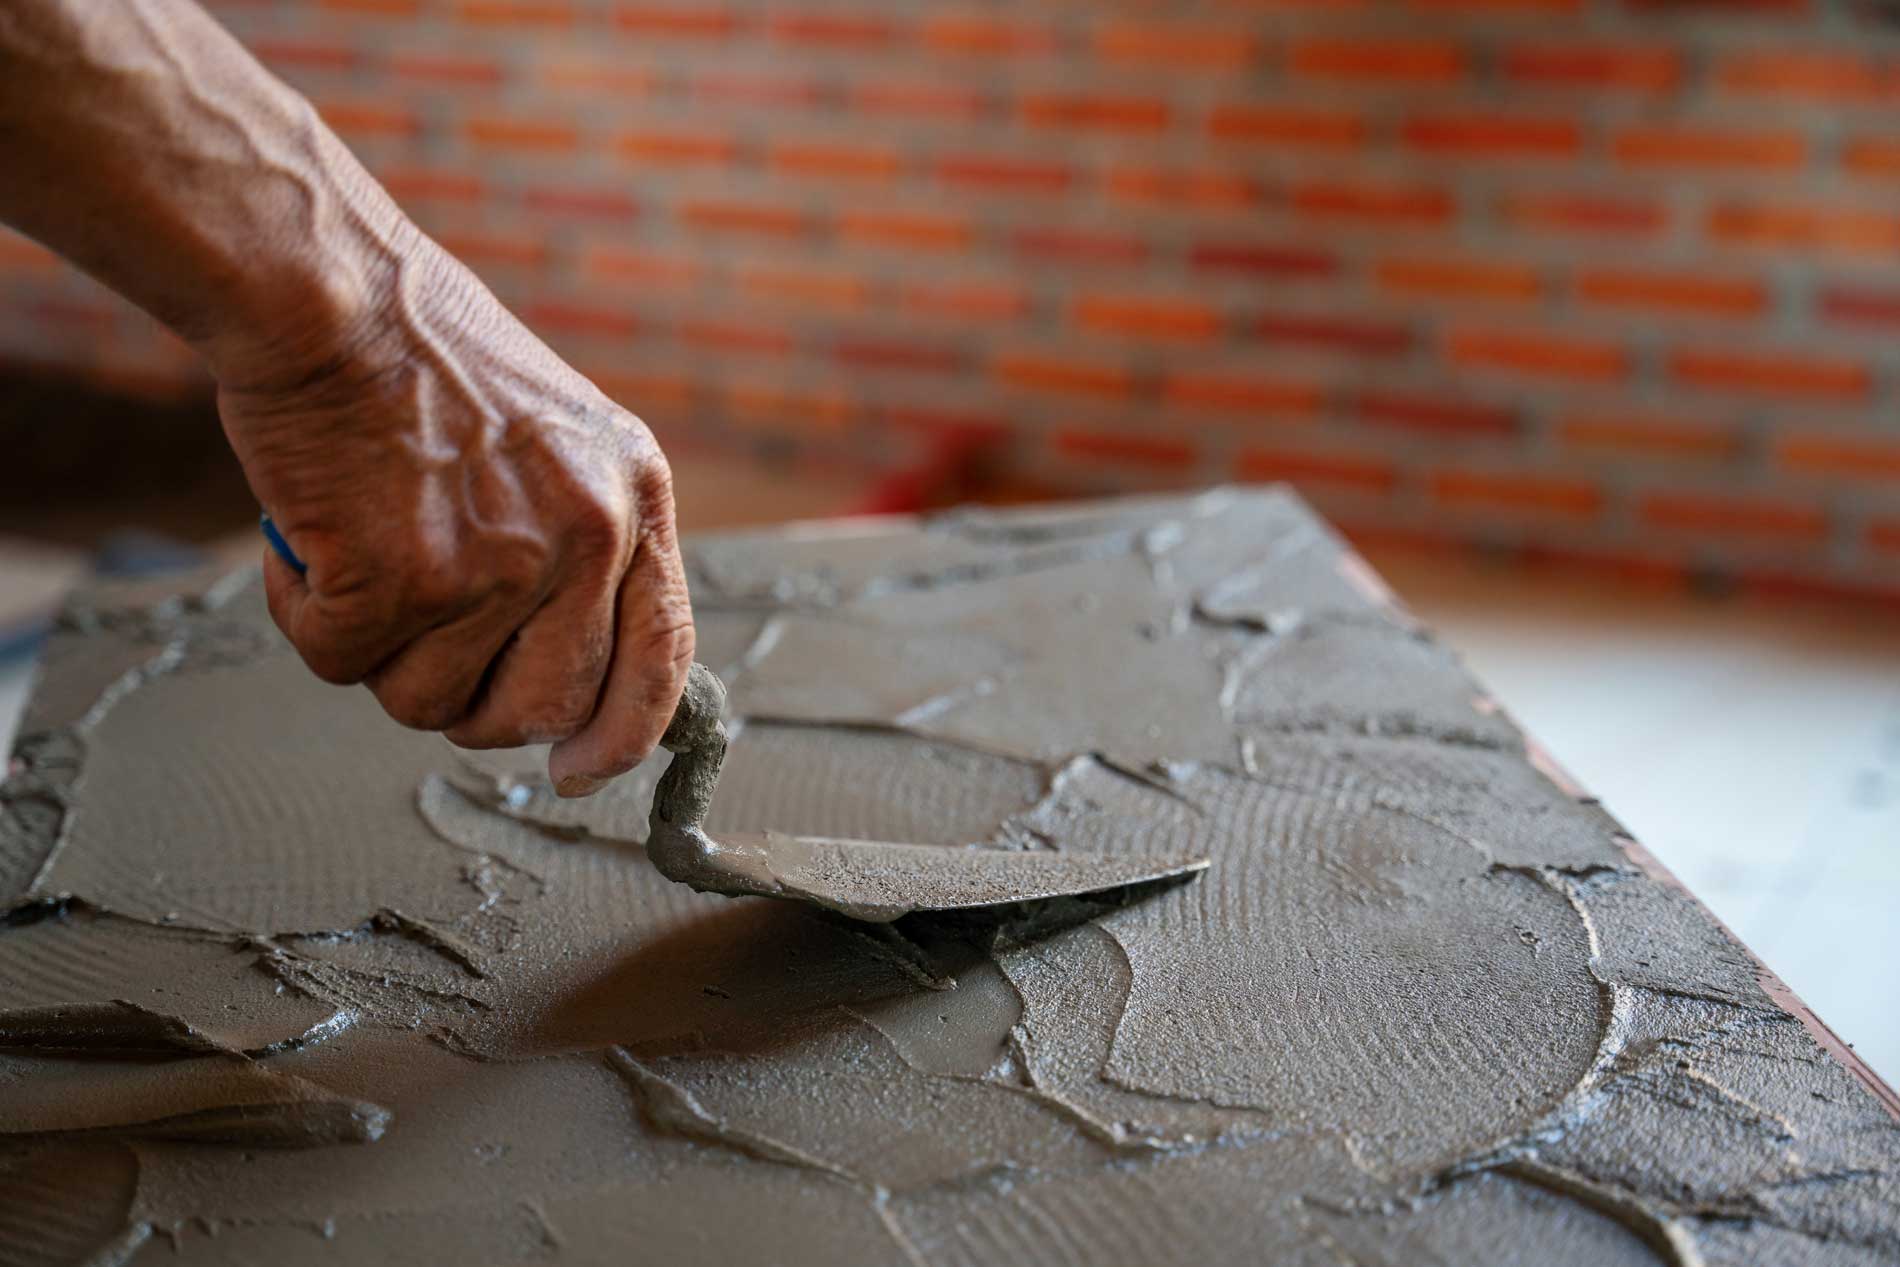
- Apply the Repair Material: Follow the manufacturer’s instructions for the selected repair material. Use a trowel to fill in the cracks or damaged areas with the repair material, ensuring that it is level with the surrounding concrete. Smooth the surface with the trowel to create a seamless finish.
- Allow the Repair to Cure: Give the repair material sufficient time to cure and harden. The curing time will vary depending on the product used, so refer to the instructions provided. Avoid walking on or applying any weight to the repaired areas until they are fully cured.
- Sand or Smooth the Surface: Once the repair material has cured, you may need to sand or smooth the surface to ensure a completely level and even patio. Use a sanding block or a concrete grinder to gently smooth down any rough patches or uneven areas.
- Inspect the Repairs: After the repairs have been completed, inspect the surface of your concrete patio to ensure that all cracks and damage have been properly addressed. Make any necessary touch-ups or additional repairs if needed.
By taking the time to repair any cracks or damage on your concrete patio, you will ensure a solid foundation for your tile installation. Addressing these issues early on will prevent further damage and provide a level surface for the tiles to adhere to. With a properly repaired and prepared patio, you can move forward confidently to the next steps of the tiling process.
Read more: How To Install Pavers Over A Concrete Patio
Leveling the Surface
Creating a level surface for your tile installation is essential to ensure a smooth and professional-looking finish. Leveling the surface of your concrete patio will not only enhance the appearance of the tiles but also contribute to their long-term durability. Here are the key steps to follow when leveling the surface of your concrete patio:
- Assess the Surface: Begin by assessing the overall condition of your concrete patio. Look for any areas that are noticeably uneven or have a significant slope. These areas may require special attention during the leveling process.
- Mark High and Low Spots: With the help of a long straightedge or a level, mark the high and low spots on the surface of the concrete patio. This will give you a visual reference of where you need to focus your efforts in order to achieve a level surface.
- Grind or Fill High Spots: If there are high spots on the surface of the concrete patio, they need to be ground down or filled in. Use a concrete grinder to carefully remove the excess material from the high spots. Alternatively, you can use a self-leveling compound to fill in the high spots and create a level surface.
- Address Low Spots: Low spots on the surface of the concrete patio can be filled in with a self-leveling compound. Prepare the compound according to the manufacturer’s instructions and pour it into the low areas. Use a trowel to spread and smooth out the compound, ensuring it is level with the surrounding surface.
- Check the Level: Once the high and low spots have been addressed, use a level or a long straightedge to check the overall levelness of the surface. Adjust as necessary by adding more compound or grinding down any remaining high spots until the entire patio is level.
- Allow the Compound to Cure: If you have used a self-leveling compound, allow it to cure completely before proceeding with the tile installation. The curing time will vary depending on the product used, so refer to the manufacturer’s instructions for guidance.
- Inspect the Surface: After the leveling process, carefully inspect the surface of the concrete patio to ensure that it is smooth and level. Address any remaining uneven areas or imperfections before moving on to the next steps.
By taking the time to level the surface of your concrete patio, you will create a solid foundation for your tile installation. A level surface not only enhances the appearance of the tiles but also ensures their proper alignment and prevents any potential issues in the future. With a properly leveled patio, you can proceed confidently to the next steps of the tiling process.
Applying a Bonding Agent
Applying a bonding agent to your concrete patio is a crucial step in ensuring a strong and durable adhesion between the concrete and the tile adhesive. The bonding agent creates a chemical bond that improves the overall bond strength and helps prevent any potential cracking or delamination of the tiles. Here are the key steps to follow when applying a bonding agent to your concrete patio:
- Clean the Surface: Before applying the bonding agent, make sure the surface of your concrete patio is clean and free of any dust, debris, or loose particles. Remove any dirt or oils using a degreaser or a cleaner specifically designed for prepping concrete surfaces.
- Mix the Bonding Agent: Follow the manufacturer’s instructions to properly mix the bonding agent. This may involve diluting the agent with water or using it as is. Use a clean container and mix thoroughly to ensure a uniform consistency.
- Apply the Bonding Agent: Use a brush or a roller to apply the bonding agent to the entire surface of the concrete patio. Make sure to cover all areas evenly and avoid leaving any spots untouched. Work in sections if necessary to ensure thorough coverage.
- Allow the Bonding Agent to Dry: Let the bonding agent dry according to the manufacturer’s instructions. This typically takes around 1-2 hours, but it may vary depending on the specific product and environmental conditions. The surface should be tacky to the touch but not wet or overly sticky.
- Inspect the Surface: After the bonding agent has dried, visually inspect the surface of the concrete patio to ensure that it has been properly coated and there are no missed areas. Touch up any spots if necessary to ensure complete coverage.
- Proceed with Tile Installation: Once the bonding agent is dry and the surface is properly prepped, you can proceed with the tile installation process. Follow the recommended adhesive and tiling techniques for your specific type of tile to ensure a successful and long-lasting installation.
By applying a bonding agent to your concrete patio, you will enhance the adhesion of the tiles and improve the overall durability of the installation. This step is especially important for outdoor applications where exposure to the elements can cause stress and movement in the concrete. By taking the time to properly apply the bonding agent, you are ensuring a strong bond and increasing the longevity of your tiled patio.
Before installing tile over a concrete patio, make sure the surface is clean, level, and free of cracks. Use a bonding agent to ensure the tiles adhere properly to the concrete.
Mixing the Mortar or Thinset
Mixing the mortar or thinset is a critical step in the tile installation process. The mortar or thinset serves as the adhesive that bonds the tiles to the concrete patio, providing stability and durability to your outdoor space. Here’s a step-by-step guide on how to mix the mortar or thinset for your tile installation:
- Gather Your Materials: Before you begin mixing, ensure that you have all the necessary materials ready. This includes a large bucket, a measuring container, a mixing paddle or drill attachment, and the mortar or thinset powder.
- Read the Instructions: Different mortar or thinset products may have specific mixing ratios and instructions, so it’s essential to read and follow the manufacturer’s guidelines. This will ensure the proper consistency and adhesion strength of the adhesive.
- Measure the Water: Use the measuring container to measure the correct amount of water needed for the mortar or thinset mixture. Pour the water into the large bucket.
- Add the Mortar or Thinset: Slow and steady, sprinkle the mortar or thinset powder into the water. It’s best to add the powder in small increments to prevent clumping and ensure thorough mixing.
- Mix the Ingredients: Attach the mixing paddle to a drill or use a mixing tool to thoroughly mix the water and powder together. Start at a low speed and gradually increase the speed to achieve a smooth and lump-free consistency. Continuously mix for a few minutes until the mixture reaches the desired thickness and uniformity.
- Let the Mixture Rest: After mixing, allow the mortar or thinset mixture to rest for a few minutes. This resting period, known as slaking, allows the ingredients to bond and results in a better adhesive consistency.
- Re-Mix if Necessary: Give the mixture a final stir to ensure uniformity before proceeding with the tile installation. If the mixture appears too dry or too thick, add a small amount of water and mix again. Conversely, if it is too wet or thin, add more mortar or thinset powder and mix until you achieve the desired consistency.
Properly mixing the mortar or thinset is essential for achieving a strong and reliable bond between the tiles and the concrete patio. Follow the manufacturer’s instructions carefully to ensure the correct mixing ratio, consistency, and overall performance of the adhesive. By taking the time to mix the mortar or thinset correctly, you will set a solid foundation for a successful tile installation that will withstand the test of time.
Applying the Mortar or Thinset
Applying the mortar or thinset is a critical step in the tile installation process. It is important to properly apply the adhesive to ensure a strong and durable bond between the tiles and the concrete patio. Here’s a step-by-step guide on how to apply the mortar or thinset for your tile installation:
- Prepare the Surface: Make sure the concrete patio is clean, dry, and properly prepared. Remove any dirt, dust, or debris that may interfere with the adhesion of the mortar or thinset.
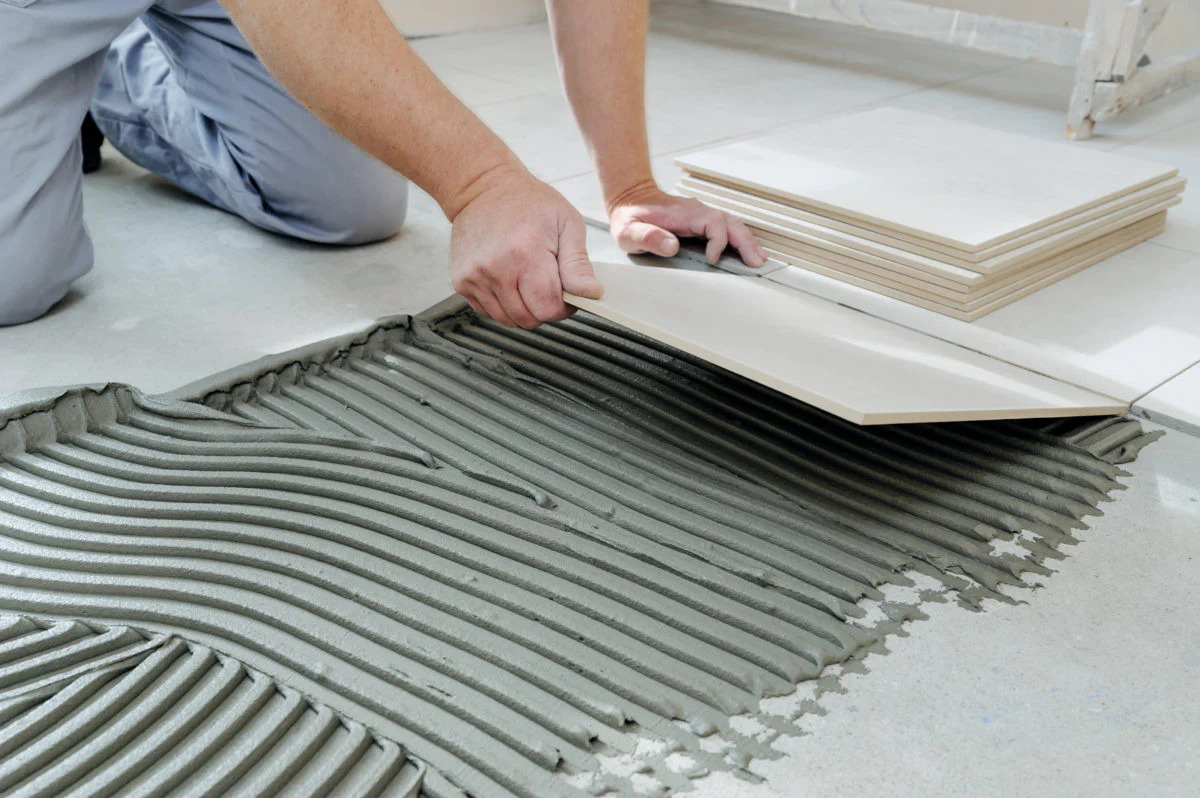
- Start at a Corner: Begin the application process at a corner of the patio. Using a notched trowel, scoop some mortar or thinset onto the trowel and apply it to the concrete surface. Hold the trowel at a 45-degree angle and spread the adhesive in a smooth and even layer.
- Work in Small Sections: To prevent the adhesive from drying out before placing the tiles, work in small sections. Apply the mortar or thinset to an area that you can comfortably tile within 10-15 minutes.
- Apply a Notched Pattern: After spreading the adhesive, use the notched side of the trowel to create ridges or grooves in the mortar or thinset. This pattern ensures proper coverage and helps with the adhesion of the tiles.
- Place the Tiles: Immediately after applying the mortar or thinset, place the tiles onto the adhesive. Press them firmly into place, ensuring that they are level and aligned according to your desired layout.
- Use Spacers: Insert tile spacers between the tiles to maintain consistent spacing and ensure even grout lines. This will create a professional and uniform appearance.
- Continue Working: Repeat the above steps, working in small sections and applying the mortar or thinset as you go along. Be mindful of the working time of the adhesive, making adjustments as needed to maintain its proper consistency.
- Check for Levelness: Use a level or straight edge to periodically check the levelness of the tiles. Make any adjustments if needed by gently tapping the tiles into place with a rubber mallet.
Applying the mortar or thinset properly is crucial for creating a strong and durable bond between the tiles and the concrete patio. Working in small sections and applying the adhesive with the correct technique ensures proper coverage and adhesion. Take your time and pay attention to the details to achieve a professional-looking tile installation that will last for years to come.
Read more: How To Build A Deck Over A Concrete Patio
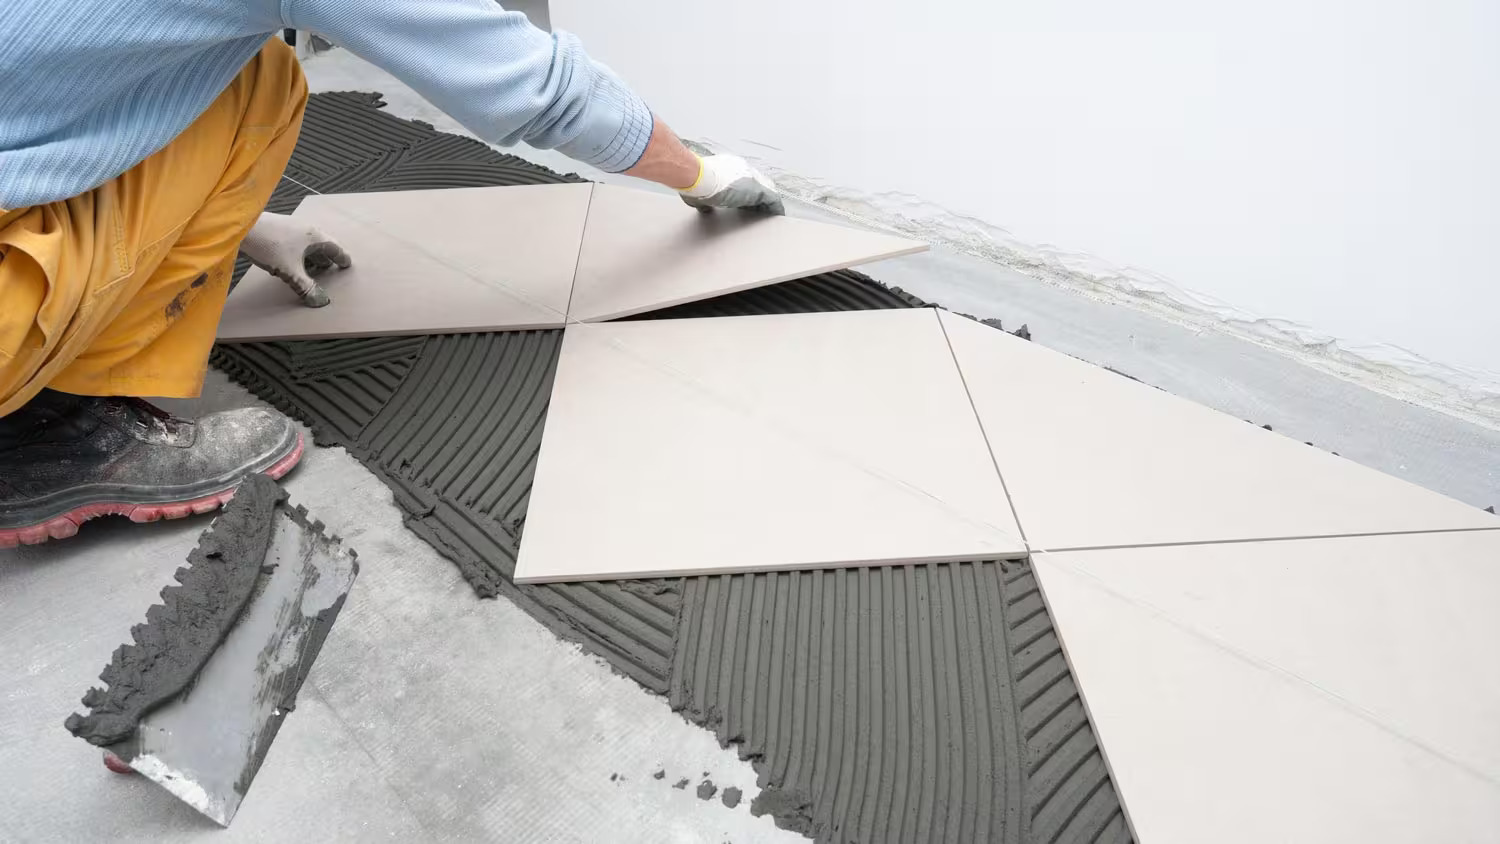
Installing the Tiles
Installing the tiles onto your prepared and adhesive-applied concrete patio is an exciting step that brings your vision to life. It’s important to approach this process with care and precision to achieve a beautiful and long-lasting tile installation. Here’s a step-by-step guide on how to install the tiles:
- Prepare the Tiles: Before starting the installation, ensure that your tiles are clean, dry, and free from any dust or debris. Inspect each tile for any imperfections or damage and set aside any damaged tiles to be replaced.
- Apply the Thinset to the Back of the Tile: Using a notched trowel, apply a layer of thinset adhesive to the back of each tile. The notches on the trowel will create ridges in the adhesive, ensuring proper adhesion and minimizing air pockets.
- Place the Tile onto the Adhesive: Carefully place each tile onto the adhesive, pressing it firmly into place. Ensure that the tile is level and aligned with neighboring tiles. Give a slight twist or wiggling motion to fully embed the tile and ensure proper contact with the adhesive.
- Use Spacers: Insert tile spacers between the tiles to maintain consistent spacing and ensure even grout lines. Adjust the spacers as needed to achieve your desired spacing.
- Check for Levelness: Periodically check the levelness of the tiles using a level or straight edge. Make any necessary adjustments by pressing down on uneven tiles or using a rubber mallet to gently tap them into place.
- Continue Installing Tiles: Repeat the above steps, applying thinset, placing tiles, and using spacers to create a seamless and even tile pattern. Work in small sections to ensure that the adhesive remains workable and the tiles are properly aligned.
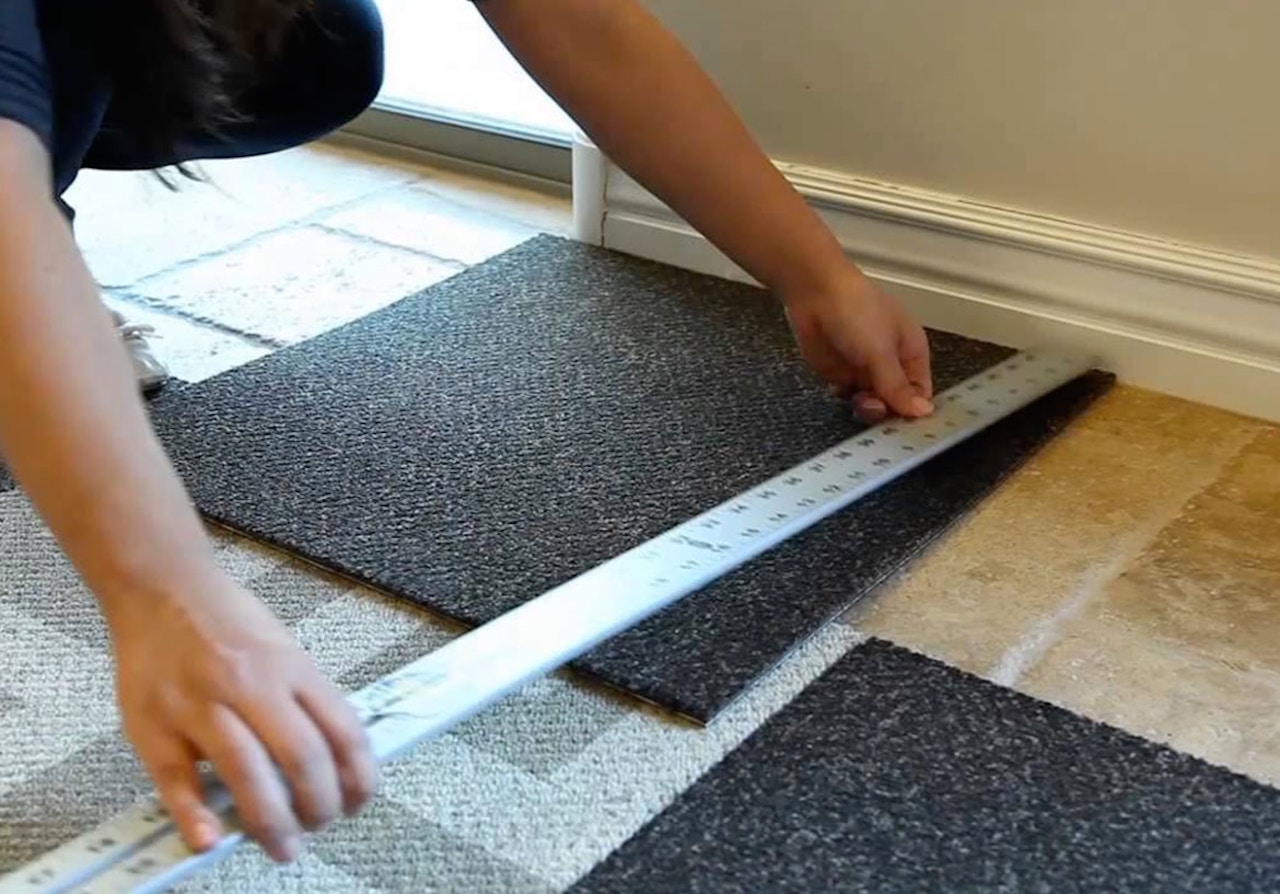
- Trim Tiles if Necessary: As you approach the edges of the patio or encounter obstacles, you may need to trim the tiles to fit. Use a tile cutter or wet saw to carefully cut the tiles to the desired size and shape.
- Allow the Tiles to Set: After installing the tiles, allow them to set and adhere to the adhesive as per the manufacturer’s instructions. This typically takes 24-48 hours, but refer to the specific product’s guidelines for the recommended drying and setting time.
By following these steps, you can achieve a beautiful and professionally installed tile surface on your concrete patio. Take your time to ensure each tile is properly aligned and level, and use spacers to maintain consistent spacing. With patience and attention to detail, your tile installation will transform your outdoor space into a stunning and functional area to enjoy for years to come.
Grouting the Tiles
Grouting the tiles is a crucial step in the tile installation process that adds the finishing touch to your outdoor patio. Grout fills the gaps between the tiles, providing stability, preventing moisture intrusion, and enhancing the overall appearance of your tiled surface. Here’s a step-by-step guide on how to grout the tiles:
- Gather Your Materials: Before you begin, ensure that you have all the necessary materials on hand. This includes grout, a grout float, a bucket, a sponge, and clean water.
- Prepare the Grout: Follow the manufacturer’s instructions to properly mix the grout. Use the recommended water-to-grout ratio and mix thoroughly until it forms a smooth and homogeneous paste. Allow the grout to rest for a few minutes before proceeding.
- Apply the Grout: Using the grout float, scoop a generous amount of grout and spread it diagonally across the tiles, pressing it into the gaps. Work in small sections to ensure that the grout does not dry out before you can finish the application.
- Work the Grout into the Gaps: Hold the grout float at a 45-degree angle and use a sweeping motion to work the grout into the gaps. Ensure that each gap is completely filled and the grout is evenly distributed. Remove excess grout from the surface of the tiles as you go along.
- Clean the Tiles: Once you have applied the grout, take a damp sponge and gently wipe the surface of the tiles at a 45-degree angle to remove any excess grout. Rinse the sponge frequently and continue wiping until the tiles are clean and the grout lines are neat and uniform.
- Allow the Grout to Cure: After cleaning the tiles, allow the grout to cure as per the manufacturer’s instructions. This typically takes 24-48 hours, but refer to the specific product’s guidelines for the recommended drying and curing time. Avoid walking or placing heavy objects on the tiles during this period.
- Seal the Grout: Once the grout has fully cured, consider applying a grout sealer to protect the grout from stains, moisture, and discoloration. Follow the manufacturer’s instructions for proper application and drying time.
By following these steps, you can achieve properly grouted tiles on your outdoor patio. Take your time to ensure that the grout is evenly distributed and the excess is properly cleaned off the tiles. The finished grouting will not only provide stability and prevent moisture penetration but also enhance the overall aesthetic of your tiled surface.
Sealing the Tiles
Sealing the tiles on your outdoor patio is an essential step to protect them from stains, moisture, and the elements. Sealing creates a barrier that helps to maintain the appearance and longevity of your tiled surface, making it easier to clean and preserving its beauty over time. Here’s a step-by-step guide on how to seal the tiles:
- Clean the Tiles: Before applying the sealer, ensure that the tiles are clean and free from any dirt, dust, or grime. Use a mild detergent or tile cleaner and a soft brush or mop to thoroughly clean the surface. Allow the tiles to dry completely before proceeding.
- Choose the Right Sealer: There are different types of sealers available, depending on the type of tiles you have. Determine the appropriate sealer for your specific tiles, whether they are porcelain, ceramic, or natural stone. Read the manufacturer’s instructions and choose a sealer that is suitable for outdoor use.
- Apply the Sealer: Follow the manufacturer’s instructions for applying the sealer. Using a clean, lint-free cloth or a sealer applicator, apply the sealer evenly to the tiles, working in small sections. Make sure to cover the entire surface, including the grout lines, as they are also prone to staining and moisture absorption.
- Allow the Sealer to Absorb: Let the sealer sit on the tiles for the recommended amount of time specified by the manufacturer. During this time, the sealer will penetrate the pores of the tiles and create a protective layer. Avoid walking on or disturbing the sealed tiles during this period.
- Remove Excess Sealer: After the recommended time has elapsed, use a clean cloth or a sponge to wipe away any excess sealer from the surface of the tiles. Make sure to remove any residue or streaks. Take care not to disturb or remove the sealer from the grout lines.
- Allow the Sealer to Cure: Give the sealer enough time to fully cure and dry. This timeframe can vary depending on the specific product, so refer to the manufacturer’s instructions for the recommended curing time. Avoid subjecting the sealed area to any moisture or heavy traffic during this period.
- Maintain Regular Sealing Schedule: Keep in mind that sealing is not a one-time process. Outdoor tiles are exposed to harsh weather conditions and continuous foot traffic, so it is important to reapply the sealer periodically. Follow the manufacturer’s recommendation for the frequency of resealing to ensure long-lasting protection.
By properly sealing your outdoor patio tiles, you provide them with added protection against stains, moisture, and the effects of time. Regular sealing will help maintain the beauty and integrity of your tiles, making them more durable and easier to clean. Consult the manufacturer’s instructions and choose a high-quality sealer that is recommended for your specific tile type for the best results.
Conclusion
Congratulations on completing the comprehensive guide on how to install tile over a concrete patio! By following the step-by-step instructions and tips provided, you have gained the knowledge and confidence to transform your outdoor space into a beautiful and functional oasis.
From preparing the concrete patio to cleaning the surface, checking for cracks or damage, and repairing any issues, you have taken the necessary steps to create a solid foundation for your tile installation. By leveling the surface, applying a bonding agent, and mixing and applying the mortar or thinset, you have ensured a strong and secure adhesion for your tiles.
By installing the tiles with precision, grouting them carefully, and sealing the surface, you have achieved a professional and long-lasting tile installation that will enhance the aesthetic appeal and functionality of your outdoor patio. It’s important to remember to maintain regular sealing and resealing of the tiles to ensure their ongoing protection and durability.
As you enjoy your newly tiled outdoor space, remember to follow proper maintenance and care practices. Sweep or use a leaf blower regularly to remove debris, clean up any spills or stains promptly, and avoid using harsh chemicals or abrasive tools that may damage the tiles or their finish.
Whether you’re looking to create a cozy seating area, an outdoor dining space, or a place to entertain guests, a tiled concrete patio can elevate your outdoor living experience. With the right materials, tools, and know-how, you can enjoy your beautiful tiled patio for years to come.
Remember, this guide serves as a general overview, and it’s important to consult the specific product instructions for the materials you are using. If you have any doubts or concerns, it is always recommended to seek professional guidance or assistance.
So, roll up your sleeves, gather your materials, and let’s get started on transforming your concrete patio into a stunning tiled haven!
Frequently Asked Questions about How To Install Tile Over Concrete Patio
Was this page helpful?
At Storables.com, we guarantee accurate and reliable information. Our content, validated by Expert Board Contributors, is crafted following stringent Editorial Policies. We're committed to providing you with well-researched, expert-backed insights for all your informational needs.


0 thoughts on “How To Install Tile Over Concrete Patio”