Home>Furniture>Outdoor Furniture>How To Make A Circular Patio With Pavers
Outdoor Furniture
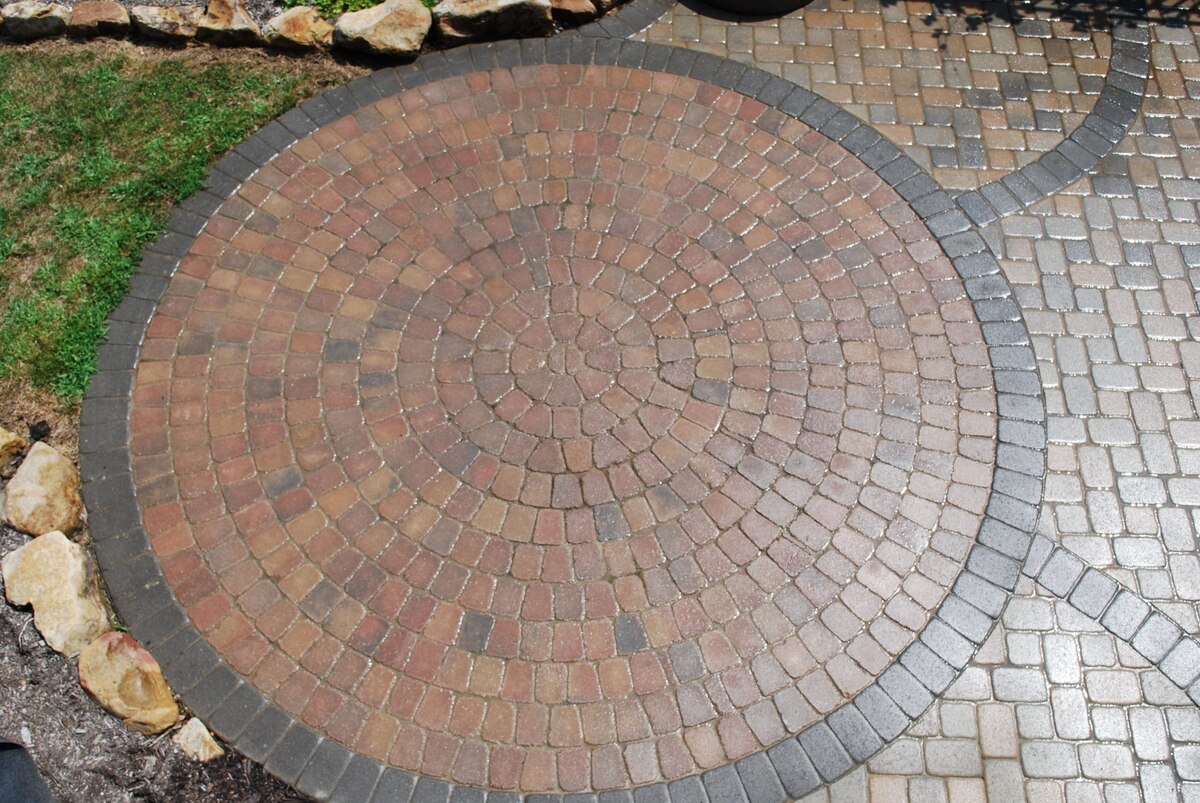
How To Make A Circular Patio With Pavers
Modified: August 17, 2024
Learn how to create a stunning circular patio with pavers and transform your outdoor space. Discover the best outdoor furniture options for your patio design.
(Many of the links in this article redirect to a specific reviewed product. Your purchase of these products through affiliate links helps to generate commission for Storables.com, at no extra cost. Learn more)
Introduction
Creating a circular patio with pavers is a great way to add beauty and functionality to your outdoor space. Whether you want a cozy area for entertaining guests or a peaceful retreat for relaxation, a circular patio can transform your backyard into a stunning oasis. In this article, we will guide you through the step-by-step process of creating a circular patio with pavers, ensuring that you have all the information you need to successfully tackle this project.
Before we dive into the details, it’s important to note that while creating a circular patio may seem daunting, it is a project that can be accomplished by any DIY enthusiast with some basic tools and a little patience. By following these steps, you’ll be well on your way to enjoying a beautiful and functional circular patio.
First, we’ll cover the planning and preparation phase, which involves determining the size, location, and design of your patio. Then, we’ll move on to marking the perimeter and excavating the area to make way for the patio. Once the area is prepared, we’ll guide you through the process of installing the edging, laying the base material, and leveling it properly. After that, it’s time to lay the pavers, cut any necessary pieces to fit the circular design, and fill the joints to ensure durability and stability. Finally, we’ll add some finishing touches to complete the project and make your circular patio truly shine.
Whether you’re a seasoned DIY expert or a beginner taking on your first outdoor project, creating a circular patio with pavers is an exciting and fulfilling endeavor. It allows you to unleash your creativity, showcase your personal style, and create a space where you can enjoy the beauty of the outdoors. So, let’s get started on making your dream circular patio a reality!
Key Takeaways:
- Creating a circular patio with pavers is a rewarding DIY project that transforms your outdoor space into a beautiful oasis for relaxation and entertainment.
- Careful planning, precise execution, and attention to detail are key to successfully creating a stunning circular patio with pavers.
Read more: How To Make A Patio With Pavers
Step 1: Planning and Preparation
The first step in creating a circular patio with pavers is careful planning and preparation. This stage is crucial as it determines the success of your project and ensures that you have a solid foundation to work with. Here’s what you need to consider:
1. Determine the Size and Location
Before you start digging or laying any pavers, take some time to determine the size and location of your circular patio. Consider factors such as the available space in your backyard, the desired function of the patio, and how it will fit into the overall landscape design. Measure the area where you plan to install the patio and mark it out with stakes and string to get a visual representation of the space.
2. Design the Layout
The design of your circular patio is an important aspect to consider. You can choose a simple circular shape or get creative with a curved design or multiple concentric circles. Sketch out your design on paper or use a landscape design software to visualize how it will look in your backyard. Take into account any existing features or structures that might affect the layout, such as trees, fences, or utility lines.
3. Select the Pavers
Next, choose the type of pavers you want to use for your patio. There is a wide variety of options available, including concrete, brick, natural stone, and interlocking pavers. Consider factors such as durability, color, texture, and cost when making your selection. Keep in mind that certain paver materials might require additional maintenance or sealing to ensure their longevity.
Read more: What Is A Paver Patio
4. Gather the Tools and Materials
Make a list of all the tools and materials you will need for the project. This may include items like a shovel, wheelbarrow, measuring tape, string, stakes, level, compacting equipment, and safety gear. Additionally, you’ll need to purchase the necessary base material, edging, and jointing sand. Gather all these supplies in advance to ensure a smooth and efficient workflow.
5. Check Local Building Codes and Permits
Before starting any construction project, it’s important to check with your local building department to see if any permits or approvals are required. Some areas may have specific regulations regarding the installation of outdoor structures or the excavation of land. It’s better to be informed beforehand to avoid any unnecessary setbacks or fines.
By carefully planning and preparing for your circular patio project, you’ll set yourself up for success and avoid any potential issues down the line. Take the time to consider the size, location, and design of your patio, select the right materials, gather the necessary tools, and ensure you comply with local building codes. With these preparations in place, you’ll be ready to move on to the next step and turn your vision into a reality.
Step 2: Marking the Perimeter
Once you have completed the planning and preparation stage, it’s time to mark the perimeter of your circular patio. This step will help you visualize the layout and ensure accurate placement of the pavers. Here’s how to mark the perimeter:
1. Gather Your Materials
Before you start marking the perimeter, gather the necessary materials. You will need stakes, string, a measuring tape, and a can of spray paint or marking chalk. Ensure that you have enough materials to mark the entire circumference of your patio.
Read more: How To Sand Patio Pavers
2. Find the Center Point
To find the center point of your circular patio, measure the width and length of the marked area and divide each measurement by two. Use a tape measure to accurately locate the center and mark it with a stake or other visible marker.
3. Determine the Patio Radius
Determining the patio radius will help you mark the outer edge of the circular shape. Measure the desired radius from the center point to the outer edge of the patio. You can use a tape measure or attach a string to the center stake and pull it out to the desired radius length.
4. Mark the Perimeter
To mark the perimeter of the patio, start at the center point and walk around in a circle, keeping the string or tape measure taut as you go. Use the spray paint or marking chalk to create a continuous line along the edge of the string. Make sure the line is clear and visible to guide you during the installation process.
5. Double-Check the Perimeter Measurements
After marking the perimeter, step back and double-check the measurements and shape of the circle. Use the tape measure to ensure that the radius is consistent throughout and that the circle is symmetrical. This step is crucial to ensure that your patio is aesthetically pleasing and properly aligned with your design.
By accurately marking the perimeter of your circular patio, you will have a clear visual guide for the installation process. Taking the time to find the center point, determine the patio radius, and mark the perimeter will ensure that the shape and layout of your patio are aligned with your design vision. Once you’re confident in the placement, you can move on to the next step and begin excavating the area to prepare for the installation of the pavers.
Read more: How To Lay A Paver Patio
Step 3: Excavating the Area
After marking the perimeter of your circular patio, it’s time to start excavating the area. Excavation is a critical step as it creates a level surface and removes any grass, plants, or debris that may interfere with the installation of the pavers. Follow these steps to properly excavate the area:
1. Gather Your Tools
Before you begin excavating, gather the necessary tools. This may include a shovel, a spade, a wheelbarrow, a rake, and a garden hose. Having these tools at hand will make the excavation process more efficient and manageable.
2. Start Digging
Begin by digging within the marked perimeter, working from the outer edge towards the center. Use a shovel or spade to break up the existing soil and remove any grass, rocks, or roots. It’s important to dig deep enough to accommodate the base material and pavers while ensuring a level surface.
3. Check for Levelness
As you excavate, periodically check for levelness to ensure that the surface is even. Use a long 2×4 board or a level tool to check for any high or low spots. Adjust the depth of your excavation as needed until you achieve a uniformly level surface throughout the area.
Read more: How To Slope A Paver Patio
4. Remove Excess Soil
During the excavation process, you may encounter excess soil or dirt. Use a wheelbarrow or other suitable containers to remove this excess material from the site. It’s important to keep the work area clean and clear to facilitate the next steps of the installation process.
5. Compact the Soil
After excavating the area, use a tamper or plate compactor to compact the soil. This helps establish a stable and solid base for the patio. Pay extra attention to any areas that feel soft or loose, as these may require additional compaction to ensure proper stability.
6. Check the Depth
Before moving on to the next step, double-check the depth of your excavation. Measure the depth at various points across the area to ensure consistency. The depth should be sufficient to accommodate the base material and pavers, typically around 6-8 inches depending on the type and thickness of the pavers you are using.
Excavating the area is a crucial step in the installation process of your circular patio. Take your time to dig deep enough, maintain levelness, and remove any excess soil. By following these steps, you’ll create a solid foundation for your patio and ensure a smooth installation of the base material and pavers in the next steps of the project.
Step 4: Installing the Edging
After excavating the area for your circular patio, the next step is to install the edging. Edging serves multiple purposes, including containing the pavers, preventing them from shifting, and providing a clean, finished look to the patio. Here’s how to properly install the edging:
Read more: Which Pavers Are Best For Patio
1. Select the Edging Material
There are various types of edging materials available, such as plastic, metal, and concrete. Choose the material that best suits your aesthetic preferences, budget, and the overall design of your patio. Ensure that the edging material is sturdy and durable enough to withstand the elements and heavy foot traffic.
2. Measure and Cut the Edging
Measure the length of the perimeter of your circular patio to determine the amount of edging material you will need. Use a hacksaw or another suitable cutting tool to cut the edging to the required length. If necessary, overlap the ends of the edging pieces to ensure a seamless and secure connection.
3. Place the Edging
Starting at a convenient point along the perimeter, position the edging material on the outer edge of the excavation area. Make sure the edging is flush against the soil or base material and stands upright. Gently tap it in place with a rubber mallet or a hammer, ensuring that it is securely anchored in the ground.
4. Secure the Edging
To further secure the edging, use metal stakes or a similar fastening method. Insert the stakes through the pre-drilled holes in the edging material and into the ground. Space the stakes evenly along the length of the edging, ensuring that they are driven in at a slight angle towards the patio to provide stability.
Read more: How To Build Patio Paver Stairs
5. Check for Levelness
As you install the edging, periodically check for levelness. Use a level tool or a straight-edge to ensure that the edging is straight and even throughout. This is important for maintaining a consistent height for the pavers and achieving a visually pleasing result.
6. Trim or Adjust the Edging
If necessary, trim or adjust the edging to fit the curvature of your circular patio. This may involve cutting or bending the edging material to ensure a smooth and continuous border. Take your time to make precise adjustments, as this will greatly enhance the overall appearance and functionality of your patio.
Installing the edging is an important step in creating a well-defined and durable circular patio. By selecting the right edging material, measuring and cutting it accurately, and ensuring a secure and level installation, you’ll create a solid boundary for your pavers. Once the edging is in place, you’re ready to move on to the next step, which involves laying the base material to provide a stable foundation for your patio.
Step 5: Laying the Base Material
With the edging securely in place, it’s time to move on to the next step in creating your circular patio: laying the base material. The base serves as a stable foundation for your pavers, helping to distribute weight evenly and prevent shifting or settling. Follow these steps to properly lay the base material:
1. Determine the Base Material
There are different options for the base material, including crushed gravel, sand, or a combination of both. The choice depends on various factors, such as the soil type, local climate, and the type of pavers you are using. Consult with a professional or local supplier to determine the most suitable base material for your project.
Read more: How To Build A Raised Paver Patio
2. Calculate the Amount Needed
Measure the area of your circular patio to calculate the amount of base material you’ll need. The depth of the base material is typically around 4-6 inches, but this can vary based on the recommendations for your specific project. Multiply the area by the depth to determine the volume of base material required. Purchase slightly more material to account for any potential waste or variations in thickness.
3. Spread the Base Material
Using a wheelbarrow or shovel, distribute the base material evenly across the excavation area. Start from one side and work your way towards the other, ensuring a consistent layer of the base material. Use a rake or a straight edge to level the material and create a smooth surface. Aim for a depth that aligns with the thickness specified for your project.
4. Compact the Base Material
Once the base material is evenly spread, use a plate compactor or hand tamper to compact it. This process helps to stabilize the base and create a solid, level surface for the pavers. Compact the material in multiple passes, making sure to reach all areas of the patio. Check for any low or high spots and adjust accordingly for a uniform layer of compacted base material.
Read more: How To Build Patio Paver Stairs
5. Check for Levelness
After compacting the base material, check for levelness using a long 2×4 board or a level tool. Place the board or level across the area to ensure an even surface. Make adjustments as needed by adding or removing base material to achieve a level base that will support the pavers.
Read more: How To Install Pavers Over A Concrete Patio
6. Moisture and Drainage
Pay attention to the moisture content of the base material. It should be slightly damp but not overly saturated. This will help with compaction and ensure a stable base. Additionally, ensure that the patio has proper drainage by sloping the base away from any structures or towards designated drainage areas.
Laying the base material is a critical step in creating a sturdy and long-lasting circular patio. By selecting the appropriate base material, calculating the required amount accurately, spreading and compacting it properly, and ensuring levelness and drainage, you’ll establish a solid foundation for the installation of the pavers. With the base material in place, you’re now ready to move on to the exciting next step of laying the pavers and bringing your circular patio to life.
Step 6: Leveling the Base
Once the base material for your circular patio is laid, the next step is to ensure that it is properly leveled. Leveling the base is essential for ensuring that the pavers sit evenly and securely, providing a stable surface for your patio. Follow these steps to successfully level your base:
1. Gather Your Tools
Before you begin leveling the base, gather the necessary tools. You will need a long 2×4 board or a level tool, a rubber mallet or a hammer, and a measuring tape. Having these tools on hand will make the leveling process easier and more precise.
2. Determine the Desired Height
To determine the desired height of your base, measure the thickness of the pavers you are using. The height of the base should be slightly lower than the thickness of the pavers to allow for bedding sand and ensure a flush finish. Mark this height on the side of the edging or use a temporary guide to maintain consistency.
3. Start at the Center
Begin leveling the base from the center of your circular patio. Place the 2×4 board or level across the base material, parallel to the edging. Gradually move it back and forth in a sawing motion to distribute the base material evenly. Add or remove material as needed to achieve the desired height.
4. Check for Levelness
As you work your way out from the center, periodically check for levelness using the 2×4 board or level tool. Place it across different areas of the base material to ensure a flat and even surface. Adjust the height as necessary, using the mallet or hammer to gently tap down any high spots and adding more base material to low areas.
5. Use a Screed
If you have a large area or need to level a significant amount of base material, you can use a screed. A screed is a straight, long board or tool that can be used to move and level the base material more efficiently. Place the screed across the base material and use a back-and-forth motion to distribute the material evenly and achieve levelness.
6. Double-Check the Levelness
After completing the leveling process, take the time to double-check the levelness of the base. Use the 2×4 board or level tool to ensure that the entire surface is consistent and meets your desired height. This step is crucial for a smooth and professional-looking installation of the pavers.
Leveling the base is an important step in creating a sturdy and visually appealing circular patio. By using the right tools, determining the correct height, starting at the center, checking for levelness, and using a screed if necessary, you’ll achieve a level and even base for your pavers. With the base properly leveled, you’re now ready to move on to the exciting next step of laying the pavers and bringing your circular patio to life.
Read more: How Thick Should Patio Pavers Be
Step 7: Laying the Pavers
After properly leveling the base, it’s time to move on to one of the most exciting steps of creating your circular patio – laying the pavers. This is where you will see your patio design come to life and the space begin to take shape. Follow these steps to successfully lay your pavers:
1. Plan the Layout
Before you start laying the pavers, plan out the layout of your patio. Consider the design and pattern you want to achieve with the pavers. You may choose a traditional running bond pattern or get creative with a herringbone or circular design. Lay some pavers out on the base to get a visual representation of how they will fit together.
2. Start from the Center
Begin laying the pavers from the center of your circular patio. This will ensure a symmetrical and balanced look. Place the first paver in position, aligning it with the center of the patio. Gently press it into the base material, ensuring it sits securely and at the desired height.
3. Continue in Circular Rows
Work your way out from the center in a circular pattern, placing the pavers tightly together. Follow the planned layout and pattern, ensuring that each paver is aligned and level with the adjacent ones. Use a rubber mallet or a hammer with a protective block to tap each paver into place, ensuring a tight fit.
Read more: How To Kill Moss On Patio Pavers
4. Check for Levelness and Alignment
As you lay the pavers, periodically check for levelness and alignment. Use a level tool or a straightedge to ensure that the pavers are even and flush with the surrounding ones. Make any necessary adjustments by adding or removing base material and tapping the pavers into place.
5. Cut Pavers as Needed
When you reach the edges of your circular patio or encounter irregular spaces, you may need to cut some pavers to fit. Use a wet saw or a paver cutting tool to make precise cuts. Measure carefully and mark the pavers before cutting them to ensure accurate sizing and a clean finish.
6. Maintain Proper Joint Spacing
As you lay the pavers, maintain consistent joint spacing between them. This is typically achieved by using plastic spacers or by eyeing the proper distance. Ensure that the joints are equal in width to create an aesthetically pleasing look and allow for proper water drainage.
7. Adjust as You Go
Throughout the process of laying the pavers, make adjustments as needed to maintain a uniform appearance. Ensure that the patio remains level and even by checking the surface with a level tool. Use the rubber mallet or hammer to tap down any high spots or add more base material to low areas.
Laying the pavers is an exciting and rewarding step in creating your circular patio. By carefully planning the layout, starting from the center, maintaining levelness and alignment, cutting pavers to fit, maintaining consistent joint spacing, and making adjustments along the way, you’ll create a visually stunning and functional patio. With the pavers in place, you’re now ready to move on to the next step of filling the joints to complete the installation process.
Read more: How To Lay Patio Pavers On Grass
Step 8: Cutting the Pavers
When laying pavers for your circular patio, you may come across areas where the standard-size pavers do not fit perfectly. In these instances, you will need to cut the pavers to achieve the desired fit and pattern. Here’s a step-by-step guide on how to cut the pavers:
1. Safety First
Prior to cutting pavers, it’s important to prioritize safety. Wear protective gear, including safety glasses and gloves, to protect yourself from flying debris and sharp edges. Additionally, be cautious when using cutting tools to avoid accidents.
2. Measure and Mark
Start by measuring the area where the paver needs to be cut. Use a measuring tape to determine the exact dimensions. Transfer these measurements onto the paver, making sure to mark the cutting line clearly. You can use a pencil, chalk, or a marker to mark the paver.
3. Choose the Right Tool
There are several tools that you can use to cut pavers, including a wet saw, angle grinder with a masonry blade, or a paver splitter. The choice of tool depends on the thickness and material of the pavers, as well as your access to specific tools. Consult with a professional or your local home improvement store to select the best tool for your project.
Read more: How To Make Paver Stairs
4. Setup the Cutting Tool
Follow the manufacturer’s instructions for setting up and preparing the cutting tool. Ensure that the blade is properly installed and adjusted. If using a wet saw, fill the reservoir with water to keep the blade cool and lubricated during the cutting process.
5. Cut the Paver
Position the marked paver on the cutting surface, aligning it with the blade or cutting mechanism. Slowly and steadily feed the paver into the cutting tool, applying light pressure. Let the tool do the work and avoid forcing the paver through, as this can cause unnecessary damage or accidents. Take your time to achieve a clean and accurate cut.
6. Check the Fit
After cutting the paver, check the fit in the desired area. Place it into position and ensure that it fits snugly and aligns with the surrounding pavers. Make any necessary adjustments by fine-tuning the cut or smoothing the edges with a file or sandpaper.
7. Dispose of Waste Properly
Safely dispose of the waste paver pieces. Collect them in a designated area or use a trash bag to prevent any injuries from sharp edges. You can also repurpose or use the small leftover paver pieces for smaller gaps or creative projects.
By following these steps, you can confidently cut the pavers to achieve a precise fit for your circular patio. Remember to prioritize safety, accurately measure and mark the pavers, choose the appropriate cutting tool, make clean and steady cuts, and check the fit before continuing with the installation process. Cutting pavers allows you to customize your patio design and create the perfect layout for your outdoor space.
Read more: How To Build Patio Steps From Pavers
Step 9: Filling the Joints
After all the pavers have been laid in your circular patio, the next step is to fill the joints between them. Joint filling not only enhances the overall appearance of the patio but also helps to stabilize and secure the pavers. Follow these steps to properly fill the joints:
1. Choose the Jointing Material
There are various options for jointing materials, such as polymeric sand, regular sand, or mortar. The choice depends on the desired look, level of weed and insect prevention, and the weather conditions in your area. Consider factors like durability, compatibility with your pavers, and ease of application when selecting the jointing material.
2. Clean the Paver Surface
Prior to filling the joints, it’s important to clean the surface of the pavers. Use a broom or a leaf blower to remove any debris, dust, or loose particles. This will ensure that the jointing material adheres properly and creates a solid bond.
3. Wet the Paver Surface
Lightly mist the paver surface with water before applying the jointing material. This will help the jointing material settle and bond effectively. Avoid oversaturating or creating puddles, as excessive moisture may hinder the curing process.
Read more: How To Clean Grease Off Patio Pavers
4. Apply the Jointing Material
Follow the manufacturer’s instructions to apply the selected jointing material. Pour the material onto the paver surface, focusing on the joints between the pavers. Use a sweeping motion or a pointing trowel to push the material into the joints, ensuring thorough coverage. Work in small sections to prevent the jointing material from drying out before it’s fully applied.
5. Compact the Jointing Material
Once the jointing material is applied, use a plate compactor or a vibrating plate to compact it. This helps settle the material firmly into the joints and ensures a tight bond with the pavers. Follow the recommended compaction instructions provided by the manufacturer to achieve the desired results.
6. Clean the Excess Material
After compacting, use a broom or a brush to sweep away any excess jointing material from the surface of the pavers. Pay close attention to the joints, ensuring that they are filled evenly and there is no excess material obstructing the patio’s appearance.
7. Wet and Cure the Joints
Once the excess material is removed, lightly mist the paver surface and the filled joints with water. This will activate the curing process for certain jointing materials. Follow the recommended curing time provided by the manufacturer, which typically involves keeping the joints moist for a specified duration.
By carefully filling the joints between the pavers, you will achieve a visually appealing and stable circular patio. Take the time to choose the appropriate jointing material, clean the paver surface, apply the material properly, compact it for a tight bond, and clean any excess. Following these steps will ensure that your joints are filled effectively and the patio is ready for the final step of adding finishing touches.
Read more: How To Clean Grease Off Patio Pavers
Step 10: Adding Finishing Touches
With the pavers laid and the joints filled, your circular patio is almost complete. However, adding a few finishing touches can elevate the overall look and functionality of your outdoor space. This step allows you to personalize your patio and create a welcoming atmosphere. Here are some ideas for adding those finishing touches:
1. Sealing the Pavers
Consider sealing the pavers to enhance their durability and protect them from stains and weathering. Select a high-quality paver sealer that is suitable for your specific type of pavers. Follow the manufacturer’s instructions for application and allow sufficient drying time before using the patio.
2. Installing Landscape Lighting
Illuminate your circular patio by installing landscape lighting. This not only adds ambiance but also allows you to enjoy the patio during the evening hours. Choose lighting fixtures that complement the design of your patio and strategically place them to highlight the key features of the space.
3. Adding Outdoor Furniture
Complete your patio by adding outdoor furniture that suits your style and needs. Choose comfortable seating options, such as patio chairs, benches, or even a cozy outdoor sofa. Include a table for dining or entertaining, and consider additional accessories like umbrellas or a fire pit to enhance the functionality and comfort of the space.
Read more: How To Clean Grease Off Patio Pavers
4. Incorporating Planters and Greenery
Add life and color to your patio by incorporating planters and greenery. Choose plants that thrive in your climate and are suitable for outdoor conditions. Place them strategically around the patio, incorporating different heights and textures to create visual interest. Consider hanging planters, vertical gardens, or even a small herb garden to maximize space.
5. Installing a Water Feature
Elevate the ambiance of your circular patio by installing a water feature. This could be a small fountain, a cascading waterfall, or even a simple birdbath. The sound of running water adds a soothing element to your outdoor space, creating a serene and tranquil atmosphere.
6. Creating a Pathway
If your circular patio is surrounded by a larger outdoor area, consider creating a pathway to connect different areas. This could be a meandering stone path or a stepping stone design. Not only does it provide functionality, but it also adds visual interest and ties the patio into the overall landscape design.
By adding these finishing touches, you’ll transform your circular patio into a beautiful and inviting outdoor oasis. Whether it’s sealing the pavers, installing lighting, adding furniture and planters, incorporating a water feature, or creating a pathway, these final details will personalize your patio and make it a space where you can relax and enjoy the outdoors to the fullest.
ConclusionCongratulations on successfully creating a stunning circular patio with pavers! Throughout this step-by-step guide, we’ve covered the planning and preparation, marking the perimeter, excavating the area, installing the edging, laying the base material, leveling the base, laying the pavers, cutting the pavers, filling the joints, and adding finishing touches. By following these steps, you have transformed your outdoor space into a beautiful and functional patio that you can enjoy for years to come.
Creating a circular patio with pavers may have seemed like a daunting task, but with careful planning, patience, and attention to detail, you have accomplished it. Your circular patio will serve as a versatile and inviting space for entertaining guests, hosting gatherings, or simply relaxing and enjoying the outdoors.
Remember to maintain your patio by regularly cleaning and inspecting the pavers, checking the joints, and resealing them as needed. This will help preserve their beauty and longevity over time. Additionally, consider updating and refreshing your patio’s look by periodically rearranging furniture, updating the planters with new greenery, and adding seasonal decorations.
Now that your circular patio is complete, it’s time to sit back, relax, and admire your hard work. Enjoy the warmth of the sun on your face, the cool breeze in the evenings, and the memories made in your outdoor sanctuary. Your circular patio will undoubtedly become a focal point for gatherings, conversations, and cherished moments with loved ones.
Thank you for joining us on this journey to create a circular patio with pavers. We hope this guide has provided you with the knowledge and inspiration to embark on and successfully complete this outdoor project. May your circular patio bring you joy, relaxation, and a renewed connection with nature right in the comfort of your own backyard.
Now that you've mastered crafting a circular patio, why not expand your outdoor design skills further? If you're itching for another weekend project, our guide on building an easy DIY patio will set you up for success. This step-by-step tutorial simplifies the process, making it accessible even if you're not a seasoned builder. Not only will this new addition spruce up your backyard, but it also serves as a perfect spot for your next family gathering or a quiet evening under the stars.
Frequently Asked Questions about How To Make A Circular Patio With Pavers
Was this page helpful?
At Storables.com, we guarantee accurate and reliable information. Our content, validated by Expert Board Contributors, is crafted following stringent Editorial Policies. We're committed to providing you with well-researched, expert-backed insights for all your informational needs.
0 thoughts on “How To Make A Circular Patio With Pavers”