Articles
How To Build A Ceiling Frame
Modified: October 28, 2024
Learn how to build a sturdy ceiling frame with our informative articles. Find step-by-step guides, tips, and tools for your DIY project.
(Many of the links in this article redirect to a specific reviewed product. Your purchase of these products through affiliate links helps to generate commission for Storables.com, at no extra cost. Learn more)
Introduction
Building a ceiling frame is an essential step in constructing or renovating a space. Whether you are creating a new room, adding a drop ceiling, or installing a suspended ceiling, a well-built ceiling frame provides the necessary support and structure for the ceiling materials.
However, constructing a ceiling frame may seem like a daunting task, especially for beginners. But fear not! In this article, we will guide you through the step-by-step process of building a ceiling frame, ensuring that you have the necessary knowledge and confidence to tackle this project.
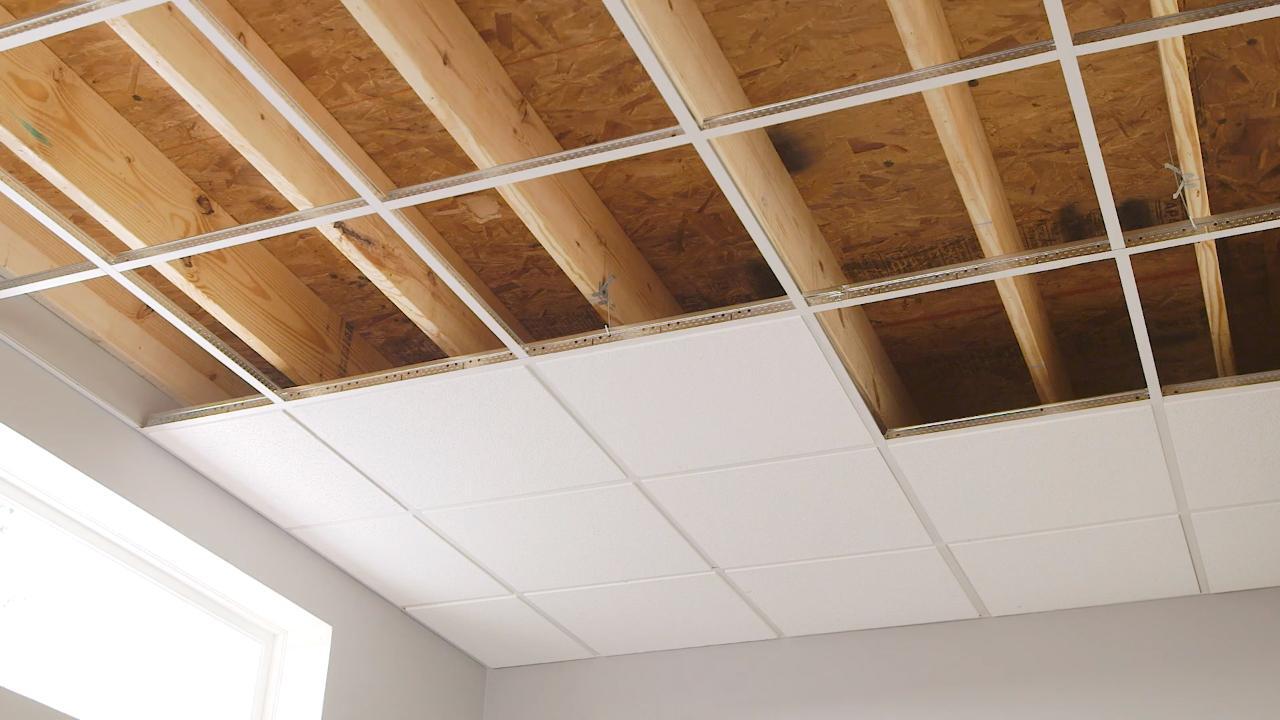
Before we jump into the details, it’s important to note that the specific steps may slightly differ depending on the type of ceiling frame you are constructing. For the purpose of this article, we will focus on a basic ceiling frame construction using L-channels and furring channels.
So, let’s dive in and learn how to build a ceiling frame that is sturdy, reliable, and visually appealing.
Key Takeaways:
- Building a sturdy ceiling frame requires careful planning, accurate measurements, and the right materials. From installing L-channels to securing ceiling joists, each step is crucial for a reliable and visually appealing end result.
- Prioritize safety, gather all necessary tools and materials, and follow the step-by-step guide to confidently build a ceiling frame. Completing the frame marks a significant milestone in your construction project, setting the stage for a beautiful and functional ceiling.
Read more: How To Frame Cathedral Ceiling
Step 1: Gather the Necessary Materials
Before you start building the ceiling frame, it’s crucial to gather all the necessary materials and tools. Having everything prepared will streamline the construction process and prevent unnecessary delays. Here is a list of the essential materials you’ll need:
- L-Channels: These metal channels will be used to secure the frame to the walls.
- Furring Channels: These hat-shaped channels will provide the structure for the ceiling frame.
- Ceiling Joists: These horizontal beams will support the ceiling material and distribute the weight evenly.
- Screws or Nails: Depending on your preference, choose the appropriate fasteners for attaching the materials together.
- Measuring Tape: You’ll need this to accurately measure and mark the ceiling and walls.
- Level: A level will ensure that the ceiling frame is straight and level throughout the installation process.
- Drill or Screwdriver: For screwing the materials together, a drill or screwdriver is essential.
- Safety Equipment: Always prioritize safety and wear protective gear, such as gloves and goggles.
It’s important to note that the exact quantity of materials may vary depending on the size and dimensions of your project. It’s recommended to purchase extra materials to account for any errors or miscalculations.
Once you have all the necessary materials and tools, you are ready to move on to the next step: measuring and marking the ceiling.
Step 2: Measure and Mark the Ceiling
Accurate measurements are crucial when building a ceiling frame, as they ensure that the frame fits perfectly and aligns with the existing structure. Before you start any installation, take the time to measure and mark your ceiling. Here’s how:
- Clear the Area: Remove any furniture or obstructions from the space to allow for easy access.
- Measure the Ceiling Height: Use a measuring tape to determine the height of the ceiling. Measure from the floor to the desired height of the frame. Repeat this process at multiple locations to account for any inconsistencies.
- Mark the Height: Once you have determined the desired height, mark it on the walls using a pencil or marker. Make sure the marks are level and straight.
- Measure the Length and Width: Measure the length and width of the ceiling area where the frame will be installed. Be precise and double-check your measurements to ensure accuracy.
- Transfer Measurements to L-Channels: Take your measured length and width and transfer those measurements to the L-channels. Use a measuring tape and pencil or marker to make the appropriate marks on the channels.
By taking the time to measure and mark your ceiling accurately, you’ll ensure that your ceiling frame fits perfectly and aligns with the existing structure. This will save you time and frustration during the installation process.
Now that you have your measurements and marks in place, it’s time to move on to the next step: installing the L-channel.
Step 3: Install the L-Channel
The L-channel is a crucial component in building a ceiling frame as it provides the necessary support and stability. The L-channels will be installed along the walls, creating a secure base for the frame. Follow these steps to install the L-channel:
- Prepare the L-Channel: Cut the L-channels to match the measured length of the walls. Use a saw or metal-cutting tool to create clean and precise cuts. Make sure to wear safety goggles and gloves during this process.
- Position the L-Channel: Place the first cut L-channel against the wall, aligning it with the marked height. Use a level to ensure that it is straight and level. Mark the screw or nail hole locations along the channel on both the wall and the channel itself.
- Secure the L-Channel: Pre-drill holes at the marked locations to prevent the wall from cracking or splitting. Attach the L-channel to the wall using screws or nails. Repeat this process for all sides of the room, making sure each L-channel is installed evenly.
- Check for Stability: Give the L-channels a gentle shake to ensure they are secure and stable. If any sections feel loose, remove the screws or nails and reposition them for a more secure fit.
Installing the L-channel provides a solid foundation for your ceiling frame. It ensures that your frame will be securely attached to the walls and provides stability for the entire structure.
Once the L-channel is securely installed, you are ready to move on to the next step: attaching the furring channel.
Step 4: Attach the Furring Channel
The furring channel, also known as hat channel, is the main support structure for the ceiling frame. It creates a grid-like system that will hold the ceiling joists and provide the framework for your ceiling materials. Follow these steps to attach the furring channel:
- Measure and Cut: Measure the length of the furring channel based on the width of the room. Use a saw or metal-cutting tool to cut the furring channel to the appropriate length. Take into account any openings, such as windows or doors.
- Position the Furring Channel: Place the furring channel perpendicular to the L-channels, resting it on top of them. Start from one end of the room and work your way across, making sure the channels are evenly spaced. Use a level to ensure that the furring channel is straight and level.
- Mark the Attachment Points: Use a pencil or marker to mark the locations where the furring channel will attach to the L-channels. Make sure to place the marks at regular intervals along the furring channel’s length.
- Secure the Furring Channel: Pre-drill holes at the marked locations to prevent splitting or cracking. Attach the furring channel to the L-channels using screws or nails. Repeat this process for each furring channel, ensuring they are securely fastened.
- Check for Levelness: Once all the furring channels are attached, use a level to verify that they are straight and level across the room. Make any necessary adjustments to ensure a level framework.
Attaching the furring channel creates the grid-like system necessary for your ceiling frame. It provides a sturdy and uniform support structure for the ceiling materials and ensures the overall stability of your ceiling frame.
With the furring channel securely attached, it’s time to move on to the next step: installing the ceiling joists.
When building a ceiling frame, make sure to measure and mark the exact placement of the joists to ensure they are evenly spaced and properly aligned. This will help provide a sturdy and level foundation for the ceiling.
Read more: How To Build An Awning Frame
Step 5: Install the Ceiling Joists
The ceiling joists are horizontal beams that span across the furring channels, providing additional support and stability to the ceiling frame. They also distribute the weight of the ceiling materials evenly. Here’s how to install the ceiling joists:
- Measure and Cut the Joists: Measure the length between the walls where the ceiling joists will be installed. Use a saw or a suitable cutting tool to cut the ceiling joists to the appropriate length. Ensure that the ends are straight and clean.
- Position the Joists: Place the first joist at one end of the room, aligning it with the furring channels. Secure it by attaching it to the furring channel using screws or nails. Repeat this process for the remaining joists, positioning them at regular intervals along the furring channels.
- Ensure Levelness: Use a level to ensure that the ceiling joists are straight and level across the room. Make any necessary adjustments by loosening the screws or nails, repositioning the joists, and then securing them again.
- Check for Sturdiness: Give the installed ceiling joists a gentle push to confirm that they are securely attached and provide a stable support structure. Make sure there is no excessive movement or flexing.
Installing the ceiling joists adds an extra layer of stability to your ceiling frame, ensuring that it can support the weight of the ceiling materials and any additional fixtures, such as light fixtures or ceiling fans.
Once the ceiling joists are securely in place, you can move on to the next step: securing the ceiling joists.
Step 6: Secure the Ceiling Joists
Securing the ceiling joists is a crucial step to ensure the overall stability and durability of the ceiling frame. This involves attaching the joists firmly to the furring channels and reinforcing their connection. Follow these steps to secure the ceiling joists:
- Pre-drill Holes: Use a drill bit that is slightly smaller than the diameter of the screws or nails you will be using. Pre-drill holes through the ceiling joists at regular intervals along their length. This will prevent splitting or cracking when attaching them to the furring channels.
- Attach the Joists: Align the pre-drilled holes in the ceiling joists with the furring channels. Secure the joists by driving screws or nails through the holes and into the furring channels. Repeat this process for each joist, ensuring a secure connection.
- Reinforce with Brackets: For added reinforcement, you may choose to use metal brackets to secure the joists to the furring channels. Position the brackets at strategic points along the length of the joists and attach them using screws or nails.
- Check for Stability: Give the secured ceiling joists a gentle shake to ensure that they are firmly attached and provide a stable support structure. Make any necessary adjustments or reinforce weak spots if needed.
By securely attaching and reinforcing the ceiling joists, you ensure that they can effectively support the weight of the ceiling materials and withstand any potential stresses or loads over time.
With the ceiling joists securely in place, you are now ready for the final step: completing the frame.
Step 7: Complete the Frame
Completing the frame is the final step in building a ceiling frame. It involves adding any additional components and performing necessary finishing touches. Follow these steps to complete the frame:
- Inspect the Frame: Take a moment to inspect the entire ceiling frame, including the L-channels, furring channels, and ceiling joists. Make sure all components are securely attached and aligned properly.
- Make Adjustments: If you notice any areas that require adjustments or reinforcement, take the time to make those modifications. This can include repositioning screws or nails, adding additional support brackets, or reinforcing weak points.
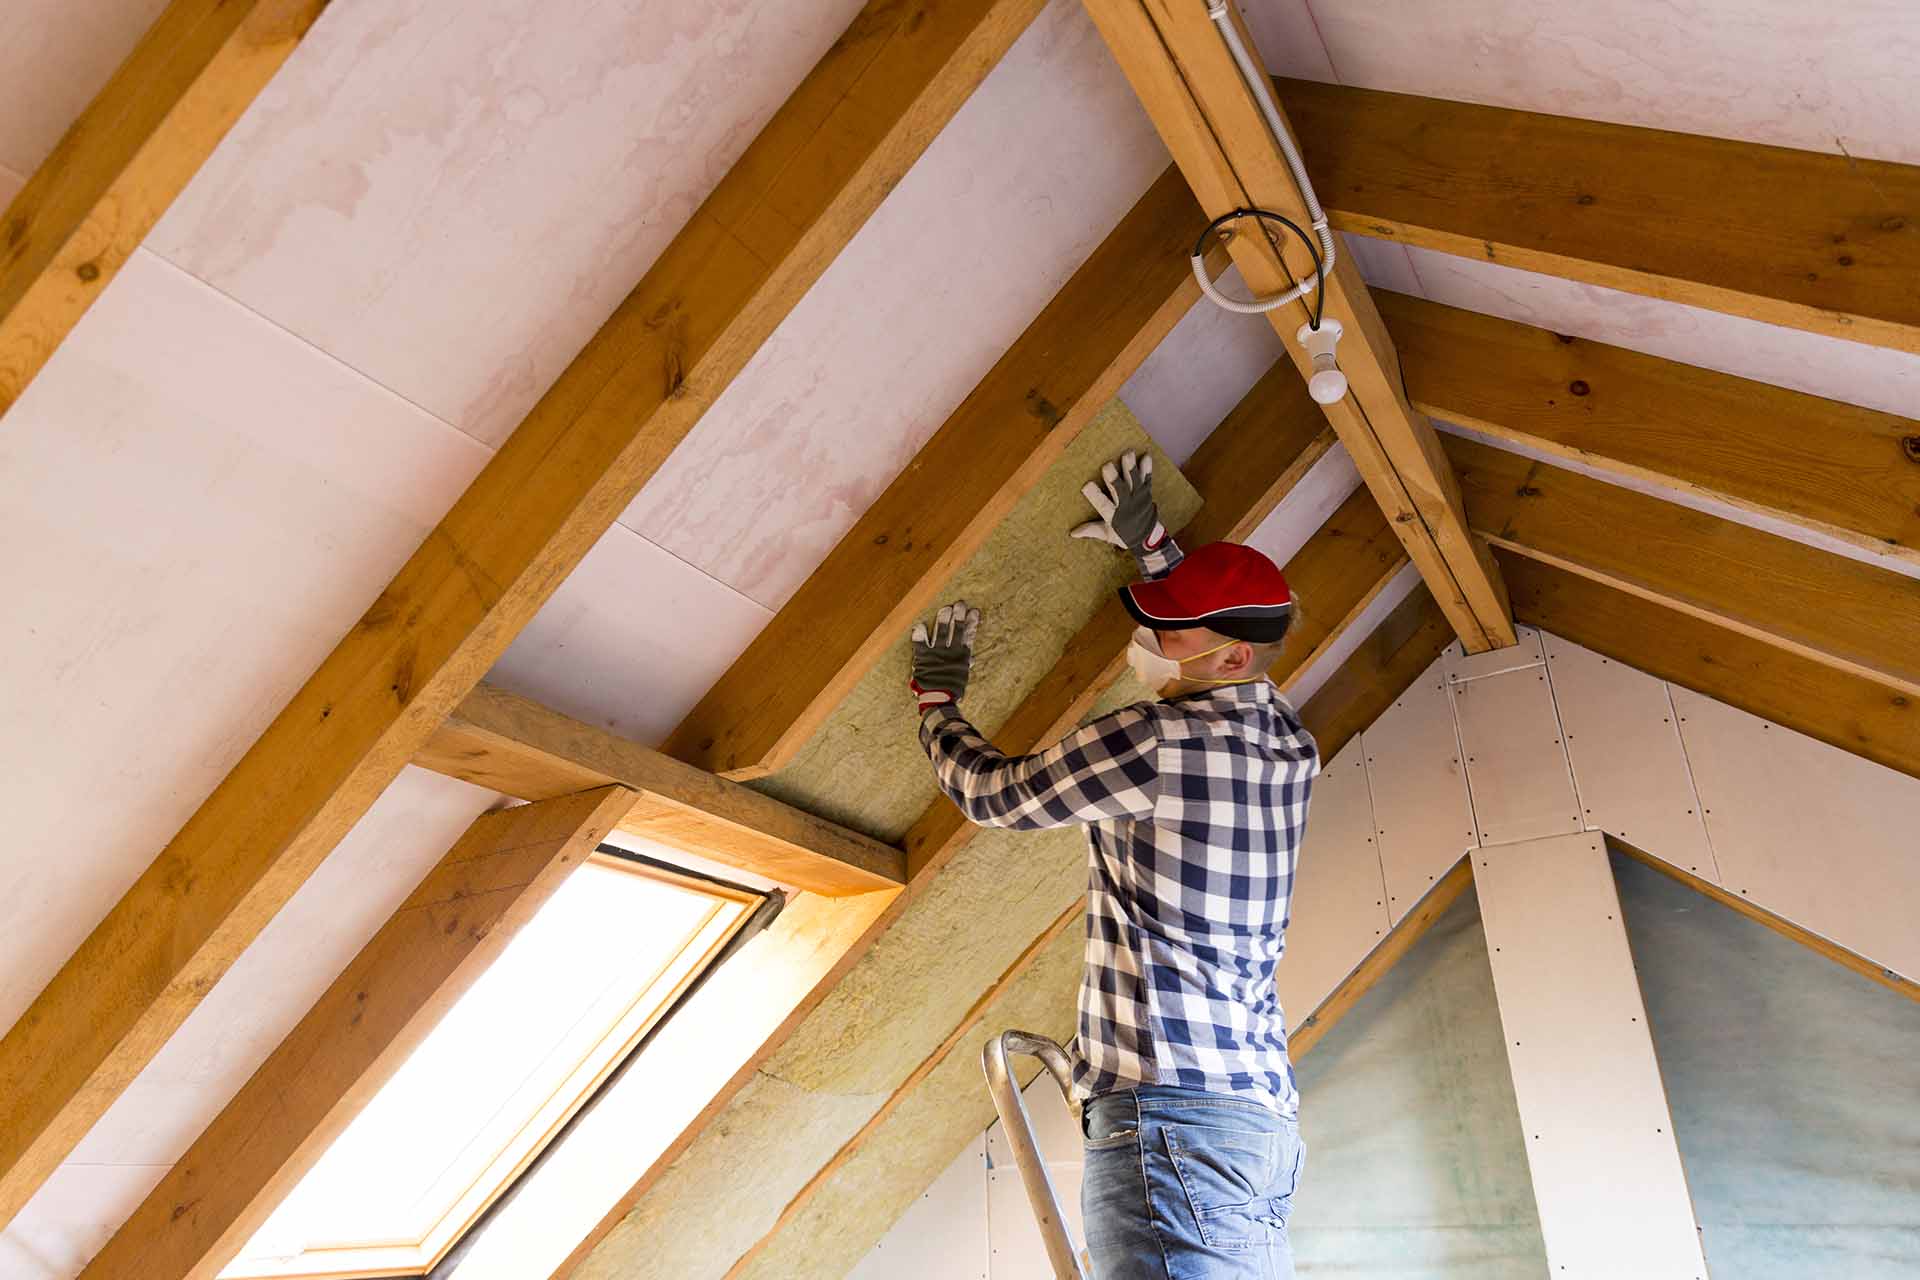
- Install Insulation (Optional): If you’re installing a suspended ceiling, you may choose to add insulation between the ceiling joists for soundproofing or energy efficiency purposes. Follow the manufacturer’s instructions for proper installation.
- Prepare for Ceiling Material Installation: Once the frame is complete, prepare the space for the installation of your chosen ceiling materials. This may include cleaning the area, removing any debris, and ensuring that the frame is ready to support the weight of the materials.
Completing the frame marks a significant milestone in your ceiling construction project. It ensures that the frame is solid, properly aligned, and ready for the next phase of the ceiling installation.
Now that the frame is complete, you can proceed with the installation of the specific ceiling materials for your project, whether it’s drywall, acoustic ceiling panels, or any other desired finish.
Congratulations! You’ve successfully built a sturdy and reliable ceiling frame, providing the foundation for a beautiful and functional ceiling in your space.
Conclusion
Building a ceiling frame may seem like a challenging task, but with the right knowledge and step-by-step guidance, it can be accomplished by anyone. A well-constructed ceiling frame provides the necessary support and structure for your ceiling materials, ensuring their longevity and stability.
In this article, we have covered the essential steps to build a ceiling frame using L-channels and furring channels. From gathering the necessary materials to completing the frame, each step plays a crucial role in creating a sturdy and reliable structure.
By measuring and marking the ceiling, installing L-channels, attaching furring channels, installing ceiling joists, and securing them, you create a strong framework that can support the weight of your chosen ceiling materials. Completing the frame by making necessary adjustments and preparing for the installation of the materials is the final step in the ceiling frame construction process.
Remember, safety should always be a priority when working on any construction project. Wear appropriate protective gear and use caution when handling tools and materials.
Now that you have learned the steps to build a ceiling frame, you can confidently take on your next DIY or renovation project. Whether you’re creating a new room, adding a drop ceiling, or installing a suspended ceiling, a well-built ceiling frame will provide the stability and structure needed for an exceptional end result.
So, roll up your sleeves and get ready to transform your space with a professionally constructed ceiling frame. Good luck with your project!
Frequently Asked Questions about How To Build A Ceiling Frame
Was this page helpful?
At Storables.com, we guarantee accurate and reliable information. Our content, validated by Expert Board Contributors, is crafted following stringent Editorial Policies. We're committed to providing you with well-researched, expert-backed insights for all your informational needs.


0 thoughts on “How To Build A Ceiling Frame”