Articles
How To Change Toilet Seal
Modified: October 28, 2024
Learn how to change a toilet seal with these helpful articles. Find step-by-step instructions and tips to fix your leaking toilet seal.
(Many of the links in this article redirect to a specific reviewed product. Your purchase of these products through affiliate links helps to generate commission for Storables.com, at no extra cost. Learn more)
Introduction
Welcome to this step-by-step guide on how to change a toilet seal. A faulty toilet seal can lead to leaks and unpleasant odors in your bathroom. It is important to replace it promptly to ensure the proper functioning of your toilet. Don’t worry if you have never done this before – with a few basic tools and some patience, you can easily replace the seal yourself.
Before we jump into the process, let’s understand the importance of the toilet seal. The toilet seal, also known as the wax ring, is a crucial component that creates a watertight seal between the toilet and the toilet flange. This prevents water from leaking out and sewage gases from entering your bathroom. Over time, the wax ring can deteriorate and lose its effectiveness, resulting in leaks and unpleasant odors.
To perform the seal replacement, you will need some basic tools and materials. Here’s a list of what you will need:
Key Takeaways:
- Replacing a toilet seal is a manageable DIY task with the right tools and patience. By following the step-by-step guide, you can ensure a watertight seal and prevent leaks and odors in your bathroom.
- Proper preparation, cleaning, and careful installation are key to a successful toilet seal replacement. Thoroughly testing for leaks and functionality ensures a well-maintained and odor-free bathroom.
Read more: How To Replace Toilet Tank Seal
Tools and materials needed:
- Adjustable wrench
- Sponge or old towels
- Putty knife or scraper
- Toilet bowl cleaner and brush
- New toilet wax ring
- Bucket or container
- Teflon tape
- Toilet tank bolts (if necessary)
Now that you have gathered all the necessary tools and materials, let’s dive into the step-by-step process of changing the toilet seal.
Key Takeaways:
- Replacing a toilet seal is a manageable DIY task with the right tools and patience. By following the step-by-step guide, you can ensure a watertight seal and prevent leaks and odors in your bathroom.
- Proper preparation, cleaning, and careful installation are key to a successful toilet seal replacement. Thoroughly testing for leaks and functionality ensures a well-maintained and odor-free bathroom.
Read more: How To Replace Toilet Tank Seal
Tools and materials needed:
Before you begin the process of changing the toilet seal, make sure you have the following tools and materials ready:
- Adjustable wrench: You will need an adjustable wrench to loosen and tighten the bolts on the toilet tank and bowl.
- Sponge or old towels: These are essential for cleaning up any water that may spill or leak during the process.
- Putty knife or scraper: You will need a putty knife or scraper to remove the old wax ring and any residue from the toilet flange.
- Toilet bowl cleaner and brush: It is important to clean the toilet bowl thoroughly before and after replacing the seal to ensure proper hygiene.
- New toilet wax ring: This is the most important material for replacing the toilet seal. Make sure you choose a high-quality wax ring that is compatible with your toilet.
- Bucket or container: You will need a bucket or container to collect any water that may be left in the toilet tank or bowl.
- Teflon tape: Teflon tape is used to create a watertight seal on the toilet tank bolts, preventing leaks.
- Toilet tank bolts (if necessary): In some cases, you may need to replace the toilet tank bolts if they are damaged or corroded.
Having these tools and materials ready will ensure a smooth and efficient process of changing the toilet seal. Before you begin, it’s a good idea to double-check that you have everything you need.
Keep in mind that safety is important when working on any plumbing project. Make sure to wear protective gloves and eyewear to avoid any potential injuries. Now that you have all the tools and materials ready, let’s move on to the step-by-step process of changing the toilet seal.
Step 1: Shut off the water supply
Before you start working on changing the toilet seal, it’s important to shut off the water supply to the toilet. This will prevent any water flow and potential accidents during the process. Here’s how you can shut off the water supply:
- Locate the water shut-off valve: The shut-off valve is usually located on the wall behind or near the toilet. It is typically a small valve with a round or lever-like handle.
- Turn off the water: Rotate the handle or lever clockwise to shut off the water supply. You should hear the water flow stopping.
- Flush the toilet: To ensure that the water supply is completely shut off, flush the toilet and hold down the handle to drain any remaining water from the tank and bowl.
Once you have shut off the water supply, it’s a good idea to place a towel or absorbent material around the base of the toilet to catch any residual water that may still be in the tank or bowl.
Remember, shutting off the water supply is an important safety precaution to avoid any accidental leaks or water damage during the seal replacement process. Now that you have completed the first step, let’s move on to the next one.
Step 2: Empty the toilet bowl
Now that you have shut off the water supply, the next step is to empty the toilet bowl. This is necessary to ensure a clean and dry working area. Here’s how you can empty the toilet bowl:
- Flush the toilet: Despite shutting off the water supply, there may still be some water in the tank and bowl. To empty the bowl, start by flushing the toilet.
- Hold down the handle: Once you have flushed the toilet, hold down the handle to allow as much water as possible to drain out of the bowl.
- Remove excess water: If there is still water remaining in the bowl, use a sponge or a cup to remove it. Squeeze out any excess water into a bucket or container.
- Wipe the bowl dry: Use a towel or sponge to wipe the inside of the bowl dry. Make sure to remove any water or residue that may be left behind.
Emptying the toilet bowl is important to create a clean and dry working area. This will make it easier to remove the toilet tank and replace the seal. Additionally, it reduces the risk of water spillage and ensures a more hygienic process.
Once you have emptied the toilet bowl and dried it, you can move on to the next step, which involves removing the toilet tank.
Read more: How To Change A Toilet Flapper
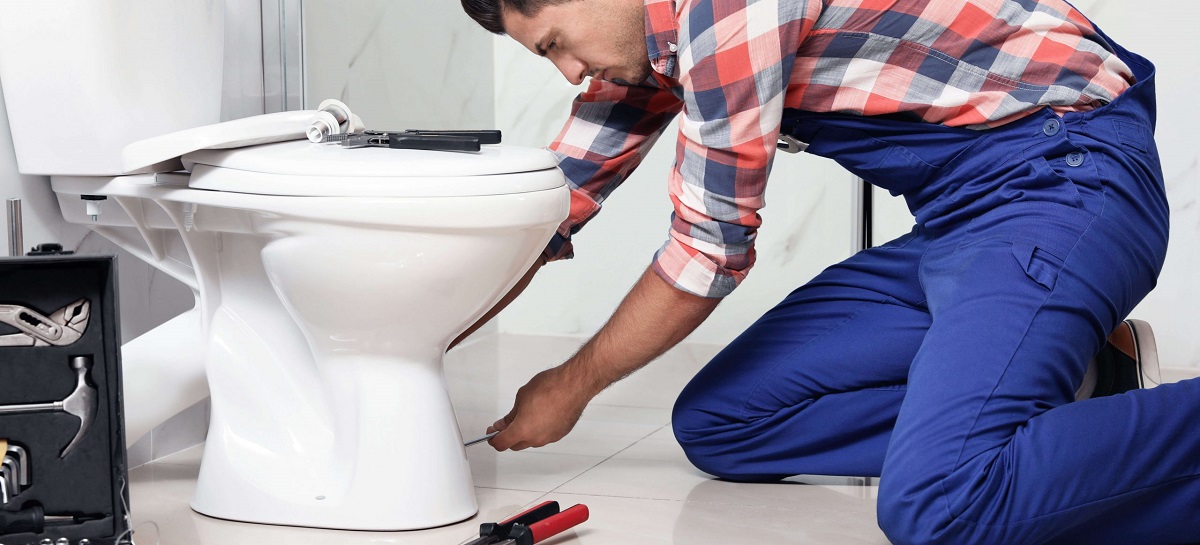
Step 3: Remove the toilet tank
With the water supply shut off and the toilet bowl empty, it’s time to remove the toilet tank. This step is necessary to access the old wax ring underneath and replace it with a new one. Follow these instructions to safely remove the toilet tank:
- Locate and disconnect the water supply line: The water supply line is connected to the bottom of the toilet tank. Use an adjustable wrench to carefully loosen and disconnect the nut that holds the water supply line in place. Be prepared for a small amount of water to drip out when disconnecting the line.
- Remove the tank bolts: Look for the tank bolts located on either side of the tank. These bolts secure the tank to the bowl. Use your adjustable wrench to loosen and remove the nuts from the tank bolts. Set the nuts aside in a safe place.
- Lift and remove the toilet tank: With the nuts removed, carefully lift the toilet tank straight up to detach it from the bowl. Place the tank in a secure location, such as a towel or a soft surface, to avoid any damage or scratches.
Once you have successfully removed the toilet tank, you will have clear access to the old wax ring and the toilet flange. Take a moment to inspect the tank for any cracks or damage. If you notice any issues, it may be necessary to replace the entire toilet. However, if the tank is in good condition, you can proceed to the next step of removing the old toilet seal.
Note: Depending on the type of toilet you have, the process of removing the tank may vary slightly. It’s always a good idea to consult the manufacturer’s instructions specific to your toilet model.
Now that you have removed the toilet tank, you can move on to the next step of removing the old toilet seal and preparing the toilet flange.
Step 4: Remove the old toilet seal
With the toilet tank removed, it’s time to remove the old toilet seal or wax ring. Follow these steps to safely remove the old seal:
- Inspect the old seal: Take a close look at the old wax ring to assess its condition. Look for any signs of damage, wear, or deformation. If the seal appears worn out or cracked, it’s definitely time for a replacement.
- Use a putty knife or scraper: Carefully insert a putty knife or scraper between the toilet flange (the opening in the bathroom floor) and the old wax ring. Gently pry up the old seal and begin removing it from the flange.
- Remove the old seal: Once the seal is loose, lift it off completely using your hands or the putty knife. Be careful not to drop any wax or debris into the open flange, as this could cause blockages in your plumbing system.
- Clean the toilet flange: After removing the old seal, use a clean cloth or sponge to wipe away any remaining residue or debris from the toilet flange. Ensure that the flange is clean and free from any obstructions.
Removing the old toilet seal is an essential step in the process of changing the seal. By removing the old seal, you are preparing the flange for the installation of a new seal, ensuring a watertight connection between the toilet and the plumbing system.
Now that you have successfully removed the old seal and cleaned the toilet flange, you can move on to the next step of cleaning and preparing the flange for the installation of a new toilet seal.
When changing a toilet seal, be sure to turn off the water supply and flush the toilet to empty the tank. Remove the toilet, clean the old seal, and replace it with a new one before reattaching the toilet.
Step 5: Clean and prepare the toilet flange
After removing the old toilet seal, it’s important to clean and prepare the toilet flange before installing a new seal. A clean and well-prepared flange ensures a proper seal and prevents any leaks. Follow these steps to clean and prepare the toilet flange:
- Inspect the toilet flange: Take a moment to inspect the toilet flange for any damage or irregularities. Look for any cracks, corrosion, or misalignment. If you notice any issues, it may be necessary to repair or replace the flange before continuing.
- Clean the flange: Use a clean cloth or sponge to wipe away any remaining residue or debris from the toilet flange. Pay special attention to the edges and corners of the flange to ensure it is clean and free from any obstructions.
- Check the flange height: Measure the height of the toilet flange to ensure it is level with or slightly above the finished floor. If the flange is below the floor level, you may need to use flange spacers or extender rings to raise it to the correct height.
- Apply Teflon tape (if necessary): If the toilet flange has threaded holes for the tank bolts, wrap Teflon tape around the threads. This will create a watertight seal when you reinstall the toilet tank later on.
Cleaning and preparing the toilet flange is a crucial step in ensuring a successful installation of the new toilet seal. By removing any debris and ensuring a level and clean flange, you will create a solid foundation for the new seal and minimize the risk of leaks.
Now that you have cleaned and prepared the toilet flange, you are ready to move on to the next step of installing the new toilet seal.
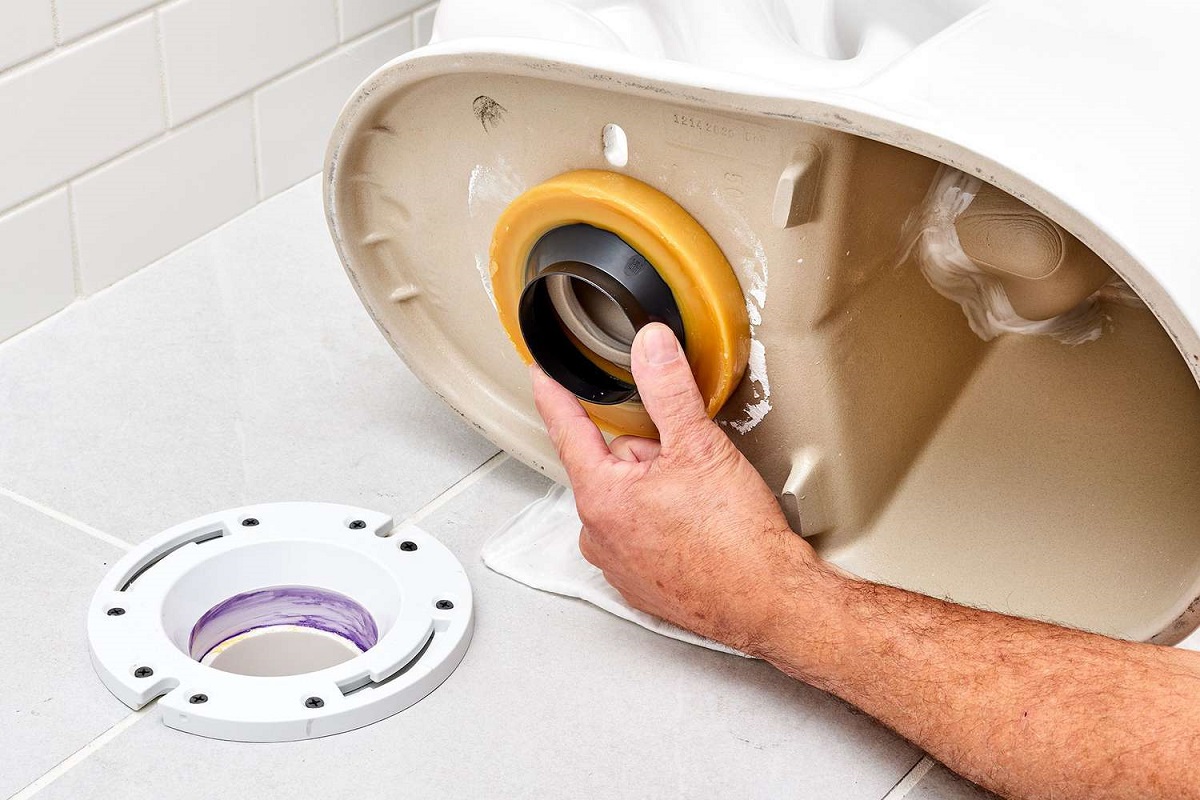
Step 6: Install the new toilet seal
With the toilet flange cleaned and prepared, it’s time to install the new toilet seal. This step is crucial in creating a watertight seal and preventing any leaks. Follow these steps to properly install the new toilet seal:
- Position the new wax ring: Take the new wax ring and place it onto the toilet flange, ensuring that it is centered over the opening. The rounded side of the wax ring should be facing up towards the toilet.
- Align the toilet bowl: Carefully lower the toilet bowl onto the wax ring, making sure that the mounting bolts on the base of the bowl line up with the holes on the flange. Apply gentle pressure to compress the wax ring and create a tight seal.
- Secure the toilet bowl: Install the washers and nuts onto the mounting bolts and tighten them evenly using a wrench. Be careful not to overtighten as this could damage the toilet bowl or the flange. Alternate between tightening each nut to ensure even pressure.
- Check alignment: Ensure that the toilet bowl is level and properly aligned with the floor. Adjust as necessary by gently shifting the bowl from side to side.
When installing the new toilet seal, it’s important to follow the manufacturer’s instructions and recommendations for your specific model of wax ring. Some wax rings may come with additional features or instructions to ensure a proper installation.
Once you have installed the new toilet seal and secured the toilet bowl to the flange, you are ready to move on to the next step of reinstalling the toilet tank.
Read more: What Is The Best Toilet Bowl Seal
Step 7: Reinstall the toilet tank
Now that the new toilet seal is installed and the toilet bowl is secured to the flange, it’s time to reinstall the toilet tank. Follow these steps to properly reinstall the toilet tank:
- Line up the tank with the bowl: Carefully position the toilet tank onto the bowl, making sure that the mounting holes on the tank align with the mounting bolts on the bowl.
- Insert the tank bolts: Insert the tank bolts through the mounting holes on the tank and align them with the corresponding holes on the bowl. Make sure the bolts are straight and secure.
- Install the washers and nuts: Place a washer onto each tank bolt, followed by a nut. Tighten the nuts evenly using an adjustable wrench, but be cautious not to overtighten, as this could damage the tank or the bowl. Alternate between tightening each nut to ensure even pressure.
- Connect the water supply line: Reconnect the water supply line to the bottom of the toilet tank. Use an adjustable wrench to tighten the nut securely, ensuring there are no leaks.
When reinstalling the toilet tank, be mindful of any rubber gaskets or seals that may be required between the tank and the bowl. Consult the manufacturer’s instructions or refer to the original configuration to ensure proper installation.
Once the toilet tank is securely in place and the water supply line is connected, you’re ready to move on to the next step of turning on the water supply.
Step 8: Turn on the water supply
With the toilet tank reinstalled, it’s time to turn on the water supply and ensure proper water flow to the toilet. Follow these steps to safely turn on the water supply:
- Locate the water shut-off valve: The shut-off valve is typically located on the wall behind or near the toilet. It is usually a small valve with a round or lever-like handle.
- Open the shut-off valve: Rotate the handle or lever of the shut-off valve counterclockwise to gradually open the valve and allow water to flow into the toilet tank.
- Check for leaks: Once the water supply is turned on, carefully examine the connections between the water supply line, tank, and bowl for any signs of leaks. Common areas to check include the supply line connection, the tank bolts, and the bowl-to-flange connection.
It’s important to open the shut-off valve slowly to prevent sudden surges of water and potential damage to the plumbing or toilet components. Take your time to observe any leaks and address them immediately if necessary.
If you notice any leaks, try tightening the connections gently. If the leaks persist, you may need to turn off the water supply again, tighten the connections further, or replace any faulty components such as washers or gaskets.
Now that the water supply is turned on and any leaks are addressed, you can proceed to the final step of testing the toilet for leaks and proper functioning.
Step 9: Test for leaks
After completing the installation process, it’s important to test the toilet for any potential leaks. Follow these steps to check for leaks and ensure the proper functioning of the newly installed toilet seal:
- Fill the tank with water: Hold down the toilet handle to allow the tank to fill with water. Observe the fill valve and overflow tube to ensure they are functioning correctly.
- Check for leaks at connections: Examine the connections between the water supply line, tank, and bowl once again. Look for any signs of water dripping or pooling around these areas.
- Inspect the toilet bowl: Carefully inspect the base of the toilet bowl for any water leakage. Pay close attention to the area where the bowl meets the flange.
- Flush the toilet: Flush the toilet and observe the tank refilling. Keep an eye out for any leaks, both during the flushing process and once the tank is filled again.
- Verify proper flushing: Ensure that the toilet flushes properly and that water flows smoothly into the bowl without any obstructions.
If you notice any leaks or issues during the testing process, it’s important to address them promptly. Tighten any loose connections, replace damaged gaskets or washers, or seek the assistance of a professional plumber if necessary.
Remember, a thorough leak test will help identify any potential problems and prevent water damage or further issues down the line. It’s crucial to ensure that the toilet is functioning properly and that no leaks are present.
With the toilet successfully tested for leaks and proper functioning, you have completed the process of changing the toilet seal. Congratulations on a job well done!
Conclusion
Changing the toilet seal is a relatively simple task that can be done by following a few easy steps. By replacing the old wax ring with a new one, you can ensure a watertight seal and prevent any leaks or unpleasant odors in your bathroom. Throughout this guide, we have provided a comprehensive step-by-step process for changing the toilet seal, from shutting off the water supply to testing for leaks.
Remember to gather all the necessary tools and materials before starting the process, including an adjustable wrench, sponge or towels, putty knife or scraper, toilet bowl cleaner and brush, new wax ring, bucket or container, Teflon tape, and toilet tank bolts if needed.
Each step, from shutting off the water supply to reinstalling the toilet tank, plays a crucial role in ensuring a successful seal replacement. Take your time, follow the instructions carefully, and pay attention to any potential leaks or issues along the way. By doing so, you can enjoy a leak-free and properly functioning toilet.
If you encounter any difficulties or are unsure about any step in the process, it’s always best to consult with a professional plumber who can provide guidance and assistance.
Remember, safety is important throughout the process. Wear protective gloves and eyewear, and be cautious when handling any tools or working with water or plumbing components.
By changing the toilet seal, you are taking proactive steps to maintain the integrity of your bathroom plumbing and ensure a clean and odor-free environment. With this guide in hand, you have the knowledge and confidence to successfully change the toilet seal and keep your bathroom in tip-top shape.
Good luck with your toilet seal replacement, and may you enjoy a well-functioning and leak-free toilet for years to come!
Now that you've mastered changing a toilet seal, why not tackle more toilet issues that could save you a plumber's visit? If your toilet has been giving you trouble, our article on toilet repair provides a comprehensive manual for addressing common problems. Don't let minor leaks disrupt your routine—learn to fix them like a pro!
Frequently Asked Questions about How To Change Toilet Seal
Was this page helpful?
At Storables.com, we guarantee accurate and reliable information. Our content, validated by Expert Board Contributors, is crafted following stringent Editorial Policies. We're committed to providing you with well-researched, expert-backed insights for all your informational needs.


0 thoughts on “How To Change Toilet Seal”