Articles
How To Take Down A Ceiling Fan
Modified: October 18, 2024
Learn how to safely and efficiently remove a ceiling fan with our comprehensive articles. Get expert tips and step-by-step instructions for a successful DIY project.
(Many of the links in this article redirect to a specific reviewed product. Your purchase of these products through affiliate links helps to generate commission for Storables.com, at no extra cost. Learn more)
Introduction
A ceiling fan can be a great addition to a room, providing comfort and improved airflow. However, there may come a time when you want to take down a ceiling fan, whether it’s because you want to replace it with a new fixture or simply remove it altogether. No matter the reason, it’s important to approach the task with caution and follow the proper steps to ensure a safe and successful removal.
In this article, we will guide you through the process of taking down a ceiling fan, step by step. We will provide you with the necessary safety precautions to follow, the tools and materials you’ll need, and detailed instructions for each stage of the removal process. By following this guide, you can confidently remove your ceiling fan and prepare the space for a new fixture or other desired changes.
Safety Precautions
Before you begin removing a ceiling fan, it is essential to prioritize safety. Here are a few important safety precautions to keep in mind:
- Turn off the power: Before starting any work, make sure to turn off the power to the ceiling fan at the circuit breaker. This will help prevent any electrical accidents or injuries.
- Use protective gear: Wear safety goggles, gloves, and a dust mask to protect yourself from debris and potential hazards.
- Secure the fan: Make sure the ceiling fan is securely fastened to the ceiling before removing any components. This will prevent the fan from falling and causing damage or injury.
- Work with a partner: If possible, enlist the help of a friend or family member to assist you in the removal process. They can provide extra support and help ensure safety.
Tools and Materials Needed
Before you begin, gather the necessary tools and materials to efficiently and effectively remove your ceiling fan. Here are the items you will likely need:
- Step ladder or appropriate scaffolding
- Phillips head screwdriver or drill with a Phillips head attachment
- Pliers or wire strippers
- Electrical tape
- Drop cloths or plastic sheeting to protect the area
- Spackle or putty knife for patching holes
- Sandpaper for smoothing rough patches
- Paint and paintbrushes for touch-ups if desired
- New ceiling fixture if you plan to replace the fan
By having these tools and materials ready, you can streamline the removal process and ensure you have everything you need to complete the task.
Key Takeaways:
- Prioritize safety by turning off the power, using protective gear, and securing the fan before taking down a ceiling fan. Following these precautions minimizes accidents and ensures a smooth removal process.
- Gather essential tools and materials, such as a ladder, screwdriver, pliers, and paint, to efficiently remove a ceiling fan. Being prepared streamlines the task and minimizes interruptions.
Read more: How To Take Off Light Cover On Ceiling Fan
Safety Precautions
When it comes to taking down a ceiling fan, safety should always be the top priority. By following these essential safety precautions, you can minimize the risk of accidents and ensure a smooth removal process:
- Turn off the power: Before you begin any work on the ceiling fan, make sure to turn off the power at the circuit breaker. This will prevent any electrical shocks or injuries. Use a voltage tester to double-check that the power is indeed turned off before proceeding.
- Use protective gear: Wear safety goggles to protect your eyes from any debris that may fall during the removal process. Additionally, wearing gloves will protect your hands from cuts or scratches. If you’ll be working with dusty or moldy areas, consider wearing a dust mask to protect your respiratory system.
- Secure the fan: Before starting to remove any components, ensure that the ceiling fan is securely fastened to the ceiling. This will prevent any accidental falls or injuries. If there are any loose screws or brackets, tighten them before proceeding.
- Work with a partner: Removing a ceiling fan can be a challenging task, especially if it’s a larger or heavier fixture. It’s always a good idea to have someone else with you to assist in holding the fan or providing extra support. This will reduce the risk of accidents and make the removal process smoother.
- Follow manufacturer instructions: Refer to the manufacturer’s instructions for your specific ceiling fan model. They may provide specific guidelines or safety precautions that are unique to your fan. Adhering to these instructions is crucial to ensure a safe and successful removal process.
By adhering to these safety precautions, you can minimize any potential risks and create a safe environment while taking down your ceiling fan. Remember to always prioritize your safety and take necessary steps to protect yourself and those around you.
Tools and Materials Needed
In order to successfully remove a ceiling fan, you’ll need to gather a few essential tools and materials. Having these items at your disposal will make the process smoother and more efficient. Here’s a list of what you’ll need:
- Step ladder or appropriate scaffolding: A sturdy step ladder or scaffolding will be necessary to safely reach and work on the ceiling fan. Choose a ladder or scaffolding that is the appropriate height for your ceiling and provides stable support.
- Phillips head screwdriver or drill with a Phillips head attachment: Most ceiling fans are secured with screws, so having a Phillips head screwdriver or drill with the appropriate attachment is essential for removing these screws. Make sure the tool is in good working condition before starting the removal process.
- Pliers or wire strippers: Depending on the wiring setup of your ceiling fan, you may need pliers or wire strippers to disconnect the electrical connections. These tools will help you safely disconnect the wiring without damaging the wires.
- Electrical tape: Electrical tape is useful for securing loose wires and preventing any accidental contact while working on the fan. It provides insulation, reducing the risk of electrical shocks or short circuits.
- Drop cloths or plastic sheeting: To protect the area around the fan, use drop cloths or plastic sheeting to cover furniture, floors, and any other surfaces that may be exposed to debris or dust during the removal process.
- Spackle or putty knife: After removing the ceiling fan, you’ll likely be left with holes or damage on the ceiling. Spackle or a putty knife can be used to fill in these holes and create a smooth surface for further repairs or paint.
- Sandpaper: Sandpaper will come in handy for smoothing out any rough patches or uneven surfaces after applying the spackle. It will help create a seamless finish, preparing the area for further repairs or painting.
- Paint and paintbrushes: If you plan on repainting the ceiling after removing the fan, make sure to have the appropriate paint and brushes ready. This will allow you to seamlessly cover up any patched areas and maintain a consistent look.
- New ceiling fixture: If you’re removing the ceiling fan to replace it with a new fixture, make sure you have the new fixture on hand. This may include a new light fixture or a different style of fan. Gather all the necessary components for the installation of the new fixture.
By having the right tools and materials before you begin, you’ll be well-prepared to tackle the task of removing a ceiling fan. This will save you time and ensure a smoother overall process with fewer interruptions or delays.
Step 1: Turn off the Power
Before you begin removing a ceiling fan, it is crucial to turn off the power to avoid any electrical accidents or injuries. Follow these steps to safely turn off the power to the ceiling fan:
- Locate the circuit breaker: Identify the circuit breaker that controls the power supply to the ceiling fan. This may be labeled “ceiling fan,” “bedroom,” or a similar description. If you’re unsure, refer to the electrical panel diagram or consult an electrician.
- Switch off the circuit breaker: Once you’ve identified the correct circuit breaker, switch it to the “off” position. This will cut off the power supply to the ceiling fan. Double-check that the power has been successfully turned off by attempting to operate the fan and verifying that it doesn’t respond.
- Use a voltage tester: As an extra safety precaution, use a voltage tester to ensure no electrical current is present. Place the voltage tester against the wires or connections associated with the ceiling fan. If the tester indicates no voltage, it is safe to proceed. However, if voltage is detected, recheck the circuit breaker and seek professional assistance if needed.
Remember, turning off the power is a critical step in ensuring your safety. Take the time to properly locate and switch off the circuit breaker, and always confirm the absence of electrical current with a voltage tester before continuing with the removal process.
Step 2: Remove the Fan Blades
Once you have ensured that the power to the ceiling fan is turned off, you can proceed to remove the fan blades. Follow these steps to safely remove the blades:
- Locate the blade attachment points: Examine the fan blades to identify the attachment points where they connect to the motor. Typically, these attachment points are held in place by screws or clips.
- Remove the screws or clips: Use a Phillips head screwdriver or appropriate tools to remove the screws or clips securing the fan blades to the motor. Carefully place the screws or clips in a safe location, as you may need them for reinstallation or in case of replacement parts.
- Gently detach the blades: Once the screws or clips are removed, gently detach each fan blade from the motor. Be careful not to apply too much force and damage the blades or motor components. If the blades are stuck or difficult to remove, wiggle them gently to loosen them or consult the fan’s instructional manual for guidance.
- Label the blades: If you plan to reinstall the fan blades in the future, it’s a good idea to label them to ensure proper alignment. You can use masking tape or small labels to mark each blade with its corresponding position (e.g., “Blade 1,” “Blade 2,” etc.). This will save you time and effort when reinstalling the blades later on.
By following these steps, you can safely remove the fan blades from the ceiling fan. Remember to handle the blades with care to avoid any damage, and keep track of the screws or clips for future use. With the blades removed, you can now proceed to the next steps of disconnecting the wiring and removing the mounting bracket.
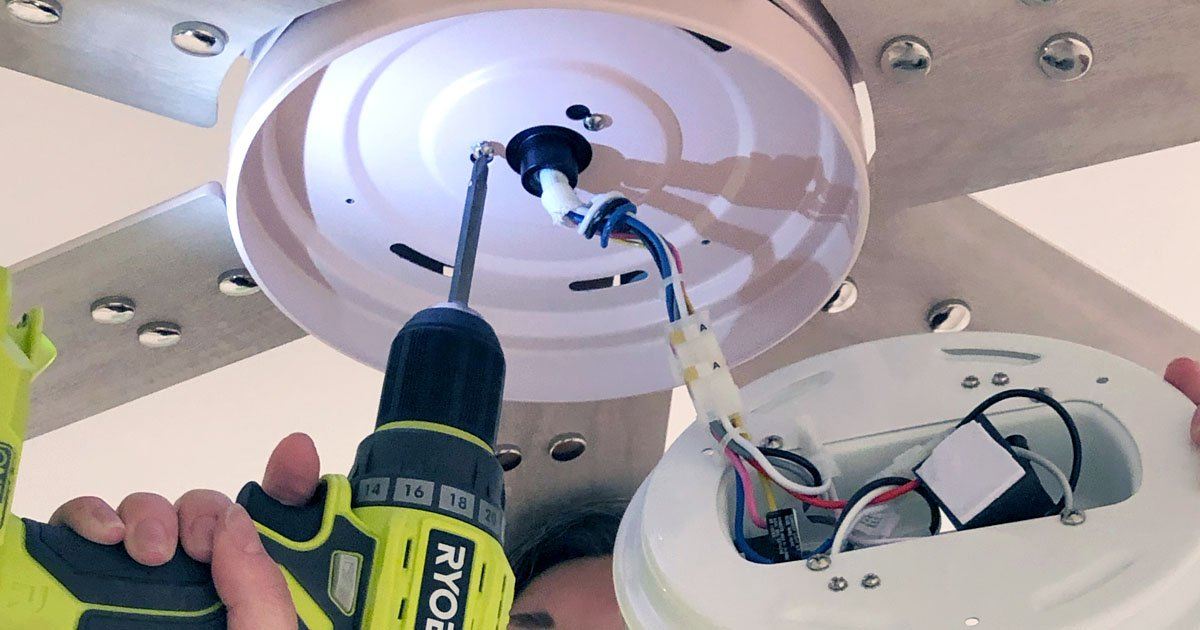
Step 3: Disconnect the Wiring
After removing the fan blades, the next step in taking down a ceiling fan is to disconnect the wiring. Follow these steps to safely disconnect the electrical connections:
- Expose the wiring: Remove any decorative covers or caps to expose the electrical wiring connections. This might involve unscrewing or unclipping a cover plate or canopy that hides the wiring.
- Identify the wiring connections: Take note of the different wiring connections. Typically, you will find a black (hot) wire, a white (neutral) wire, and a green or copper (ground) wire. The color coding may vary depending on your specific electrical setup, so refer to the fan’s instructional manual or consult an electrician if needed.
- Disconnect the wiring: Loosen the wire connectors that secure the wires together. Twist the wire connectors counterclockwise or unscrew them to separate the wires. Gently pull apart the wire ends to disconnect the wiring. Use pliers if necessary, but be careful not to damage the wires in the process.
- Secure the wires: To avoid any accidental contact or short circuits, it’s important to secure the loose wires. Wrap each exposed wire end with electrical tape, separately covering the bare metal. This provides insulation and helps prevent any potential electrical hazards.
By following these steps, you can safely disconnect the wiring of the ceiling fan. Always double-check that the power is still turned off before handling any electrical connections. Take your time to properly handle and secure the wires to ensure a safe removal process.
Make sure to turn off the power to the ceiling fan at the circuit breaker before attempting to take it down. This will prevent any risk of electrical shock while working on the fan.
Step 4: Remove the Mounting Bracket
Once you have disconnected the wiring, the next step in taking down a ceiling fan is to remove the mounting bracket. Follow these steps to safely remove the bracket:
- Inspect the mounting bracket: Take a close look at the ceiling where the fan is mounted to identify the type of mounting bracket. There are typically two types: a standard bracket that attaches to a ceiling box, or a support brace that spans between ceiling joists. Understanding the type of mounting bracket will help you determine the appropriate steps for removal.
- Disconnect any support brace or junction box: If your ceiling fan is supported by a brace or junction box, you will need to disconnect it first. Use a screwdriver to loosen and remove any screws or fasteners holding the brace or box in place.
- Remove the fan canopy: The canopy is the decorative cover that conceals the mounting bracket. Look for screws or clips around the canopy and remove them using a screwdriver or appropriate tools. Gently lower the canopy to expose the mounting bracket.
- Detach the mounting bracket: Depending on the type of mounting bracket, you may need to unscrew it from the ceiling or release it from its securing mechanism. Use a screwdriver or appropriate tools to remove any screws or fasteners holding the bracket in place. Be prepared to support the bracket’s weight as you remove the last screw or fastener.
- Patch the ceiling: With the mounting bracket removed, you may be left with holes or damage on the ceiling. Patch the holes using spackle or a putty knife, smoothing it over the damaged areas. Allow the spackle to dry according to the manufacturer’s instructions, and then sand it down to create a smooth surface. This will prepare the ceiling for further repairs or painting.
By following these steps, you can safely remove the mounting bracket of the ceiling fan. Take your time to understand the type of bracket and follow the appropriate removal method. Patching the ceiling ensures a clean finish after the removal process.
Step 5: Patch and Paint
After removing the mounting bracket, you may be left with holes or damage on the ceiling that need to be patched and painted. Follow these steps to effectively patch and paint the area:
- Prepare the surface: Use a putty knife to remove any loose debris or residue around the holes or damaged areas. Wipe the surface clean with a damp cloth to ensure a smooth and dust-free surface for patching.
- Apply spackle or filler: Take a small amount of spackle or filler and apply it to the holes or damaged areas using a putty knife or a spatula. Spread the material evenly, ensuring it fills the holes and levels with the surrounding ceiling surface. Smooth out any excess spackle or filler for a neat finish.
- Allow the spackle to dry: Follow the manufacturer’s instructions for the spackle or filler to dry completely. This typically takes a few hours, but drying times may vary depending on the product. Avoid touching or disturbing the patched areas while they are drying.
- Sand the patched areas: Once the spackle has dried, gently sand the patched areas using fine-grit sandpaper. This will help to smooth out any rough edges or uneven surfaces, blending the patched areas with the surrounding ceiling.
- Prime the patched areas: If necessary, apply a primer to the patched areas to ensure proper adhesion of the paint and create a uniform finish. Follow the instructions on the primer product for application and drying times.
- Paint the ceiling: After the primer has dried, apply a coat of paint to the entire ceiling or only the patched areas, depending on your desired look. Use a roller or paintbrush to achieve an even and consistent coat of paint. Allow the paint to dry completely between coats if additional coats are required.
By following these steps, you can effectively patch and paint the areas where the ceiling fan was removed. This will give your ceiling a refreshed and seamless appearance, preparing it for further decorating or the installation of a new fixture.
Step 6: Install a New Ceiling Fixture
If you have decided to replace the ceiling fan with a new fixture, follow these steps to safely install the new ceiling fixture:
- Gather the necessary tools and materials: Before beginning the installation, make sure you have all the tools and materials required. This may include the new ceiling fixture, a screwdriver or drill, wire connectors, electrical tape, and a ladder or scaffold for reaching the ceiling.
- Read the manufacturer’s instructions: Carefully review the instructions provided by the manufacturer for your specific ceiling fixture. Familiarize yourself with the installation process and any specific requirements or precautions.
- Disconnect the power: Begin by turning off the power to the area you will be working in. Locate the circuit breaker associated with the fixture and switch it off. Confirm that the power is off using a voltage tester before proceeding.
- Remove the old mounting bracket: If you haven’t done so already, remove the old mounting bracket that was used for the ceiling fan. Detach any wires still connected to the bracket and remove it from the ceiling. Patch any remaining holes or damage on the ceiling as necessary.
- Install the new mounting bracket: Follow the instructions provided with the new ceiling fixture to install the mounting bracket. Use a screwdriver or drill to secure the bracket to the ceiling, ensuring it is level and stable. Pay attention to any specific instructions for wiring or brace installation if applicable.
- Connect the wiring: Connect the wiring of the new ceiling fixture according to the manufacturer’s instructions. Match the corresponding wires (black to black, white to white, etc.) and use wire connectors to secure them together. Wrap the connections with electrical tape for added safety.
- Secure the fixture: Once the wiring is connected, carefully position the new ceiling fixture onto the mounting bracket. Follow the instructions to secure it in place using screws or other fasteners provided. Double-check that the fixture is securely attached and level.
By following these steps and the manufacturer’s instructions, you can safely and effectively install a new ceiling fixture. Remember to always work with caution, ensuring that the power is off before touching any electrical components. Enjoy the fresh look and improved lighting of your new ceiling fixture!
Read more: How To Take Down A Wooden Shed
Step 7: Test the New Fixture
After installing a new ceiling fixture, it’s essential to test its functionality to ensure everything is working correctly. Follow these steps to test the new fixture:
- Turn on the power: Start by turning on the power at the circuit breaker associated with the new ceiling fixture. Make sure the power is successfully restored to the area before proceeding.
- Switch on the fixture: Use the appropriate switch or control to turn on the new ceiling fixture. It may be a wall switch, a pull chain, or a remote control, depending on the type of fixture you installed. Confirm that the fixture is receiving power and functioning as expected.
- Check for proper illumination: Observe the brightness and spread of light produced by the new ceiling fixture. Ensure that it adequately illuminates the intended area and provides the desired level of illumination. Make adjustments to the positioning or settings of the fixture if necessary.
- Test any additional features: If the new fixture has any additional features, such as adjustable lights, dimming capabilities, or fan functions (for combination fixtures), test these features as well. Ensure that all the desired functions are working properly and smoothly.
- Inspect for any issues: Take a careful look at the new fixture and its connections to check for any signs of loose wiring, flickering lights, or unusual noises. Make sure all components are securely fastened and there are no visible defects or issues. If you notice any problems, consult the manufacturer’s instructions or consider seeking professional assistance.
By following these steps and testing the new fixture, you can ensure that it is installed correctly and functioning as intended. If any issues arise during testing, address them promptly to ensure the safety and effectiveness of your new ceiling fixture. Enjoy the improved lighting and functionality that the new fixture brings to your space!
Conclusion
Taking down a ceiling fan can be a straightforward process when approached with the right knowledge and precautions. By following the steps outlined in this guide, you can safely and effectively remove a ceiling fan and prepare your space for a new fixture or other desired changes.
Throughout the process, it’s crucial to prioritize safety. Always remember to turn off the power at the circuit breaker, use protective gear, secure the fan, and work with a partner when possible. Taking these precautions will help prevent accidents and ensure a smooth removal process.
Having the necessary tools and materials ready, such as a ladder, screwdriver, pliers, and paint, will make the task more efficient and manageable. Following the manufacturer’s instructions for your specific ceiling fan and new fixture is also important to ensure proper installation and functionality.
Once you have removed the fan blades, disconnected the wiring, removed the mounting bracket, patched and painted the ceiling, installed the new fixture, and tested its functionality, you can enjoy the transformed space and the benefits of your new ceiling fixture.
Remember, if at any point you are unsure or uncomfortable with any aspect of the ceiling fan removal process, it’s always a good idea to consult a professional electrician to ensure a safe and successful outcome.
With the right approach and attention to detail, you can successfully take down a ceiling fan and make room for new possibilities in your home or space.
Frequently Asked Questions about How To Take Down A Ceiling Fan
Was this page helpful?
At Storables.com, we guarantee accurate and reliable information. Our content, validated by Expert Board Contributors, is crafted following stringent Editorial Policies. We're committed to providing you with well-researched, expert-backed insights for all your informational needs.


0 thoughts on “How To Take Down A Ceiling Fan”