Home>Furniture>Outdoor Furniture>How To Make A Round Stone Patio
Outdoor Furniture
How To Make A Round Stone Patio
Modified: October 18, 2024
Learn how to create a stunning round stone patio with our step-by-step guide. Enhance your outdoor furniture with this stylish and functional addition.
(Many of the links in this article redirect to a specific reviewed product. Your purchase of these products through affiliate links helps to generate commission for Storables.com, at no extra cost. Learn more)
Introduction
Welcome to our comprehensive guide on how to make a round stone patio! A stone patio can instantly transform your outdoor space, providing an inviting area to relax, entertain, and enjoy nature. Whether you have a large backyard or a small courtyard, a round stone patio can add charm and character to any outdoor setting.
In this article, we will take you through the step-by-step process of creating your own round stone patio. We will cover everything, from planning and preparation to the final touches, to ensure that your patio is not only visually stunning but also durable and long-lasting.
Before we dive into the nitty-gritty details, let’s explore the benefits of having a round stone patio. Stone patios offer a timeless and natural appearance, blending seamlessly with various architectural styles and surrounding landscapes. They are also low maintenance, requiring minimal upkeep compared to other materials.
Furthermore, a round stone patio provides a more spacious and open feel. Unlike rectangular or square patios, which can feel confined, the circular shape offers a sense of flow and unity with your outdoor environment.
So, if you’re ready to embark on this exciting DIY project, let’s get started with the first step: planning and preparation.
Key Takeaways:
- Planning and preparation are crucial for creating a durable and visually appealing round stone patio. Carefully measure, gather materials, and design your patio layout to ensure a smooth construction process.
- Laying the round stones and adding finishing touches bring your patio to life. Pay attention to detail, fill gaps with the right material, and add furniture and lighting for a welcoming outdoor space.
Read more: How To Make A Stone Patio
Step 1: Planning and Preparation
The key to a successful round stone patio is careful planning and preparation. By taking the time to plan out your patio design and gather the necessary materials, you can ensure a smooth and efficient construction process.
Here are the steps to follow for planning and preparation:
- Choose the Location: Start by selecting the ideal location for your round stone patio. Consider factors such as sun exposure, views, and proximity to the house. Keep in mind that the patio should be easily accessible and have enough space for outdoor furniture and activities.
- Measure and Mark: Use measuring tape to determine the dimensions of your patio. The size will depend on the available space and your intended use. Once you have the measurements, mark the outline of the patio using stakes and string. To create a perfectly round shape, tie a string to the center point and measure the desired radius.
- Gather Materials: Next, gather all the necessary materials for your round stone patio. This will typically include round stones, gravel or sand for the base, edging material, and landscape fabric. Consider the type of stone you want for your patio, such as natural stone or concrete pavers, and ensure that you have enough quantity to cover the desired surface area.
- Create a Design: Sketch a rough layout of your patio, including any additional features like seating areas or pathways. This will give you a visual representation of how the patio will look and help you make any necessary adjustments before starting the construction process.
- Check for Permits: Depending on your local building codes and regulations, you may need to obtain permits before constructing your patio. Check with your municipality or homeowner’s association to ensure that you comply with any necessary guidelines.
- Prepare the Area: Before you begin any construction, remove any existing vegetation or debris from the patio area. Clearing the area will provide a clean slate for building your patio and ensure a level surface.
By following these steps, you will set a solid foundation for your round stone patio project. With the planning and preparation out of the way, you’re ready to move on to the next step: marking and digging the patio area.
Step 2: Marking and Digging the Patio Area
Now that you have completed the planning and preparation stage, it’s time to move on to the next step: marking and digging the patio area. This crucial step is essential for creating a level and stable foundation for your round stone patio.
Here’s what you need to do:
- Revisit the Marked Outline: Start by revisiting the outline you marked during the planning phase. Ensure that the stakes and string are still in place and that the shape is exactly how you want it. Make any adjustments if necessary.
- Excavate the Area: With the outline ready, it’s time to start digging. Use a shovel or a garden hoe to excavate the patio area. The depth will depend on the type of stone you’re using and the desired stability of your patio. As a general rule, a depth of 6-8 inches should be sufficient.
- Check for Levelness: As you dig, periodically check the levelness of the excavated area. Use a string level or a carpenter’s level to ensure that the patio area is even and flat. This will prevent any unevenness or sloping in the finished patio.
- Remove Excess Soil: Once you have excavated the desired depth, remove any excess soil from the patio area. You can use a wheelbarrow or a tarp to transport and dispose of the soil. This will leave you with a clear and prepared base.
- Compact the Soil: To create a solid and stable foundation, use a plate compactor or a hand tamper to compact the soil in the excavated area. This will eliminate any air gaps and ensure that the soil is firmly packed. Compact in layers, working from the outer edges towards the center of the patio area.
By following these steps, you will have successfully marked and excavated the patio area for your round stone patio. The next step is to create a solid base, which will provide a sturdy foundation for the patio stones. Stay tuned for step 3!
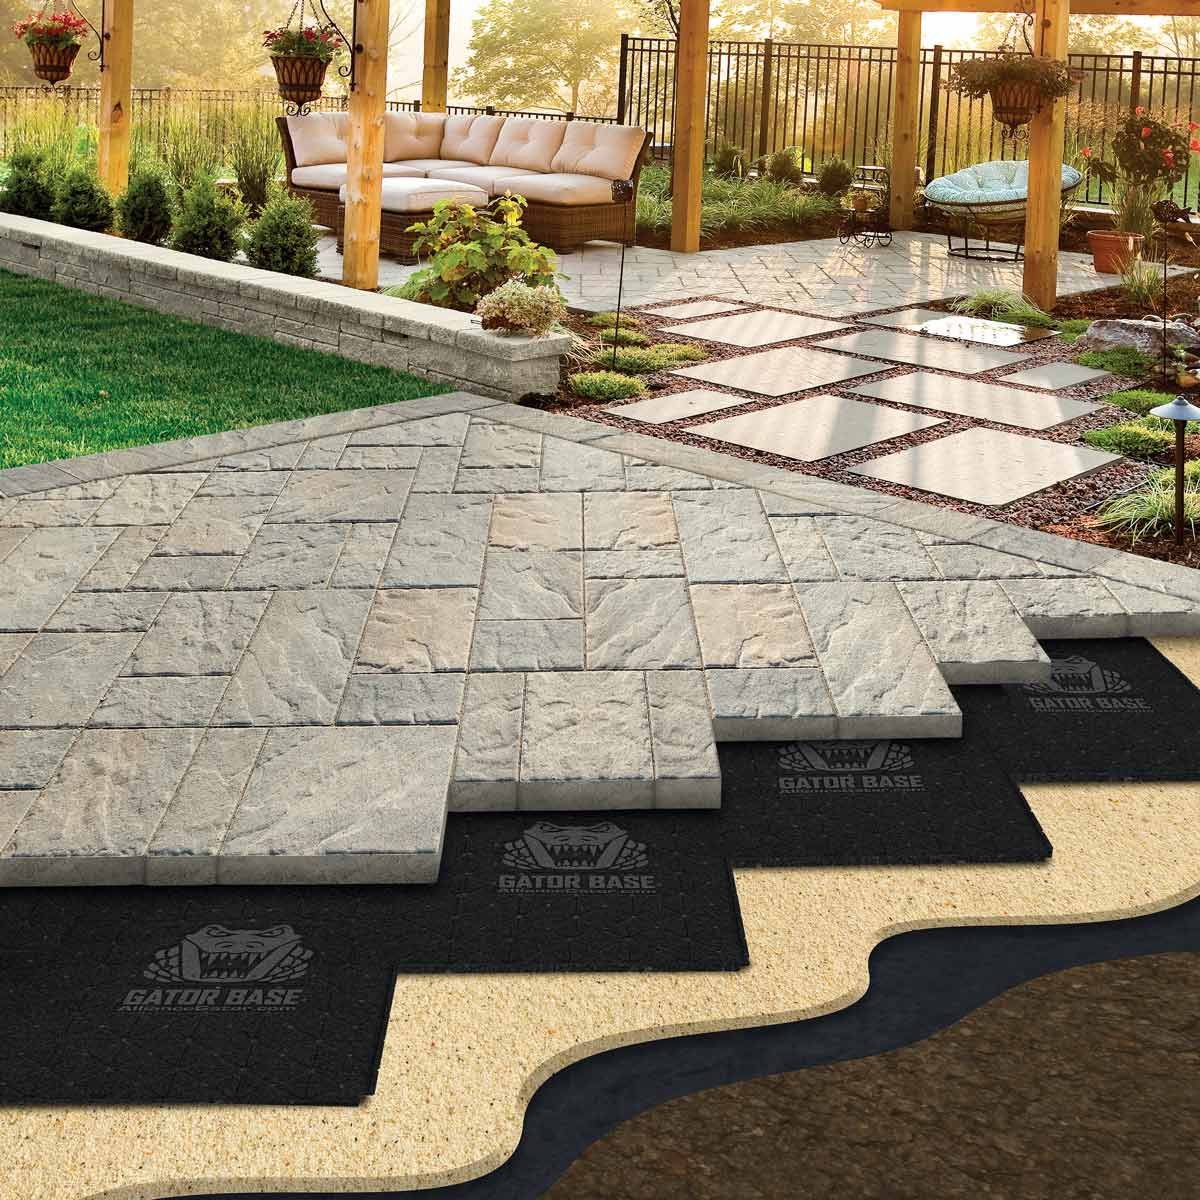
Step 3: Creating a Solid Base
Creating a solid base is crucial in ensuring the durability and stability of your round stone patio. This step involves adding layers of materials that provide proper drainage and support for the patio stones.
Follow these steps to create a solid base:
- Install Landscape Fabric: Before adding any materials, lay down landscape fabric over the excavated area. This will help prevent weed growth and ensure a clean and well-maintained patio surface.
- Add Gravel: Start by adding a layer of gravel to the excavated area. Use a coarse gravel, around 4-6 inches in depth, and spread it evenly. Use a rake or a shovel to level the gravel and ensure a uniform thickness.
- Compact the Gravel: Using a plate compactor or a hand tamper, compact the gravel layer. This will help create a solid and stable surface for the patio stones. Compact in multiple passes, focusing on any areas that may feel loose or uneven.
- Add Sand: After compacting the gravel, add a layer of sand over the compacted gravel. Use a coarse sand, such as concrete sand, and spread it evenly over the gravel layer. Aim for a thickness of around 1-2 inches.
- Level and Smooth: Use a screed or a long board to level and smooth the sand layer. Drag the screed across the surface, filling in any low spots and removing excess sand. The goal is to create a flat and even surface for the patio stones to be laid on.
- Check for Levelness: Once the sand is leveled, use a carpenter’s level or a string level to check for levelness. This is an important step to ensure that your patio will have a uniform surface. Adjust the sand as needed to achieve a level base.
With these steps completed, you have successfully created a solid base for your round stone patio. The next step is to install the edging, which will help contain the patio stones and give your patio a clean and finished look. Stay tuned for step 4!
Step 4: Installing the Edging
Installing edging is an essential step in creating a polished and defined look for your round stone patio. The edging will help contain the patio stones, prevent shifting, and provide a clear boundary between the patio and the surrounding area.
Follow these steps to install the edging:
- Select the Edging Material: Choose the type of edging material that best suits your patio design and personal preference. Common options include plastic or metal edging, stone pavers, or landscape timbers. Consider factors such as durability, aesthetics, and ease of installation.
- Lay out the Edging: Start by laying out the edging material along the perimeter of the patio. Use a mallet or a rubber mallet to gently tap the edging into the sand base. Ensure that the edging is positioned perpendicular to the ground and aligned with the patio outline.
- Create Curves: If you are creating a round stone patio, it’s important to create curved edges with the edging material. This will help maintain the circular shape of your patio. Use a flexible or bendable edging material to easily create smooth curves. Secure the curves in place by overlapping and connecting the edging pieces as needed.
- Secure the Edging: Once the edging is laid out and in the desired position, secure it in place by driving spikes or stakes through the pre-drilled holes in the edging. Drive the stakes into the ground at a slight angle, ensuring that they penetrate the edging material and go into the compacted gravel base for added stability.
- Check for Straightness and Levelness: As you install the edging, periodically check for straightness and levelness. Use a level or a straightedge to make adjustments if needed. It’s important to ensure that the edging is straight and level to maintain the integrity and aesthetics of your round stone patio.
- Trim or Connect Edging: Depending on your patio design, you may need to trim or connect the edging material to fit the curved shape. Use a hacksaw or a miter saw to trim the edging pieces as needed. Connect multiple pieces together using connectors or screws, following the manufacturer’s instructions.
With the edging installed, your round stone patio is starting to take shape. The next step is to lay the round stones and create a beautiful and functional patio surface. Stay tuned for step 5!
When laying out your round stone patio, start by marking the center point and then use a string or hose to create a perfect circle. This will ensure that your patio is symmetrical and visually appealing.
Read more: How To Grout Patio Stones
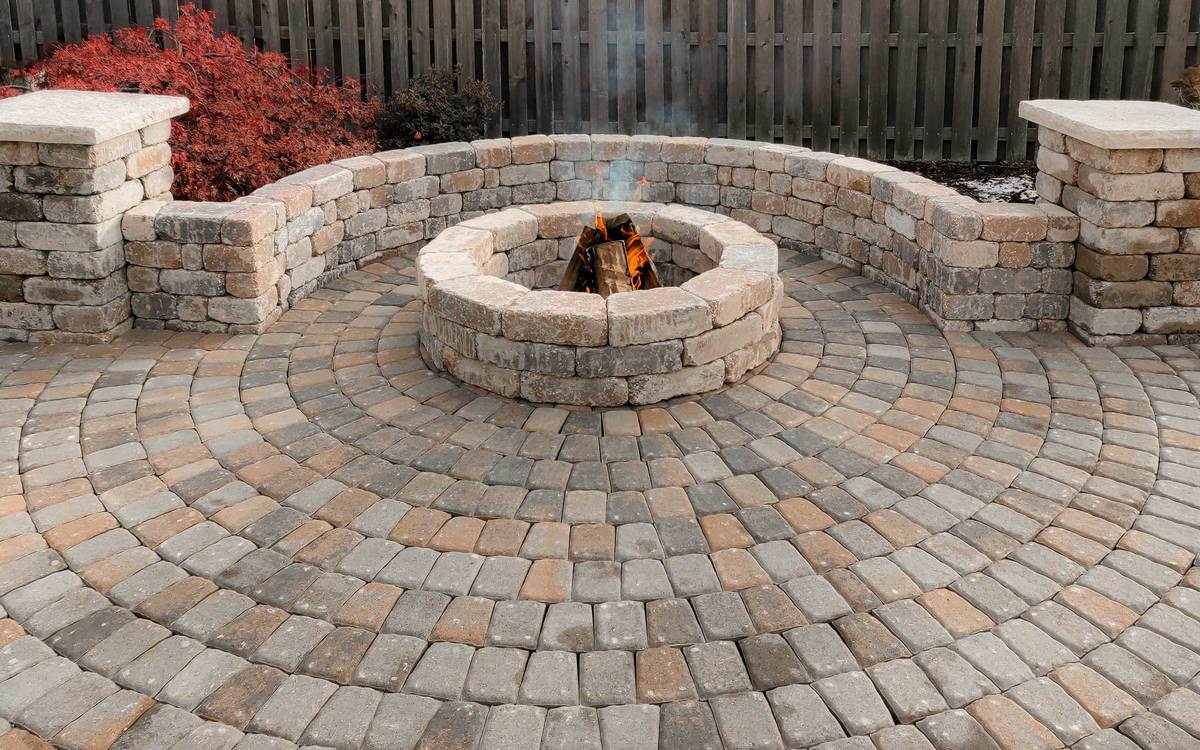
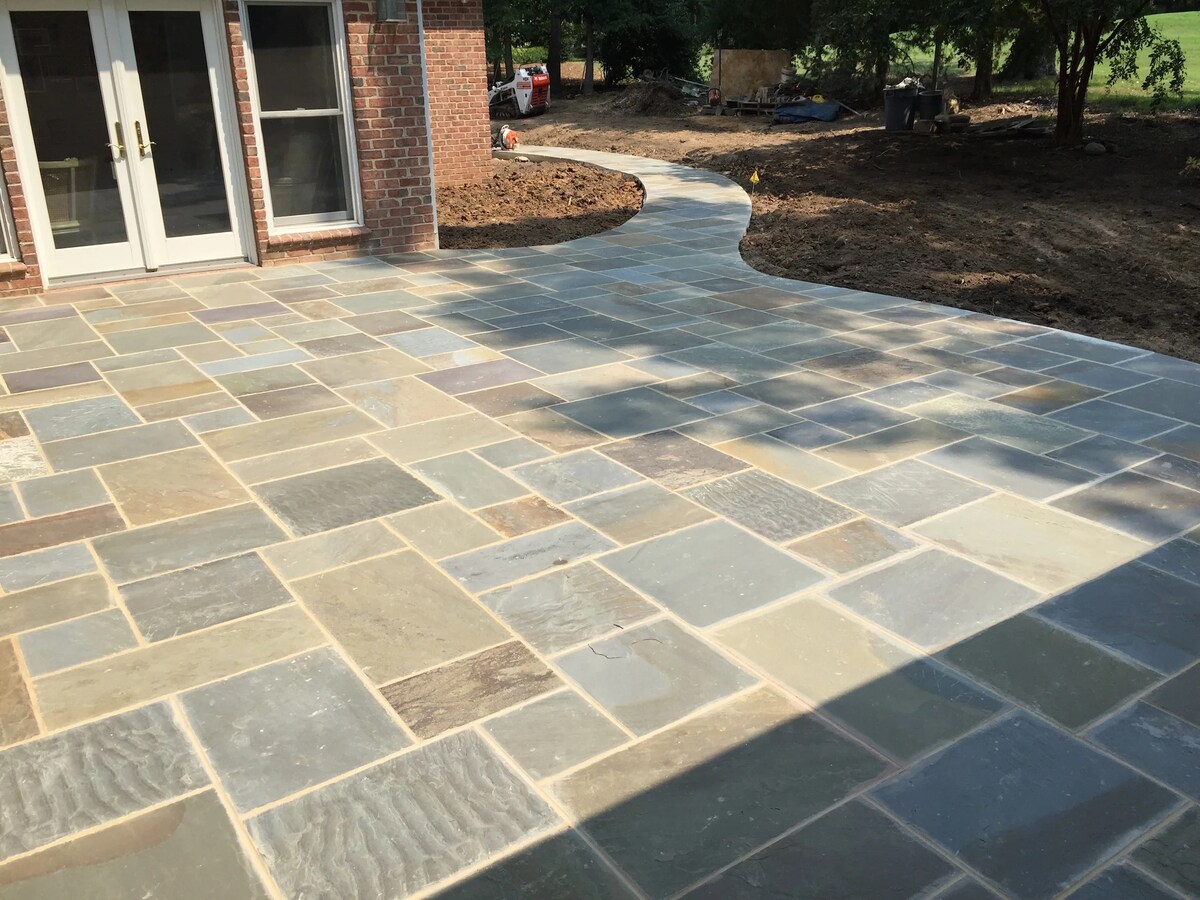
Step 5: Laying the Round Stones
Now that you have installed the edging, it’s time to move on to the exciting part of creating your round stone patio – laying the round stones. This step will bring your patio to life and add a charming and natural element to your outdoor space.
Follow these steps to lay the round stones:
- Pick the Right Stones: Select round stones that are suitable for your patio design and desired aesthetic. Choose stones that are uniform in thickness and have a smooth surface for an even and comfortable patio surface. Natural stones such as flagstone or round concrete pavers are popular choices for their durability and timeless appeal.
- Start from the Center: Begin laying the round stones from the center of your patio. This will help create a balanced and symmetrical layout. Place the first stone in the desired position, ensuring that it is flush with the edging and level with the surrounding stones.
- Continue in a Circular Pattern: Work your way outward from the center, laying each stone in a circular pattern. Position the stones close together, with minimal gaps, to create a smooth and seamless surface. Use a rubber mallet or a hammer and block of wood to tap the stones into place, ensuring they are securely set.
- Check for Levelness: As you lay each stone, use a level to check for levelness. Adjust the stones as needed by adding or removing sand underneath to create a level surface. This step is crucial for both the aesthetics and functionality of your patio.
- Vary the Stone Placement: To create visual interest and a more natural look, vary the size, color, and texture of the round stones as you lay them. This will add depth and dimension to your patio and create a visually appealing design.
- Leave Space for Gaps: Leave small gaps between the round stones to allow for proper drainage. These gaps will also provide room for expansion and contraction of the stones during temperature changes. Typically, a gap of ¼ to ½ inch is sufficient.
- Continue Until Complete: Continue laying the round stones in a circular pattern until the entire patio area is covered. Take your time, ensuring that each stone is properly placed and levelled. Step back occasionally to assess the overall layout and make any necessary adjustments.
With the round stones laid, your patio is starting to take shape and showcase its natural beauty. The next step is to fill the gaps between the stones to create a cohesive and finished look. Stay tuned for step 6!
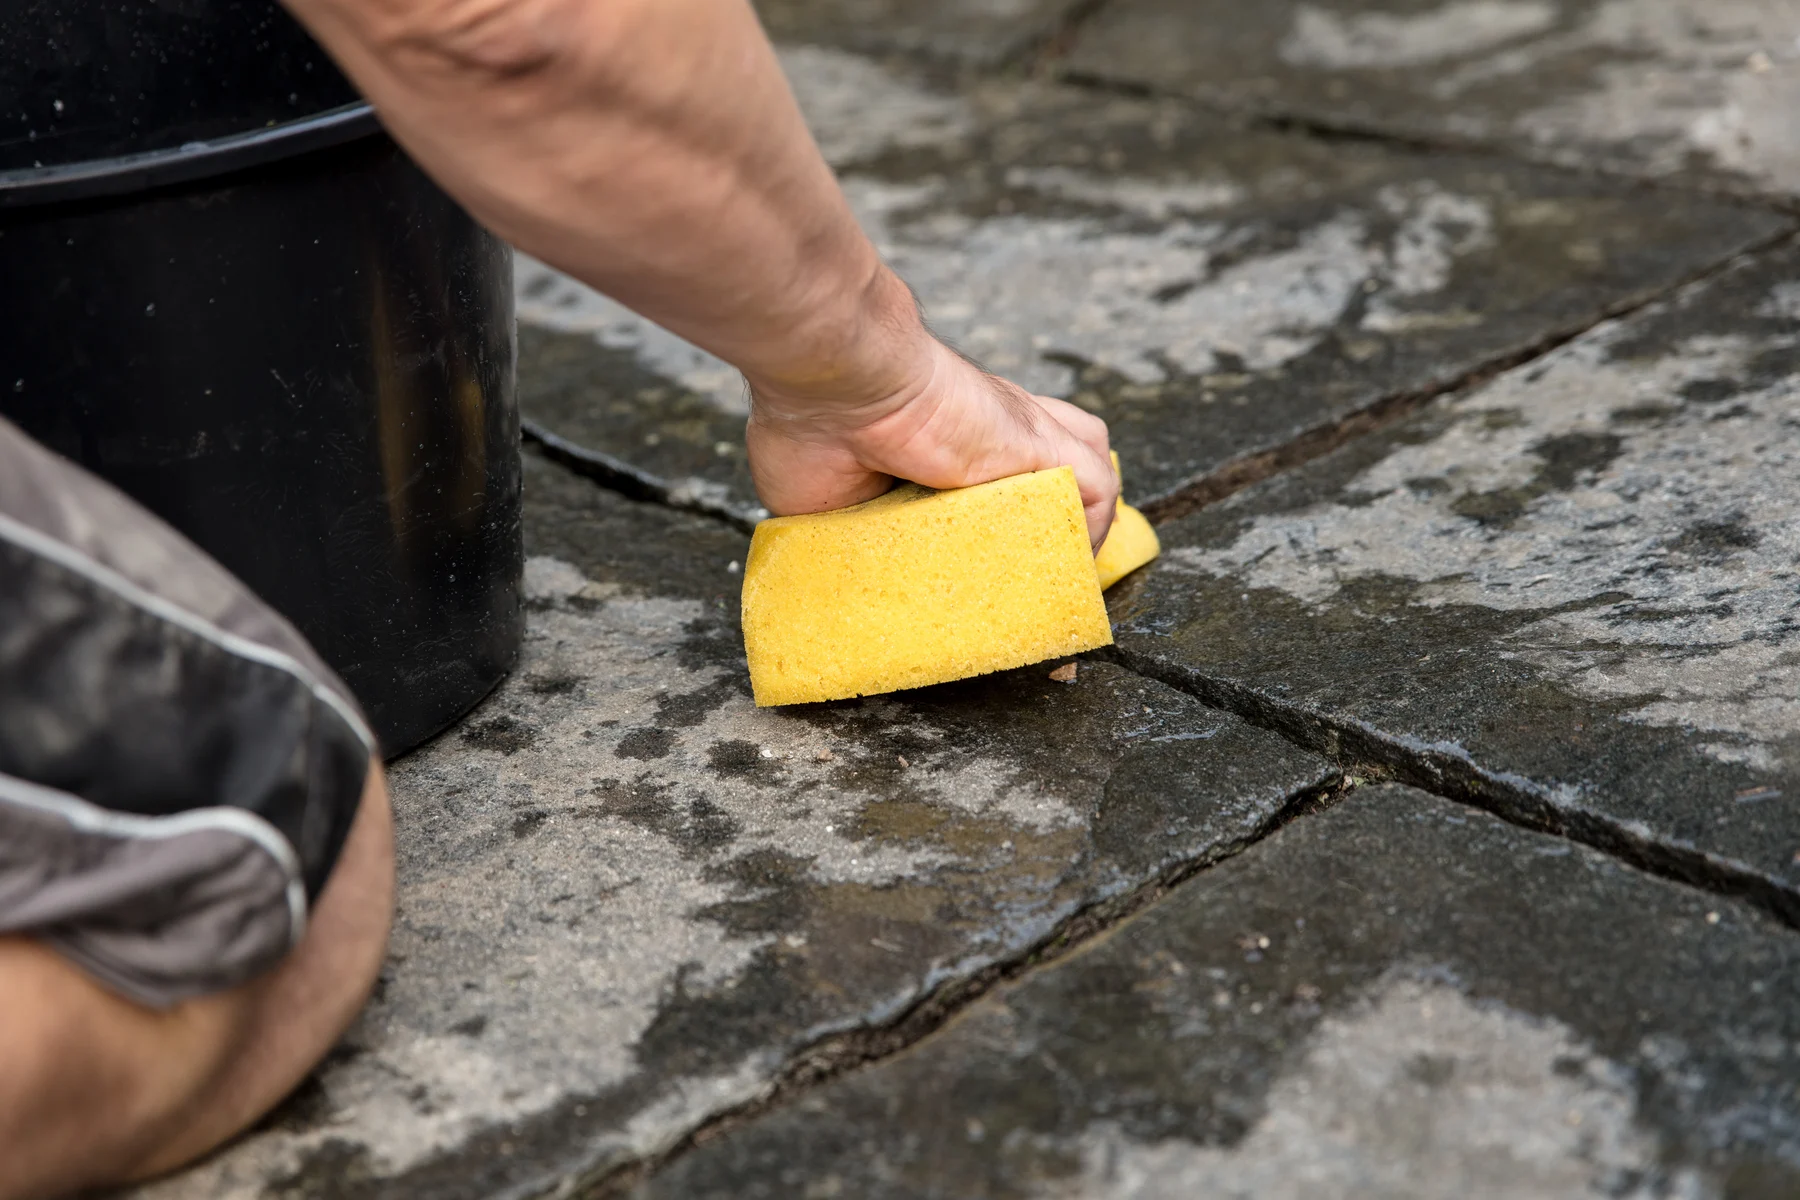
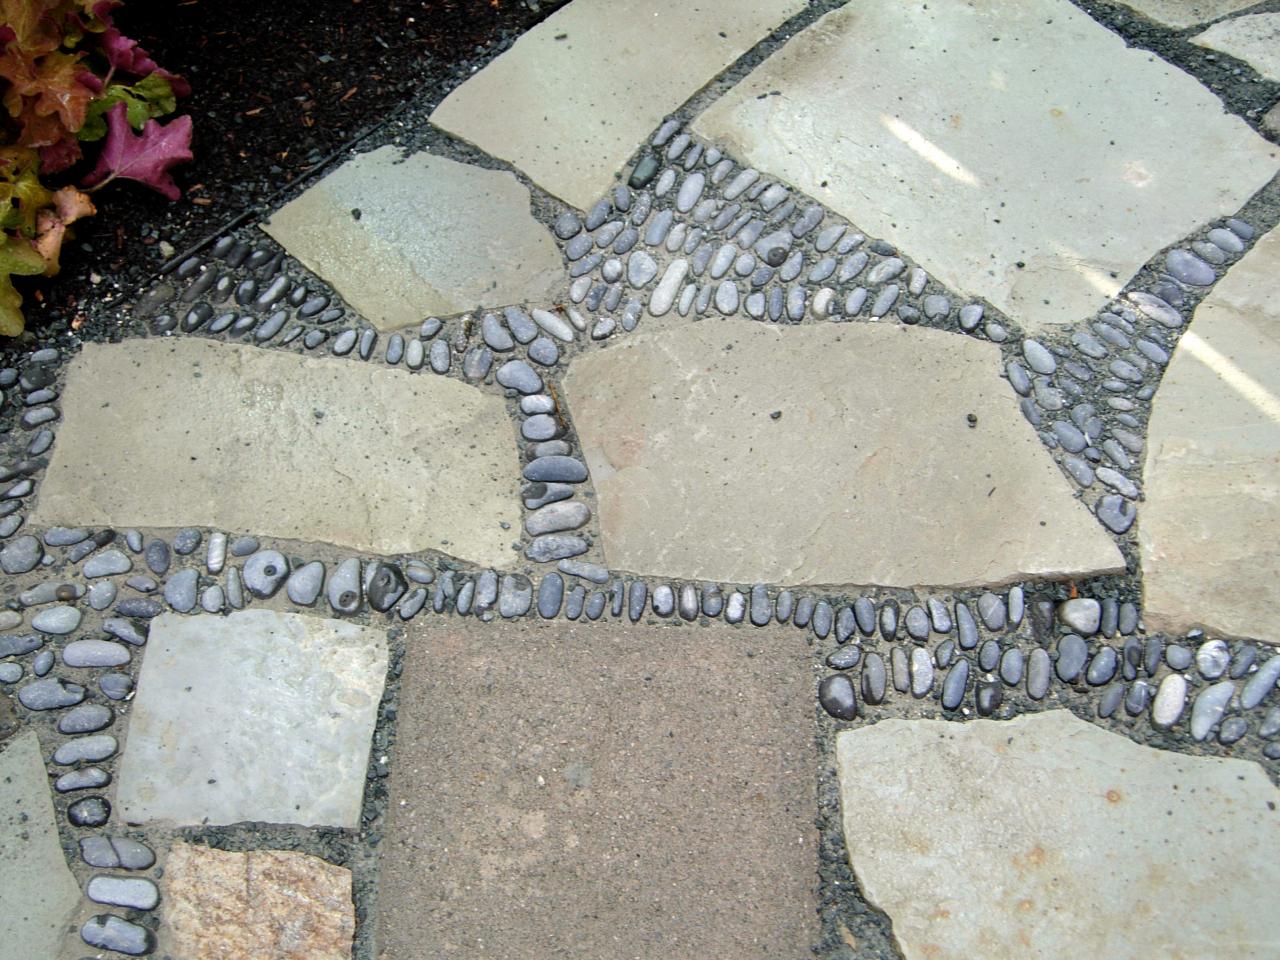
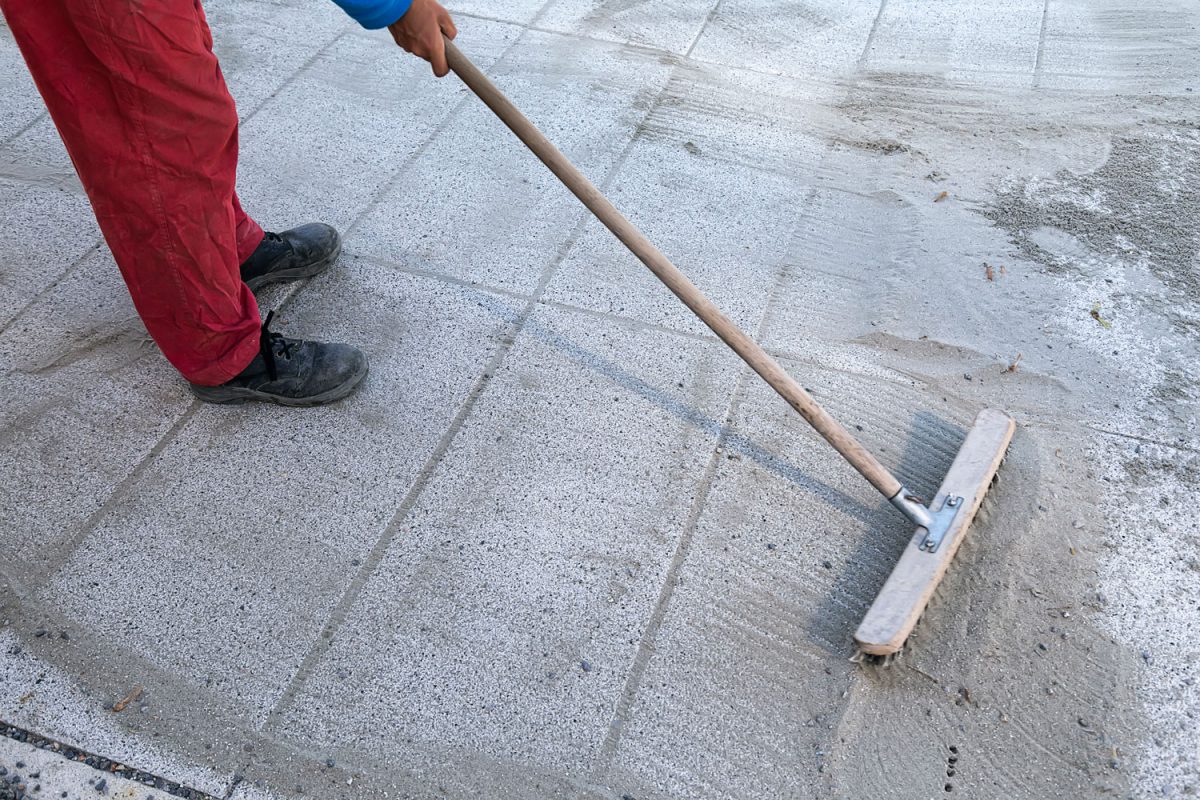
Step 6: Filling the Gaps
Now that you have successfully laid the round stones for your patio, it’s time to fill the gaps between them. Filling the gaps not only enhances the overall aesthetics of your patio but also helps stabilize and maintain the stones in place.
Follow these steps to fill the gaps:
- Select the Jointing Material: Choose the appropriate jointing material for your round stone patio. Common options include sand, gravel, or polymeric sand. Sand is the most traditional choice, providing a natural and permeable fill. Polymeric sand, on the other hand, offers a more stable option, as it hardens when activated with water.
- Pour the Jointing Material: Start by pouring the selected jointing material into the gaps between the round stones. Use a small shovel or a broom to sweep the material into the gaps, ensuring it fills the spaces evenly and completely. Be cautious not to disturb the stones’ positioning while doing this.
- Compact or Vibrate the Material: After the jointing material is poured, gently compact or vibrate the patio surface to help settle the material into the gaps. You can use a hand tamper or a vibrating plate compactor to achieve this. This step will ensure the joints are properly filled and stabilized.
- Sweep off Excess Material: Use a broom or a stiff-bristled brush to sweep off any excess jointing material from the surface of the stones. This will help create a clean and polished look for your patio.
- Moisten or Activate the Material: If you are using polymeric sand, follow the manufacturer’s instructions to activate it. This usually involves lightly misting the patio surface with water, allowing the sand to set and harden. Be sure to carefully follow the recommended curing time to achieve the best results.
By filling the gaps between the round stones, you are providing stability, preventing weed growth, and enhancing the overall appearance of your patio. Your round stone patio is now nearly complete, with just a few finishing touches remaining. Let’s move on to the final step – adding the finishing touches.
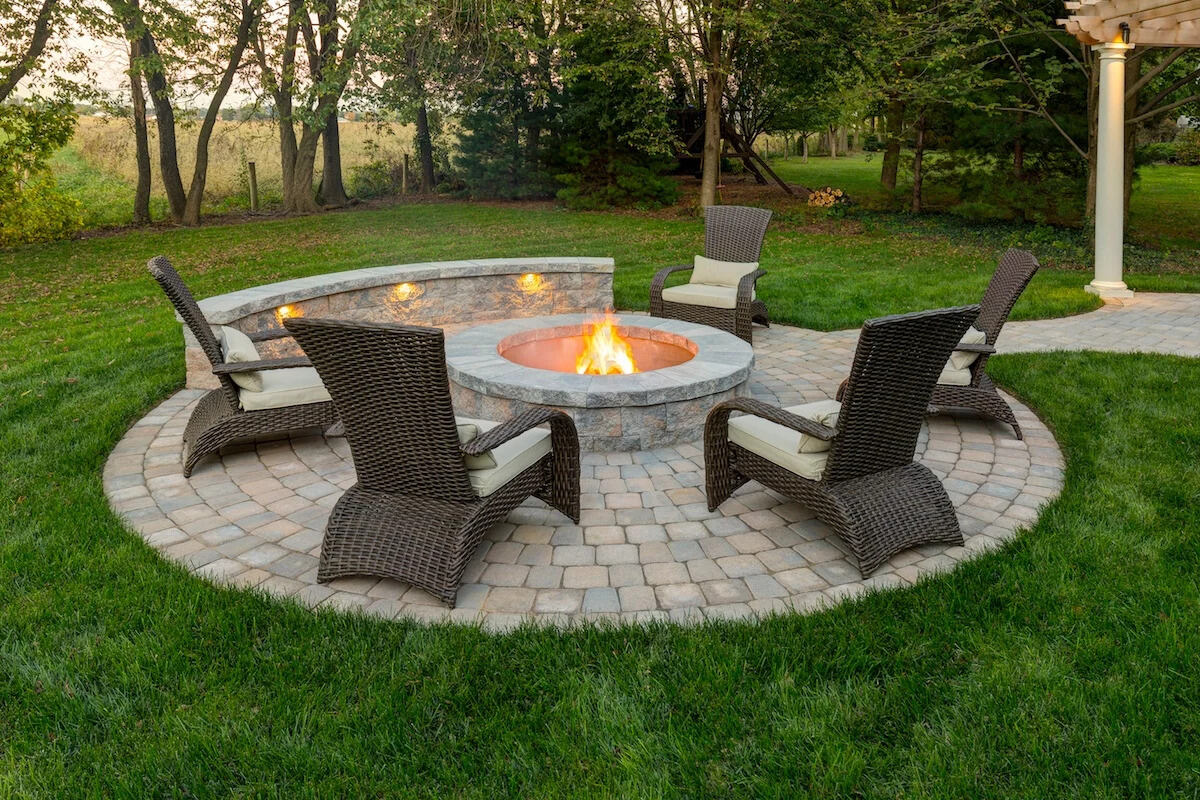
Step 7: Finishing Touches
Congratulations! You have reached the final step of creating your round stone patio. Now it’s time to add the finishing touches that will elevate the overall look and functionality of your outdoor space. These final touches will help make your patio a truly inviting and enjoyable area.
Here are some finishing touches to consider:
- Add Outdoor Furniture: Choose outdoor furniture that complements the style and size of your patio. Whether you prefer a cozy seating area with chairs and a table or a lounge setup with sofas and coffee tables, select furniture that suits your needs and enhances the comfort of the space.
- Integrate Outdoor Lighting: Install outdoor lighting fixtures to make your round stone patio usable even after the sun goes down. Consider options such as string lights, lanterns, or wall-mounted fixtures to create an enchanting and inviting atmosphere.
- Incorporate Planters or Potted Plants: Adding greenery in the form of planters or potted plants can bring life and color to your patio. Choose plants that thrive in your climate and select pots or planters that complement the design aesthetic of your patio.
- Create a Focal Point: Consider adding a focal point to your patio, such as a fire pit, water feature, or garden sculpture. This will add visual interest and create a central element around which the rest of your patio can be designed.
- Include Outdoor Accessories: Personalize your patio by incorporating outdoor accessories such as pillows, cushions, rugs, or throw blankets. These accessories will add comfort, style, and a sense of personal touch to your outdoor space.
- Maintain and Care for Your Patio: Regularly clean and maintain your round stone patio to ensure its longevity and visual appeal. Sweep away debris, remove stains or spills promptly, and periodically reapply jointing material if needed. This will keep your patio in pristine condition for years to come.
By adding these finishing touches, your round stone patio will become a true extension of your indoor living space, providing a beautiful and inviting area to relax, entertain, and enjoy outdoor activities.
With the completion of Step 7, you have successfully created your round stone patio from planning to finishing touches. Congratulations on your DIY accomplishment! Now it’s time to sit back, unwind, and savor the beauty and functionality of your outdoor oasis.
Conclusion
Creating a round stone patio is a rewarding DIY project that can transform your outdoor space into a stunning and functional area for relaxation and entertainment. By following the step-by-step process outlined in this comprehensive guide, you can successfully design and construct your own round stone patio.
Throughout the journey, we explored the importance of planning and preparation, marking and digging the patio area, creating a solid base, installing the edging, laying the round stones, filling the gaps, and adding the finishing touches. Each step plays a crucial role in achieving a durable, visually appealing, and inviting patio.
Remember, proper planning and preparation set the foundation for a successful project. Taking the time to measure and mark the patio area accurately, gathering the necessary materials, and creating a sound design will ensure a smooth construction process.
As you dig the patio area and create a solid base, the stability and levelness of the patio are of utmost importance. Compacting the soil and adding layers of gravel and sand will provide a sturdy surface for your round stones.
Installing the edging not only enhances the aesthetics of your patio but also helps contain the stones and define the boundary. Choose the appropriate edging material that complements your design and securely install it around the perimeter of the patio.
Laying the round stones requires careful placement and attention to detail. Take your time to create a visually pleasing and level surface, leaving small gaps for expansion and proper drainage.
Filling the gaps with the appropriate jointing material ensures stability and prevents weeds from growing between the stones. Choose the right material for your needs and follow the instructions for proper installation and curing.
Finally, adding the finishing touches, such as outdoor furniture, lighting, plants, and personal accessories, will make your round stone patio a welcoming and enjoyable space for outdoor activities and relaxation.
As you complete your round stone patio, remember to regularly maintain and care for it to preserve its beauty and functionality. Clean, sweep, and refresh the jointing material as needed to extend the lifespan of your patio.
Enjoy the fruits of your labor, sit back, and revel in the beauty and tranquility of your round stone patio. Whether you are hosting gatherings, enjoying a quiet moment with a book, or simply basking in the beauty of nature, your patio will be a welcoming retreat for years to come.
After mastering your round stone patio, why not improve your garden's appeal with creative fencing options or expand your outdoor living space? Our guide on varied garden fence ideas offers brilliant solutions for privacy and style, perfect for any landscaping project. If relaxation and entertainment outdoors are more your style, our covered patio ideas provide inspiration for creating cozy, inviting spaces that friends and family will love.
Frequently Asked Questions about How To Make A Round Stone Patio
Was this page helpful?
At Storables.com, we guarantee accurate and reliable information. Our content, validated by Expert Board Contributors, is crafted following stringent Editorial Policies. We're committed to providing you with well-researched, expert-backed insights for all your informational needs.


0 thoughts on “How To Make A Round Stone Patio”